
Sustainable Sewing Project: Piece Softly
Achieve supple results with 3 techniques for fine fabrics
Casual, contemporary attire should be effortless: It should move gracefully during wear and express your personal aesthetic. Garments with a soft, drapey hand and thoughtfully selected prints, patterns, and colors fit the bill perfectly. Yet sewers who appreciate fine fabrics often have a stash of silks, rayon wovens, and refined cottons and linens that sit unused, waiting for a special occasion. Consider combining bits and pieces of these textiles into a one-of-a-kind top or easy jacket. It’s a great way to add style and interest to a wardrobe of everyday separates—and it’s a smart and creative stash buster.
When joining these fabrics, you don’t want your sewing methods to work against the materials’ inherent suppleness. To avoid stiff or unstable seams and edges, I’ve adapted some traditional quilting techniques that work well with luscious, soft fabrics. Foundation piecing, strip piecing, and sashing can all be used successfully, and each complements different kinds and collections of fabric. They produce light and lovely art garments that can be dressed up or down, so you can feel like a fashion original every time you wear one.
Pattern and fabric recommendations
The right pairing of silhouette and fabrics is the key to a flattering garment you’ll love to wear
 Pattern ideals
Don’t overcomplicate things. Choose a basic garment design with minimal seaming but with some shaping in the form of darts or seams.
Plan for a stable front opening. A front-band-style jacket or blouse will cleanly anchor the pieced sections and offer a place to establish a closure.
Keep the shaping natural. Patterns with a natural shoulder line, a well-fitting bust, and a soft hang allow the piecing to shine. Oversized garment styles distract the eye from fine fabric piecing and overfitted garments can distort the piecing. The Tabula Rasa Jacket from FitForArtPatterns.com was designed for such projects; its side panel and square armhole facilitate piecing.
Verify the fit first. Test the pattern for fit and function. Stitch a wearable muslin test garment—unlined cotton is a good choice—to check this pattern’s ease of wear and confirm that it flatters your shape.
 Textile options
Find an anchor fabric. A good beginning is an intriguing piece of kimono silk, a scarf with an interesting motif, or a soft but damaged, ill-fitting, or otherwise unwearable garment that needs a new lease on life.
Seek out coordinating materials. Take your fabrics with you as you search for other soft or light fabrics to pair with the anchor fabric. You will need one large piece for your sleeves, but the sleeves should be kept quiet to keep the attention on the pieced sections.
Add textures and color interest. Look for fabrics that offer color play or texture variation, such as silk or rayon jacquards, cross-woven dupionis (wash them for a softer hand), shadow stripes, Swiss dots, hand-dyed silks, silk ikats, and batiks.
Try upcycling. Shop in thrift stores or vintage shops for garments that can be used as yardage, or interesting vintage neckties for sashing.

Design guidelines
It takes thought and experimentation to develop an overall design. My concepts will help you get started, but trust your eye and revel in the creative process.
Focus the piecing. In a jacket, piecing the entire garment can be overwhelming. Visually, the garment gets cluttered. Ideal piecing placement is on the front and back, where your fine fabrics can take center stage. Then soft, coordinating fabrics can be added for the sleeves, sides, and garment finishes.
Consider where to draw the eye. Extensive piecing in the yoke or upper body brings the eye to the face; conversely, complex piecing near the hem of the garment brings the eye to the hips. Avoid placing prominent motifs in the bust area where it can be awkward to draw the eye.
Think about geometry. Depending on your available materials and your personal preferences, decide if you want a symmetrical, asymmetrical, or random arrangement. Let your fabrics tell you if you should feature large or small pieces, or a combination.
Disperse textiles strategically. Use each fabric in more than one place so the design looks organic and visually balanced.
Develop full-size patterns for each section you will piece. A right and left front and a full back are a good start. Pellon Tru-Grid is great for this purpose because it keeps the fabric pieces from shifting as you plan designs.
Place your favorite fabrics first. Then fill in around the featured anchor pieces with coordinating fabrics.
Test your design. If you have planned the design but are afraid to cut apart the fabrics, do a trial: Draw the fabric motifs and piecing lines on the base patterns (or sketch the ideas) to assess the overall design.
 Stabilize with foundation piecing

This stitch-and-flip technique is ideal for designs with diagonal or curved seamlines, and for unstable fabrics. The fabrics are sewn to a lightweight underlayer that
provides support and opacity.
1. Divide your pattern. Then, add seam allowances to each new seamline.
2. Cut the foundation. Cut each garment section planned for piecing from a soft, lightweight fabric such as china silk or crepe de Chine.
3. Attach the first piecing element. With the right side up, position it on the foundation’s right side. Baste around the edges to secure.
4. Attach the remaining elements. Place the next piecing element on the first, with right sides together and their seamlines aligned. Sew the seam, then flip the newly attached piece so its right side is exposed. Press the seamline. Repeat for the remaining piecing elements, until the entire foundation is covered.
5. Construct the garment. Follow the pattern instructions to complete the work.
Pattern: Fit for Art Tabula Rasa Jacket (modified). Fabrics: author’s stash.
Keep the drape with strip piecing
In this method, the garment pattern is divided vertically into strips. These new pieces are cut from the desired fabrics, then seamed together. This single-layer technique is well suited for sheer and very drapey fabrics.
1. Divide the pattern. Make each new seamline parallel to the pattern’s original grainline. Add seam allowances to the new seamlines.
2. Cut the strips. Cut them on the straight grain so the seams will be smooth and the garment will drape properly. For added interest, join small pieces into longer, multipatterned strips.
3. Join the strips. Use a narrow French seam or a serged rolled-hem finish; in either case, the seam allowances can be on the fabric’s wrong or right side, depending on your preference. Test seaming methods first to determine which looks best with your fabric. Repeat for all the garment sections to be pieced.
4. Construct the garment. Join the pieced sections following the pattern instructions; use the same seam style as you did for the strip piecing.
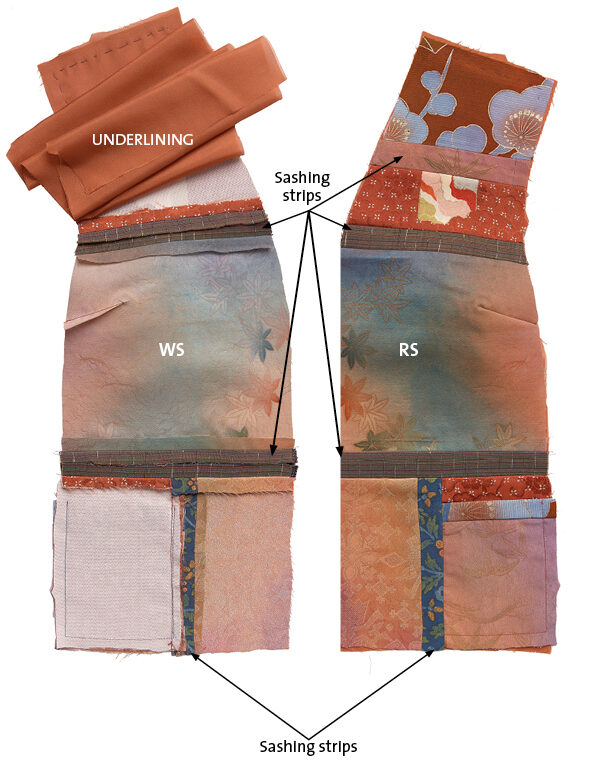
Frame fabrics with sashing
Add sashing strips between the piecing elements to set off precious textiles. Then underline the pieced garment sections to conceal and protect the seams.
1. Place the piecing elements. Place the fabrics as desired on the pattern pieces; trim them so all edges abut with no overlap, and the entire piece is covered. Avoid planning a seamline along a dart.
2. Cut sashing strips. Choose a solid or textured fabric, such as washed silk dupioni. For 1-inch-wide sashing, cut 2-inch-wide strips, which will be sewn with 1⁄2-inch-wide seam allowances. For 1⁄2-inch-wide sashing, cut 1-inch-wide strips and join them with a 1⁄4-inch-wide seam allowance.
3. Plan the sewing sequence. It is often easier to piece two or more subsections and then join them to create the full garment section. Join the pieces, pressing the seam allowances open or toward the sashing strips.
4. Apply an underlining. Use a fabric that is compatible with your piecing elements. China silk, crepe de Chine, or lightweight cotton wovens are good choices. Baste the underlining to each pieced section’s wrong side.
5. Construct the garment. Handle each pieced and underlined section as a single unit and follow the pattern instructions to complete the garment.


Log in or create an account to post a comment.
Sign up Log in