
Runway Sewn Your Way Technique: Pamela Howard Adds Hidden Buttoning
Concealed bound buttonholes give a coat a clean-finished look
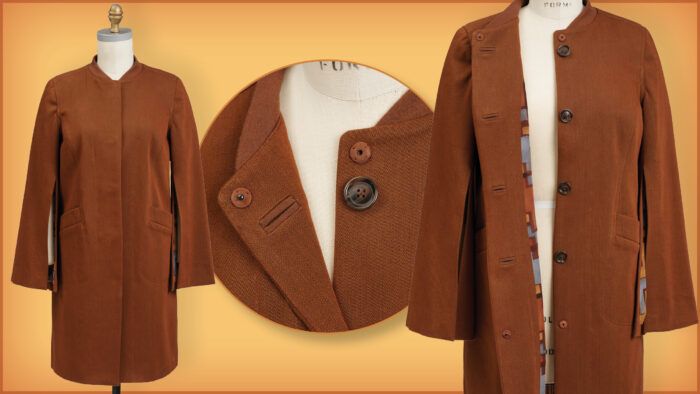
When creating the Runway Sewn Your Way Challenge coat, I made a few changes to pattern #101 from Burda Style March 2019 and one was to the front closure. I used a technique called “hidden buttoning,” which I read about in The Spadea Sewing Book (Spadea Publishing Company, 1967). The book was a gift from one of my sewing buddies, and it is greatly treasured. It details techniques by many designers, some familiar but many unknown to me.

What is hidden buttoning?
The hidden buttoning technique is from designer Jacques Tiffeau. It enables a garment to be buttoned but have a clean look, as the buttons and buttonholes are hidden when the garment is closed. This is accomplished even before garment construction by transferring the buttonhole markings to the right front facing instead of making them on the outer right front.
I interfaced the front facings for the coat with Pro Weft Supreme, a light fusible interfacing from FashionSewingSupply.com. This keeps the facings stable enough to withstand the installed bound buttonholes.

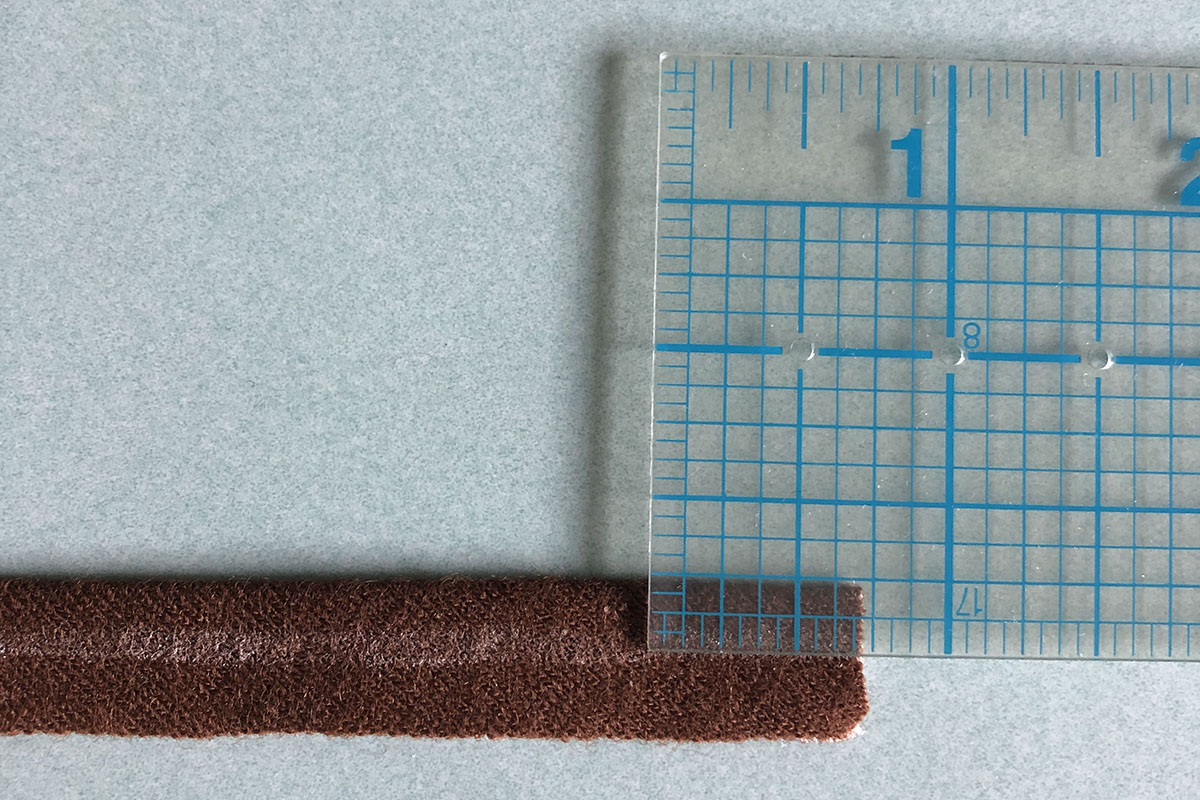
There are a few ways to make bound buttonholes, but I prefer the two-piece method to create the welt “lips,” which are made from fabric strips. For this coat, I cut them from the same wool jersey as the collar and interfaced them with fusible Pro Tricot Deluxe, also from Fashion Sewing Supply.

Hidden buttoning how-to
Start with marking and cutting
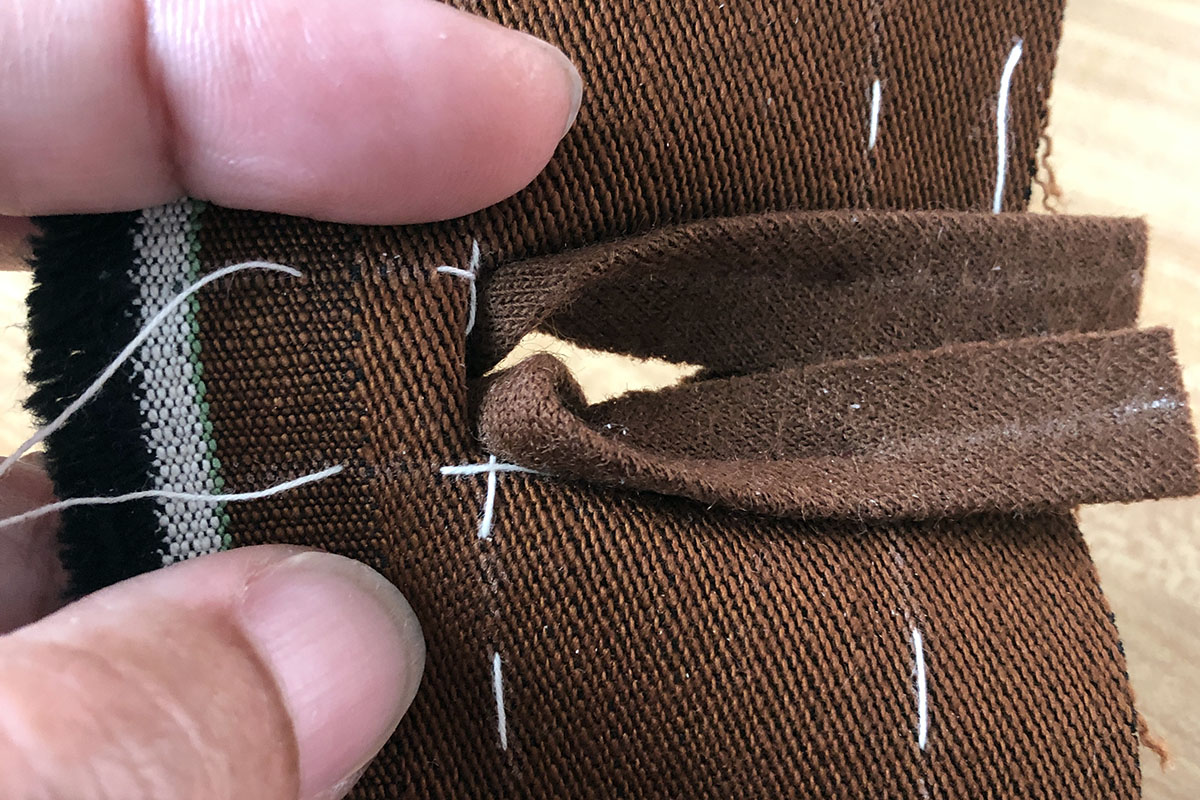
1. Mark all buttonhole locations on the right front facing. Trace with thread in case chalk marks disappear before you finish. I thread-marked the centers of each buttonhole, so I could chalk-mark 1/4 inch above and below. The finished bound buttonhole depth I wanted was 1/2 inch.

2. Cut the welt lips longer than the width of the buttonhole. The excess can be removed later.
Press each welt lip in half lengthwise.


3. Then mark 1/4 inch from the folded edge on both sides of each strip, as shown below.

4. After marking above and below the center of each buttonhole on the facing, remove the center thread. That leaves the 1/2-inch buttonhole opening on the coat facing. You’ll base the width on your chosen button size.

Aligning and sewing
5. Lay one welt lip so its chalk line aligns with the top or bottom thread line on the facing.

You can choose which lip to sew on first. Make sure some fabric extends past each end of the buttonhole box. Carefully pin it in place, and backstitch at the beginning and end of the box.
*Note: Place the folded edge of the welt lip on the outside of the buttonhole box (away from the box’s center).

6. Next, lay the opposite side and repeat the process. Do this for each buttonhole.

Tip: Check for accuracy by examining the stitching lines on the facing’s wrong side.


7. After each buttonhole is done, chalk-mark an X within the welt box. This is the cutting line to open the buttonholes.


I like this marking method to have the larger triangle “ends” to close up later. Cut carefully along the chalk marks, with small, sharp scissors. This is a view from the top and back to show the cut opening.

8. Gently push the welt lips through the opening from the top side to the facing’s underside.
Gently align them so the fold edges meet.

Be sure the triangles are away from the center of each buttonhole opening.

9. Thread-baste the lips closed by hand and press flat.

10. Then stitch each end closed, by sewing the lateral triangles to the welt ends.

11. Press from the wrong side and then press gently on the fabric’s right side.

A sample and finishing
I made a sample to be sure that the button will pass through the opening.

Since the buttonholes were made in the right front facing, I decided to use a piece of lining to cover the white interfacing on the jacket front. This ensures the interfacing won’t be seen through the buttonhole openings.

Finish the buttonholes and install the facings as directed in the garment pattern instruction. Once you complete your coat, or any garment you choose to make with hidden buttoning, you should only see the buttons if it is left open. A view my coat’s interior, below, provides a clearer view of the buttonholes and lining.

The buttoned coat front shows the clean-finished, hidden buttoning technique.

I hope you enjoy the process of making your garments for this Runway Sewn Your Way Challenge. We can’t wait to see what you create!
Photos: Pamela Howard, except where noted.


Pamela, your coat is gorgeous! I love the pockets. Very polished!
becky
Thank you so much, Becky!!
Pam: thank you for that great tutorial. I like the technique
Thanks so much, so glad you liked the technique!
Absolutely stunning coat! But I don’t understand the logic of the addition of lining to one of the facings to cover the interfacing. Which side? When? Thank you.
Thank you! I added the lining to the upper area of right side of the coat front. This was done to hide the white interfacing that could be seen through the openings of the bound buttonholes that are in the right front facing.