
I’ve always liked the idea of tracing patterns without seam allowances, marking the seamline the old-fashioned way with tailor’s chalk. But I also like cutting folded fabric and having precise seam allowances, which usually requires using patterns with seam allowances included.
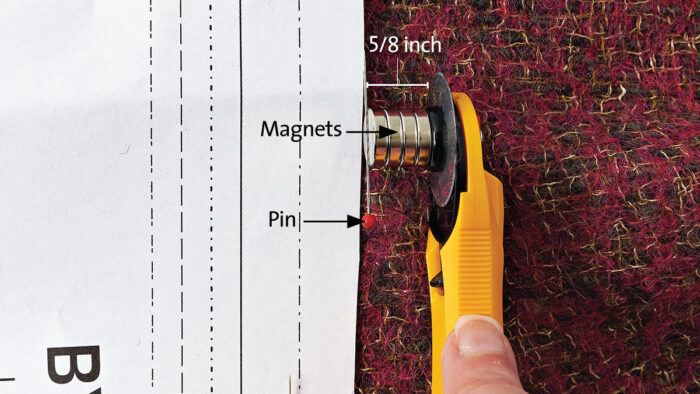
I came up with an easy, accurate seam allowance guide for my rotary cutter. I placed a small disk magnet on the center of the rotary blade. I measured and found the magnet’s outer surface was exactly 5⁄8 inch away from the cutting edge. Note: You may need to try different sized magnets and stack more than one to achieve the right depth.
Then I attached a glass-head pin to the magnet’s surface. Now, as I cut, the pin rolls along the pattern’s edge and the blade cuts 5/8 inch from the stitching line. I can mark the seamlines and know the seam allowances are consistent.
—Jennifer Georgia, Silver Spring, Maryland
ID fabric pieces with tape
When I’m cutting out a garment, I label each fabric piece on the wrong side with a small piece of low-tack painter’s tape, with the name of the pattern piece and an arrow pointing up toward the neckline. That way, I can tell at a glance which pattern piece I’ve got, which side of the fabric is the right side, and which way is up. This saves so much time and so many mistakes when I’m sewing the garment.
—Sian Meikle, Toronto, Ontario, Canada
Control curly edges
I was making T-shirts in a rayon-blend knit. Instead of serging the seam allowances together, I pressed them open. When attaching the sleeves, the intersecting bodice seam allowances kept rolling under despite being carefully pinned. After a few tries and some frustration, I pulled out a fabric glue stick and placed a dab of glue on the underside of each pressed seam allowance, near where the crossing seam would go. I was able to set the sleeves without any rolling or buckling of the seam allowances, and all the crossing seams were smooth.
—Denise Stahl, Spring, Texas
Blow off some steam
In Threads #214, Summer 2021, Patricia Robertson sent in a tip where she used the Ove Glove to protect her hands from her iron’s steam. I have the Ove Glove, but it is thick and cumbersome and there is no way you could turn up a narrow hem while wearing it. I need my fingers for that. I simply turn on a small fan and aim the air flow toward the area I’m pressing. The fan blows the steam away before it can scorch my fingers. I’ve been doing this for years.
—Linda Lutich, Houston, Texas
Slaphappy storage
After struggling to keep various rolls of interfacing and stabilizers tidy, I found a solution: 12-inch slap rulers, available in the school supplies department. I “slap” these around my stabilizers and other materials to keep them from unrolling. You can label the rulers with permanent markers to identify each product.
—Elizabeth Yott, Rocky Point, North Carolina


Log in or create an account to post a comment.
Sign up Log in