


Legend has it that Stretch & Sew founder Ann Person could make a new pair of pull-on knit pants in less time than it would take to wash and dry a dirty pair. I wear pull-on knit pants often, and while I’ve never gotten as quick at making them as Ann, I have perfected a procedure for making a pair with my favorite features in two to three nights of easy sewing—from the cut-out to pull-on. I’ve combined all the best construction ideas from the commercial pants patterns I’ve seen, and over the years I’ve collected a few great tips that speed up and improve my results. These pants have a cut-on casing for a quick and comfortable 11⁄4-inch elastic waistband, stabilized hems that are flat and smooth, and topstitched and reinforced side-seam pockets that are just as deep as I want them. The fit reflects all my efforts at customizing a pants pattern, and is far better than anything I could purchase; almost every seam is serged for speedy, finished results.
Steps from pattern to pull-on knit pants
In the drawings below, I’ll show you how to prepare a fitted pants pattern for knits and a pull-on waist, easily draft a pocket that suits you, and provide complete instructions for whipping up your own perfected version of this wardrobe staple.
 Prepare your knit pants pattern and cut it out
If you don’t have a pattern for knit pants, you can adapt a fitted pattern for woven pants by removing any pocket details, darts, and fly extensions, and adding length for a cut-on elastic casing. If you are starting with a knits pattern, use it as is but mark the pocket opening as explained in Step 2 at right. For either pattern type, to narrow the leg opening at the hem, remove the same amount at the inseam and side seam, tapering to the original width at mid-thigh.
1. Trace your pattern and remove unwanted ease
Trace the waistlines, seamlines, center front lines (omit any fly extension), and grainlines from all existing pattern pieces onto pattern-tracing paper. Most knit fabrics require no ease when made into pants; to remove the ease from a for-wovens pattern, draw a line from the hem through the casing parallel to the vertical grainline and near the center on both the front and back tracings. Slice each tracing on this line, and overlap one side on the other by 1⁄4 inch, then tape the pattern back together.
 2. Mark the pocket opening and add the casing
Mark a 6-inch pocket opening along the front side seamline, 2 inches below the waistline. To add a casing, extend the traced center front and center back lines 21⁄2 inches above the existing waistline, and at each side seam, draw a line straight up from the hip, parallel to the grainline, to 21⁄2 inches above the waistline. Then draw the casing top edge from the extended side seam to center front or center back.
 3. Make the pocket pattern
Draft a pocket pattern by first drawing a rectangle 6 inches wide and about 14 inches long (feel free to vary these dimensions if you want a pocket that’s a different size). Curve the bottom edge and transfer the pocket opening marks from the side seam to the pocket pattern as shown. Draw the straight grainline parallel to the long edges of the rectangle.
4. Add specific seam allowances
Add 1⁄2-inch seam allowances and a 1-inch hem allowance to the front and back pattern pieces; no seam allowance is needed at the casing edge. Add 1⁄2-inch allowance to the side seamline of the pocket pattern.
5. Cut and mark the fabric pieces
Cut out your pants, including four pocket pieces. Mark the pocket opening on the wrong side of each pocket. Mark knee lines, hemlines, and waistlines with tiny clips in the seam allowances.
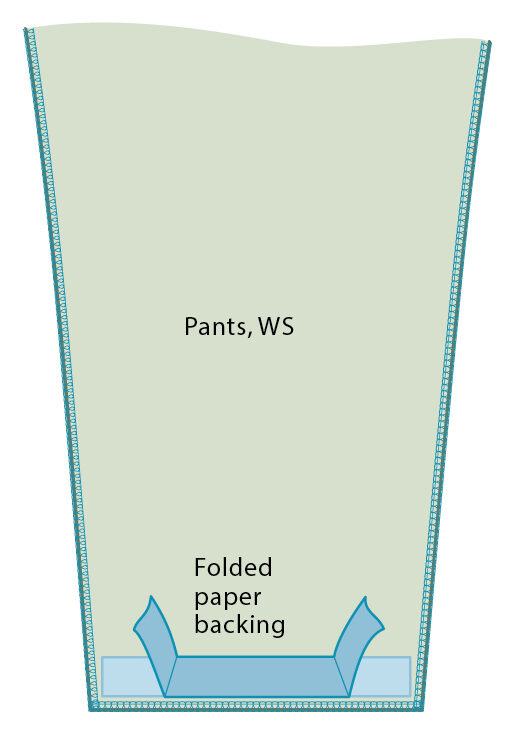
6. Stabilize the hem edges
Serge-finish the bottom edge of each leg. Fuse a strip of fusible web 1⁄8 inch from the serged edge of each, but don’t remove the paper backing yet. This stabilizes the cross-grain for hemming; it will soften after washing.
Attach the pockets to the front and back
1. Stabilize the front side seam opening
To stabilize the pocket opening on the front of the pants within the seam allowance, first cut the stabilizer (1⁄4-inch-wide ribbon or 1⁄2-inch-wide fusible stay tape) 1 inch longer than the pocket opening. On the wrong side of the front, position the stabilizer against the seamline in the pocket opening seam allowance as shown; fuse or stitch it close to the seamline.

2. Attach each pocket piece to the pants
With right sides together and the pocket opening marks aligned, serge one pocket piece to each pants front or pants back, trimming the allowances as little as possible, if at all. This will inset the pocket seam slightly from the side seamline. Serge off the edge of the pants about 1 inch below the end of the pocket.

3. Edgestitch to keep the pockets from peeking out later
Press the pockets away from the pants over a ham, with the serged seam allowance pointing toward the pocket. From the right side, edgestitch each pocket piece close to the seamline as shown.

4. Sew the top portion of the side seam
Pair each front section with its corresponding back section, right sides together. With your sewing machine, sew the side seam from the top of the pants to the top of the pocket opening; backstitch. Set the machine to the longest stitch length and baste the side seam along with the pocket opening; then change back to the regular stitch length, backstitch at the bottom of the pocket opening, and sew about 1 inch of the side seam below the pocket and backstitch again. Folding each pocket piece toward its front or back section, press the seam allowances open over a ham.

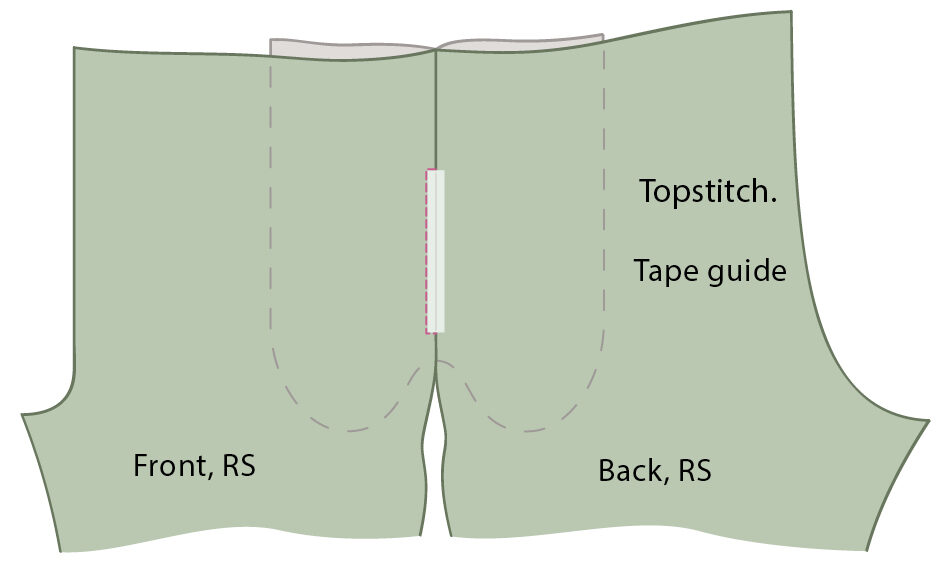
5. Topstitch the pocket opening on each front
Turn each front/back unit right side up, seam allowances open as pressed. Mark the ends of the pocket opening on the front (use the pattern as a guide). Starting and stopping at the side seam, topstitch the front to the front pocket along with the opening as shown. Pull the threads to the wrong side and tie them off.
Assemble the legs
1. Serge the pocket edges together
Fold each front/back unit on its side seam so the right sides are again together. Align the pocket edges and the remainder of the side seamlines, using the clipped marks to line up the knee lines and hemlines. Serge along the outer edge of the pockets, barely trimming the fabric. Curve onto the body of the pants, blending into the previous straight stitching about 1 inch below the pocket, as shown. Do not remove the work from your serger, you can use your sewing machine later to smooth the blend if necessary.

2. Serge the side seams
Continue serging the side seam to the bottom edge. When you reach the fusible web, pull off about 3⁄4 inch of the paper backing and bend it back as you serge past it. Press the side seam allowances and pockets toward the front. Baste the pocket tops to the fronts 1⁄2 inch below the top edge.
3. Serge the inseam
With the right sides together, align the inseam edges of each front/back unit, matching the knee line and hemline clips. Bend back about 3⁄4 inch of the fusible-web paper backing at the hemline. Serge each inseam.
4. Serge the crotch seam
Turn one leg right side out and tuck the other leg, still inside-out, inside it, aligning the inseams. Serge the entire center front/center back seam, from the top of the front casing to the top of the back casing. Optional: Using your sewing machine, reinforce the crotch seam with straight stitches. Press the seam flat as sewn at the crotch, and toward one side near the waist
Sew the waist elastic and the hems
1. Prepare the elastic
Cut your waistband elastic 5 inches smaller than your waist measurement. Butt the ends together over a scrap of knit fabric and stitch through all layers to secure.
2. Baste the elastic to the casing
Divide and mark both the elastic and the pants top edge into quarters. Line up the top of the elastic with the top of the casing on the inside of the pants and vertically machine-baste the elastic to the casing at the quarter marks.
3. Serge the elastic to the casing
Turn the pants inside out. Disengage the serger knife and, with the elastic on top, use a long stitch length to serge the top edge of the elastic to the casing edge, stretching the elastic but not the pants.
 4. Add a center backmarker
Cut a 31⁄2-inch length of ribbon or twill tape and fold it in half crosswise. Baste it to the center back waist edge so a loop of ribbon sticks above the top edge as shown. This provides a permanent loop to identify the back of the pants.
5. Zigzag the elastic and casing in place
Fold down the elastic and baste again at the quarter marks. The loop will stick out below the casing. From the right side of the pants and using your sewing machine, sew a medium-wide zigzag stitch 1⁄4 inch from the top edge and again 1 inch from the edge, as shown, stretching the elastic and fabric flat. Remove the basting threads, and steam the elastic heavily to shrink it back into shape.
6. Sew the hems
Remove the paper backing from the fusible web, and press up the hem on each leg. Using a 4mm twin needle, topstitch the hem from the right side about 3⁄4 inch from the bottom edge.
7. Check for stray threads and pins
Inspect the pants inside and out in good light for hanging threads and missed pins, then try on the pants.


Log in or create an account to post a comment.
Sign up Log in