

Felted Wool Jersey: Stylish, Versatile and Easy to Sew
Get to know this felted wool knit; it’s versatile, stylish, and easy to sew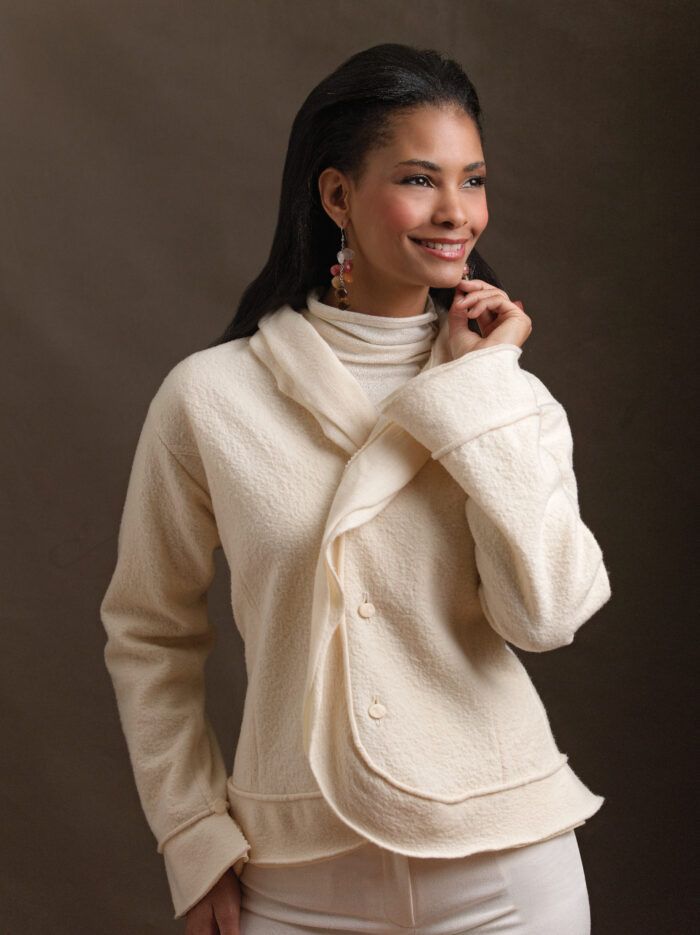
Wool is one of the most versatile fibers available to home sewers. It’s sculptable, breathes well, insulates, and drapes beautifully. Wool comes in many weaves and knits, and wool jersey is among my all-time favorites. After a round in a washing machine, 100-percent wool jersey fabric takes on an entirely new life, shrinking to half its original size with compact fibers that don’t fray. This makes it the perfect candidate for trying out new techniques for stylish jackets, tops, and more.
After taking a few classes on felted wool taught by fiber artist Jean Cacicedo, I was captivated by the possibilities of working with this unique fabric. Already experienced in working with Ultrasuede and making garments with overlapping seams, I began experimenting with felted wool. Ultrasuede and felted wool are very different, but the construction processes used on these materials are surprisingly similar. Both fabrics don’t ravel and lend themselves to many simple and elegant seam and edge treatments.
Tools for smooth sewing
When creating wool jersey garments, it helps to have these notions handy for smooth sewing:
- Universal needles, sizes 80/12 or 90/14
- Chalk marker in a contrasting color
- Double-sided basting tape
- Rotary cutter and mat
- Polyester or cotton thread
- Edgestitch presser foot
- Small trimming scissors and/or appliqué scissors
- Pinking shears (optional)
- Wavy blade for rotary cutter (optional)
Test the fabric first
For felting, you must use pure, 100-percent wool jersey. Blends don’t shrink and felt in the same way and give you very different results. Even though a fabric bolt may be marked “wool jersey,” fabric stores are not always certain of what they actually have on hand. The only way to make sure you have the right fabric is to test it: Cut off a swatch, throw it into hot water in the washing machine, and dry it on high heat. If it shrinks to almost half the original size in the first wash, you have the right fabric. If it doesn’t shrink much the first time, it won’t get there after multiple washes.
Purchasing and felting know-how
Buy at least twice the fabric length the pattern calls for, and cut the fabric in manageable lengths. I prefer 3-yard lengths. Be sure to save a small amount—at least 1/2 yard—of unwashed fabric for trims, pocket linings, and other details.
If you are washing more than one color, wash similar colors together. Fabrics can bleed and change during laundering. Machine-wash the fabric in the hot water. The agitation process is actually more important than the water temperature so top-loading machines work best. Any kind of detergent is fine. After construction, the garment is “dry-clean only.” Further washing will distort it.
Adjust the pattern and support the hem
Remove the hems and facings from the pattern pieces by tracing a new pattern. Felted jersey doesn’t ravel, so finishing the hem is purely decorative. Certain garment styles may dictate when a hem needs more support. In that case, place a strip of felted jersey on the garment’s wrong side along the raw edges. Sew two rows of stitching 3/8 inch or more apart. Trim the excess strip next to the stitching. The easiest way is to stitch near an edge without trying to be too perfect and then to trim close to the stitching evenly.
Cutting and marking tips
The true straight of grain on washed felted wool is blurred and is no longer important. Turn pattern pieces in any direction to conserve fabric. It is important, though, to be consistent in using the same side as the right side.
A rotary cutter is the best tool for cutting felted wool. It produces a smooth, visible line in the lap-seam construction used to create these garments. Scissors tend to make choppy lines, but pinking shears are great for decorative edges.
Washed wool doesn’t always lie flat, so cut each piece individually, smoothing the fabric as best you can. The selvage edges can get especially ruffled. Steaming the fabric also helps shrink the unevenness.
Mark all pieces before moving or removing the pattern tissue. Tailor tacks are the best pattern-marking method because tailor’s chalk and other marking tools aren’t always clearly visible on the fabric’s textured surface.
Felted wool jersey has quickly become one of my favorite fabrics to sew, allowing me to experiment with techniques in a stylish way. After you experience the versatility of this amazing fabric and try these eye-catching techniques, I know you’ll love it as much as I do.
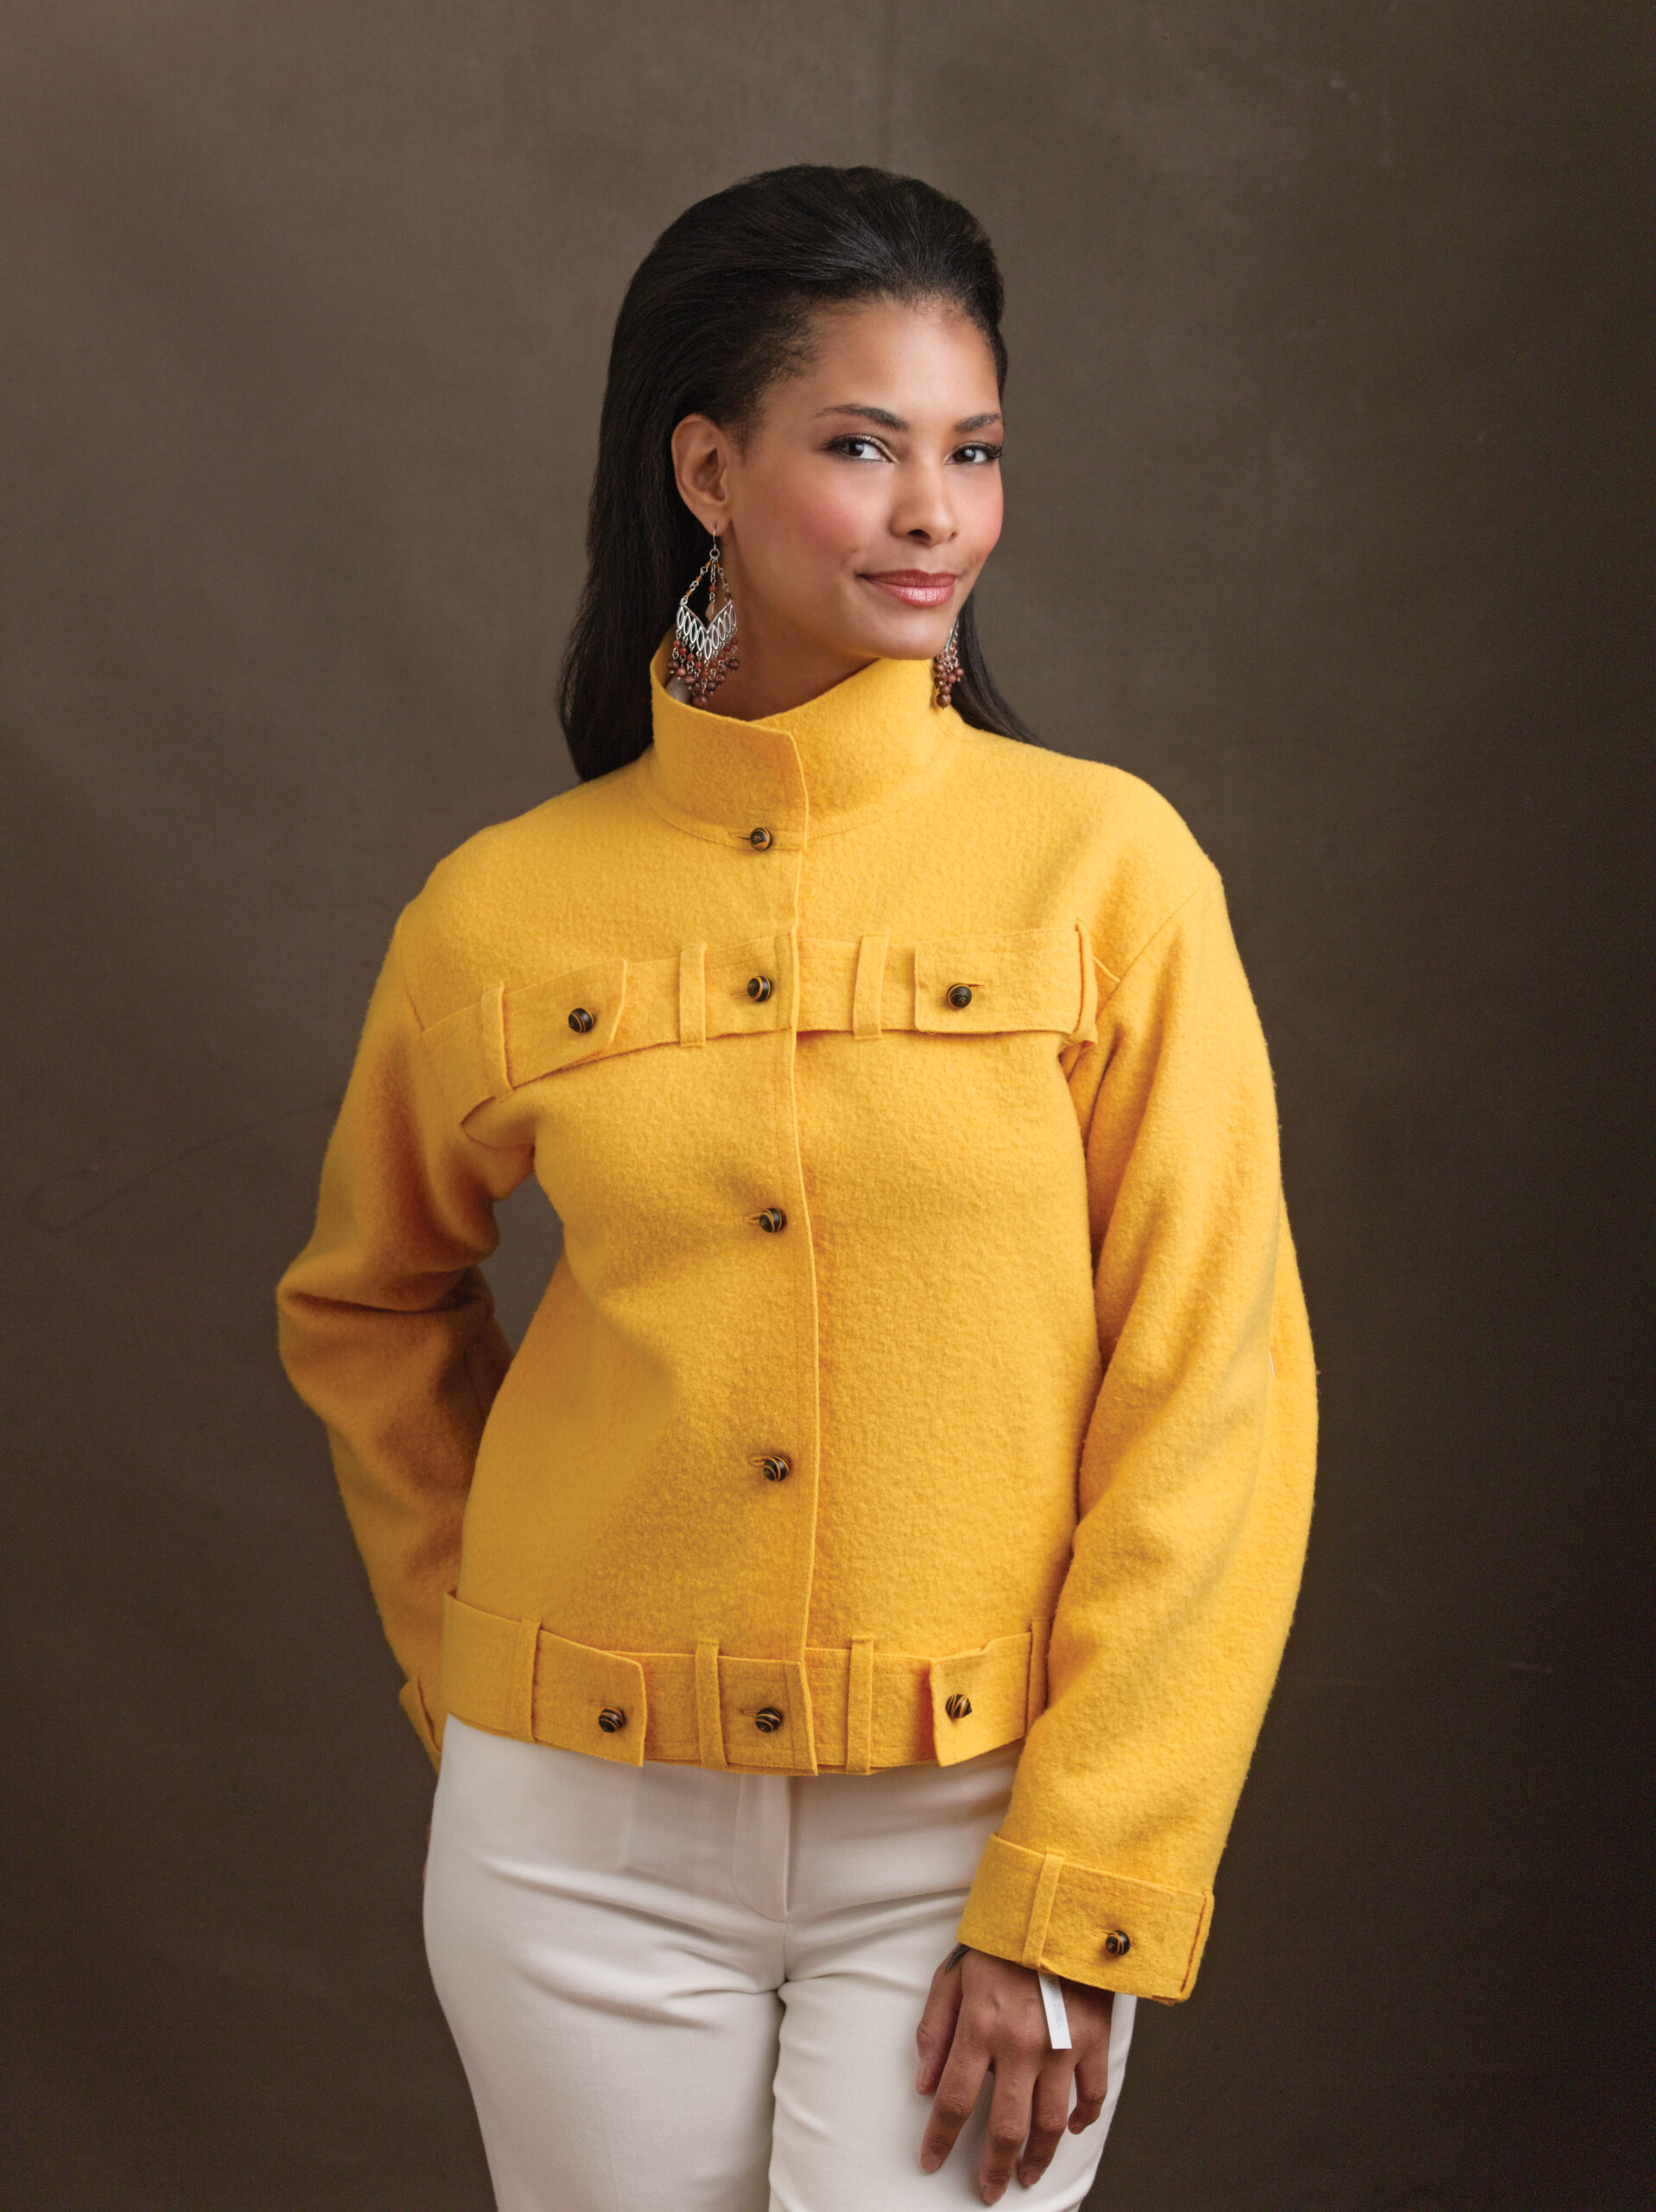
Highlight edges with lapped seams
Lapped seams help eliminate bulk and highlight the fabric’s unique edges. For side seams, make the front pieces overlap the back. You can cut it with a straight edge, or use a zigzagged or wavy blade to create an interesting detail.

1. Cut off the seam allowance. To start, measure, mark, and trim off one seam allowance. On the side that still has the seam allowance, use a chalk marker to mark the seamline.

2. Align the seam’s edges. Apply a strip of double-sided basting tape to the center of the remaining seam allowance. Remove the paper coating from the tape, and place the cut edge over the seam allowance. Then align the raw trimmed edge to the chalk-marked line on the adjoining side, and finger-press the two together.

3. Sew the seam. Stitch very close to the cut edge. Using an edgestitch presser foot ensures even stitching from the edge. Stitch again about 3⁄8 inch from the first stitching. Remove the tape before stitching the second line if the tape seems to stiffen the seam too much. Test the seam on a sample before sewing your garment.
4. Trim the seam allowance. Use small, sharp scissors or appliqué scissors to trim the excess fabric next to the second row of stitching on the seam’s wrong side.
Remove bulk with cut-away darts
Felted wool is too thick for traditional darts; cut away the excess for a smooth finish.
First mark and remove the dart’s inner triangle, as shown at right (A). Then, abut the dart’s two cut edges, and place a felted wool strip behind them, as shown below. Use double-sided basting tape to hold the layers in place (B), and stitch very close to the cut edges of the dart. Sew another row of stitching 3⁄8 inch from the first row along each cut edge (C). Trim the excess fabric from the strip on the wrong side.
|
|
|
|


Another way to create shape you’d ordinarily form with darts is to reshape the pattern pieces by transforming the darts into seams. For instance, if there are bust and contour darts that shape the waistline area, extend the contour darts upward to emulate a princess line. Then extend the bust darts so they intersect the contour line to segment the front into three separate pieces. Use lapped seams when you sew the pieces together.
Try a variety of buttonholes
Here are three options for straight-stitch buttonholes on felted wool garments.
1. To make a basic buttonhole, straight-stitch a narrow, 1⁄8-inch-wide continuous rectangle that’s as long as your button plus 1⁄8 inch. Do this through a single layer or through two layers with a second felted layer applied to the wrong side for support.

2. Or, add the second layer as a decorative piece on the garment’s right side, as shown in the buttonhole above.
3. Or, place a small scrap of unwashed jersey centered over the buttonhole’s right side. Mark and sew a narrow rectangle, cut the center slit, and trim the unwashed jersey close to the stitching. The unwashed jersey curls and forms a three-dimensional buttonhole.
Create decorative details
Since felted wool jersey doesn’t ravel, you can use the fabric to make its own trim. Below are a couple options for unwashed and washed jersey.

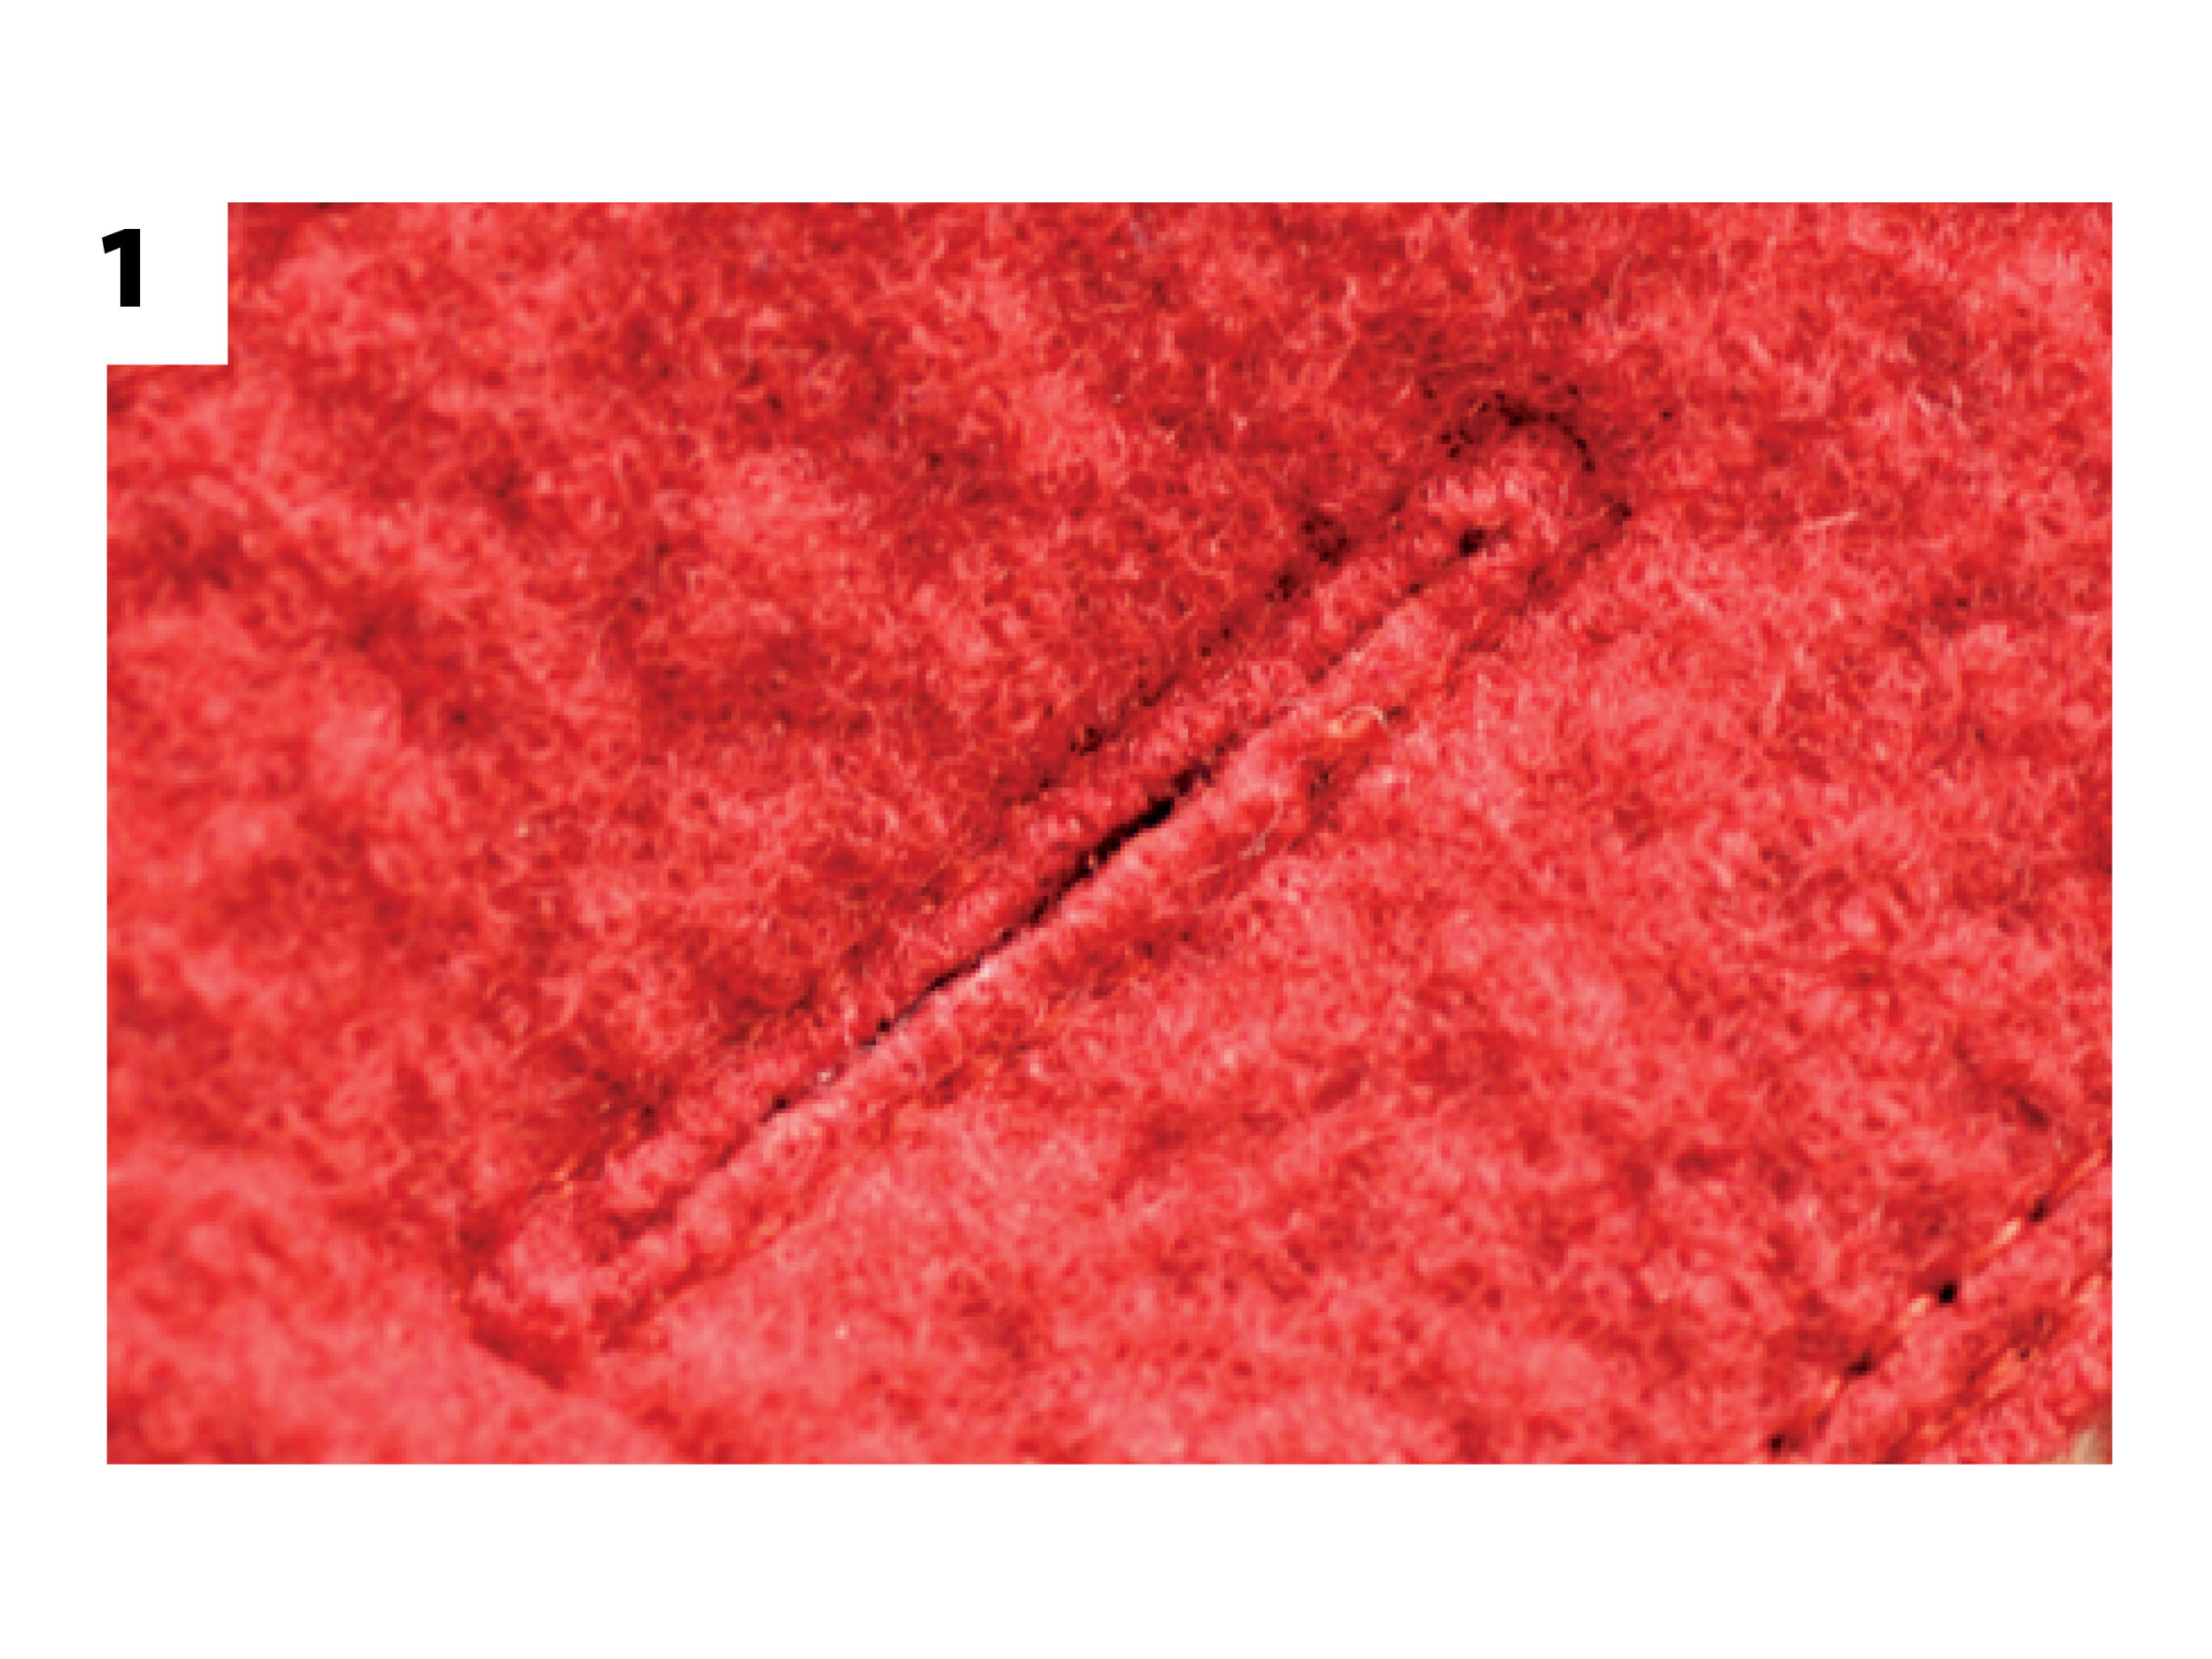
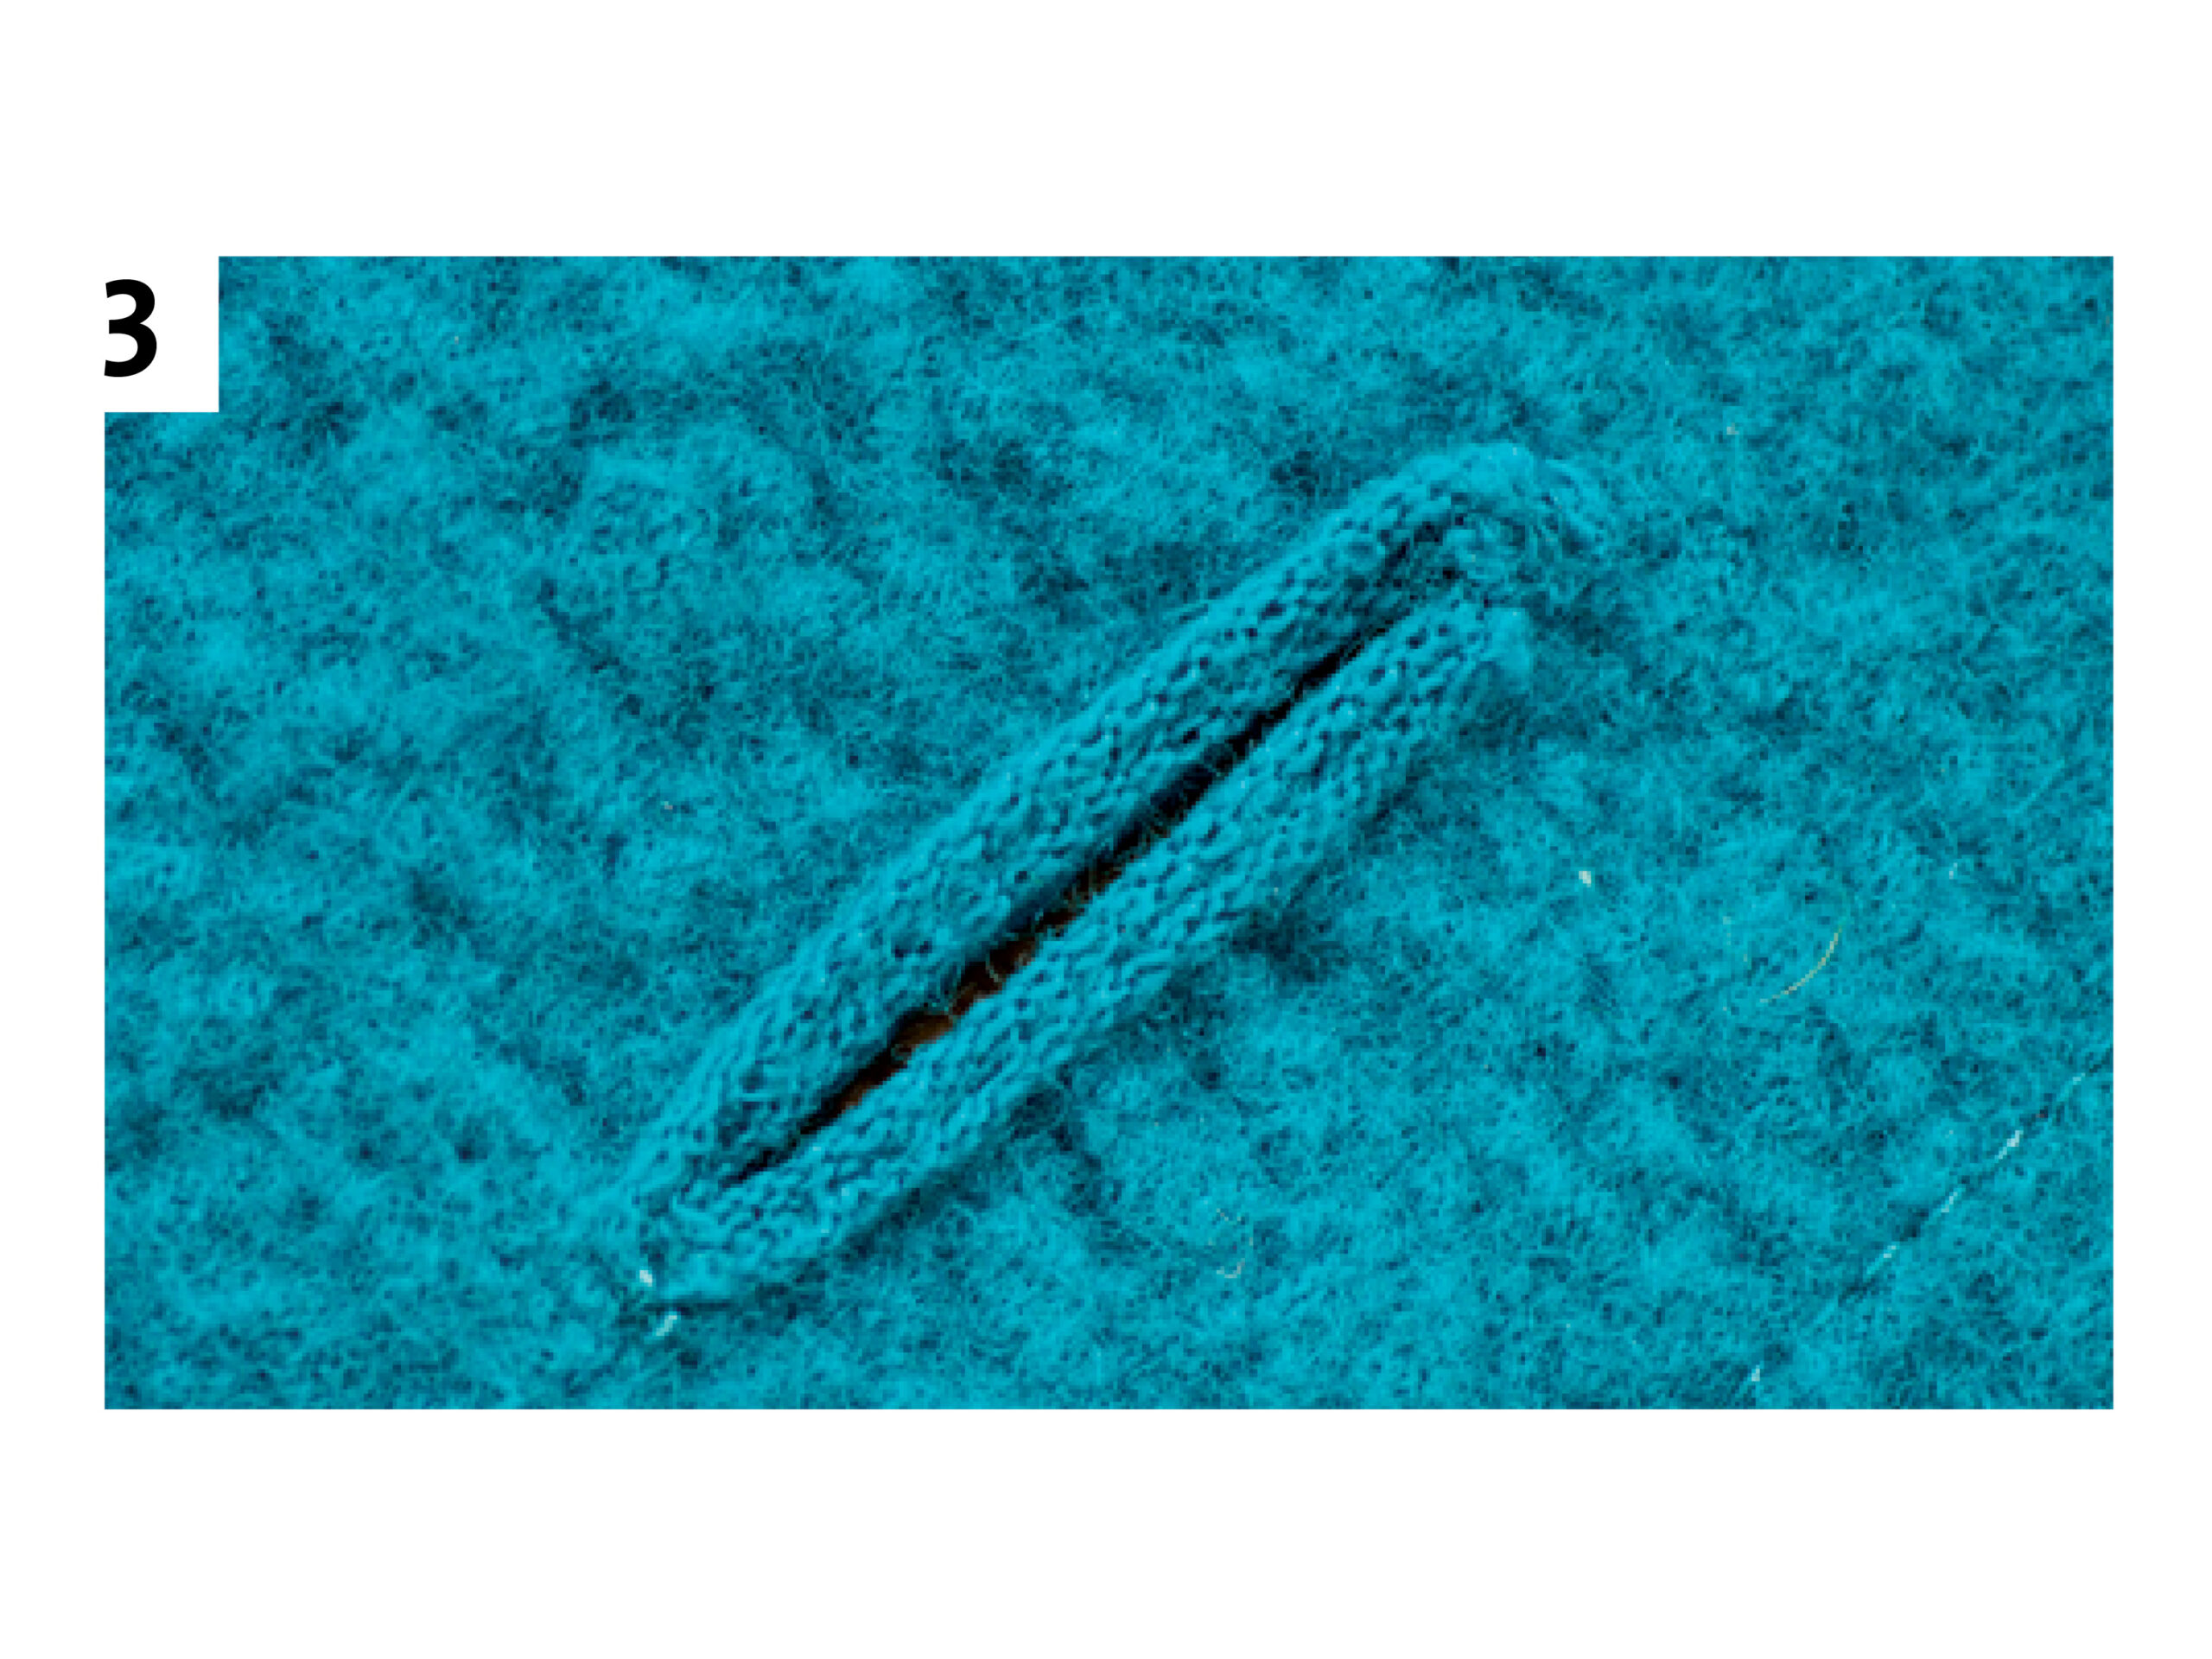
Camouflage a seam
A thin strip of unwashed jersey curls up when sewn down its center. Use this technique to add a bit of detail in a contrasting jersey or using the leftover unwashed self fabric from your garment. To create the look, place a strip of unwashed jersey where you would like the detail. Pin the strip flat, and sew it in place along its center. After sewing, the fabric curls up and hides the stitch line.
 |
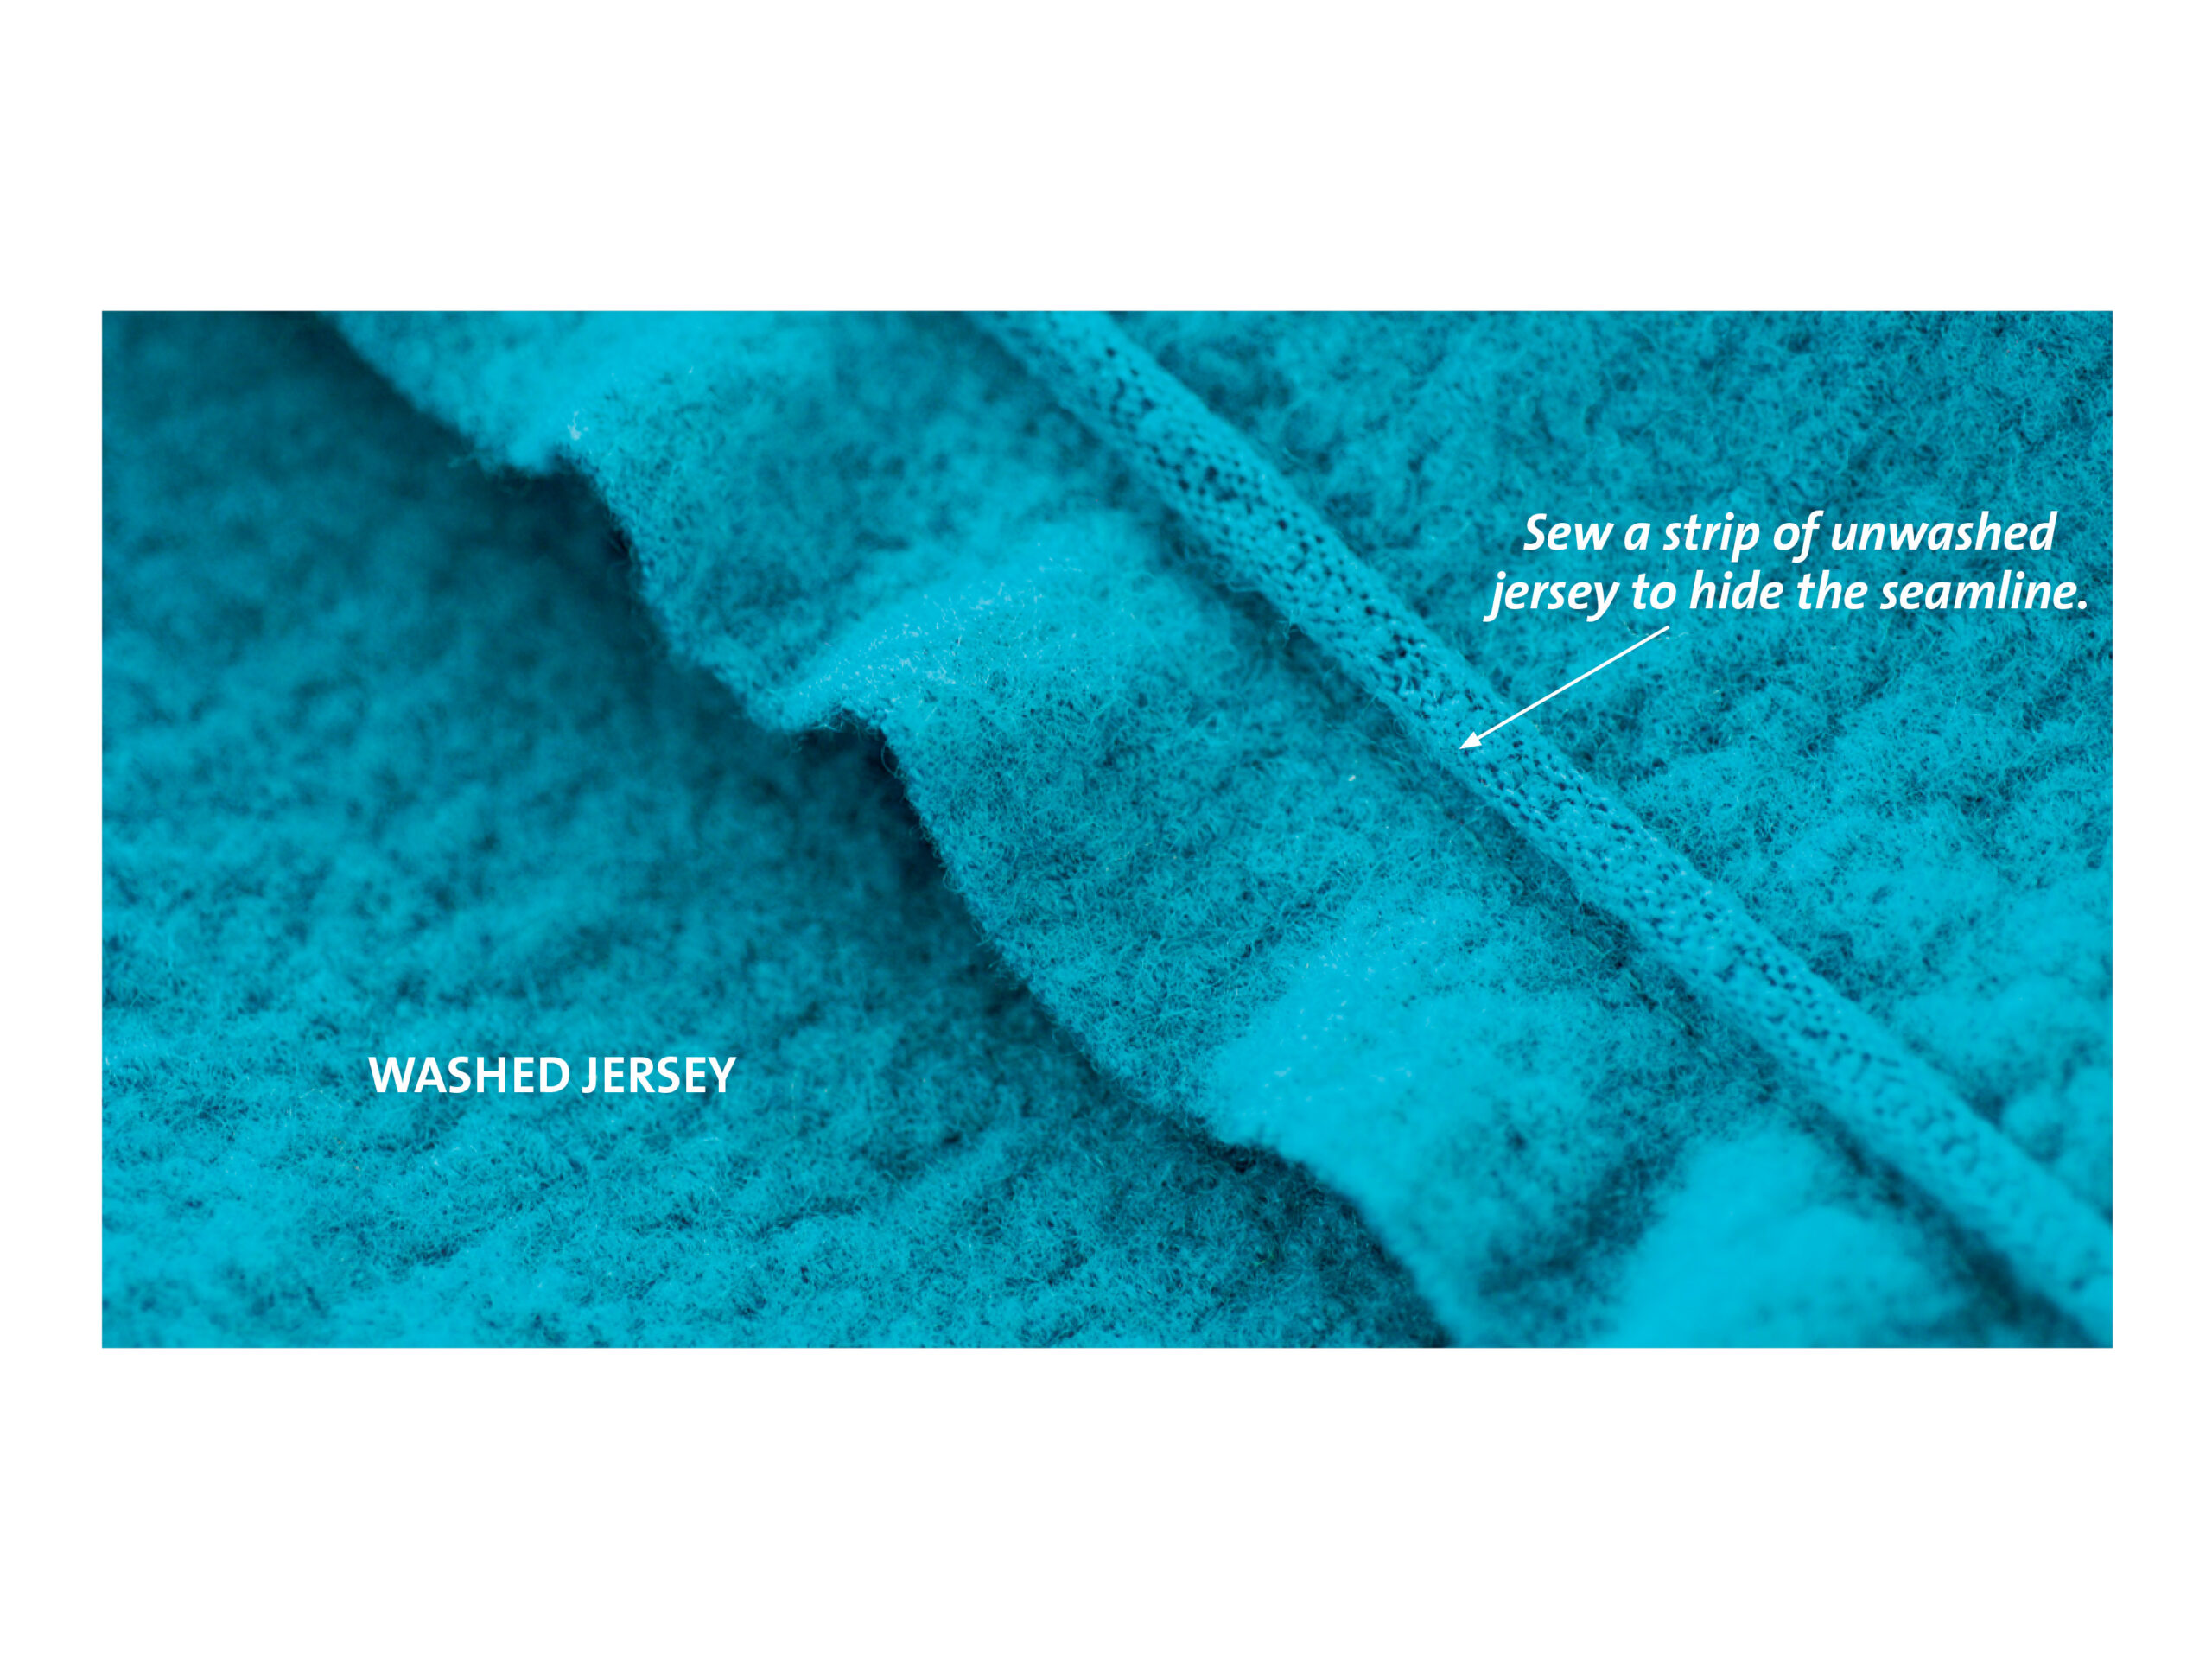 |
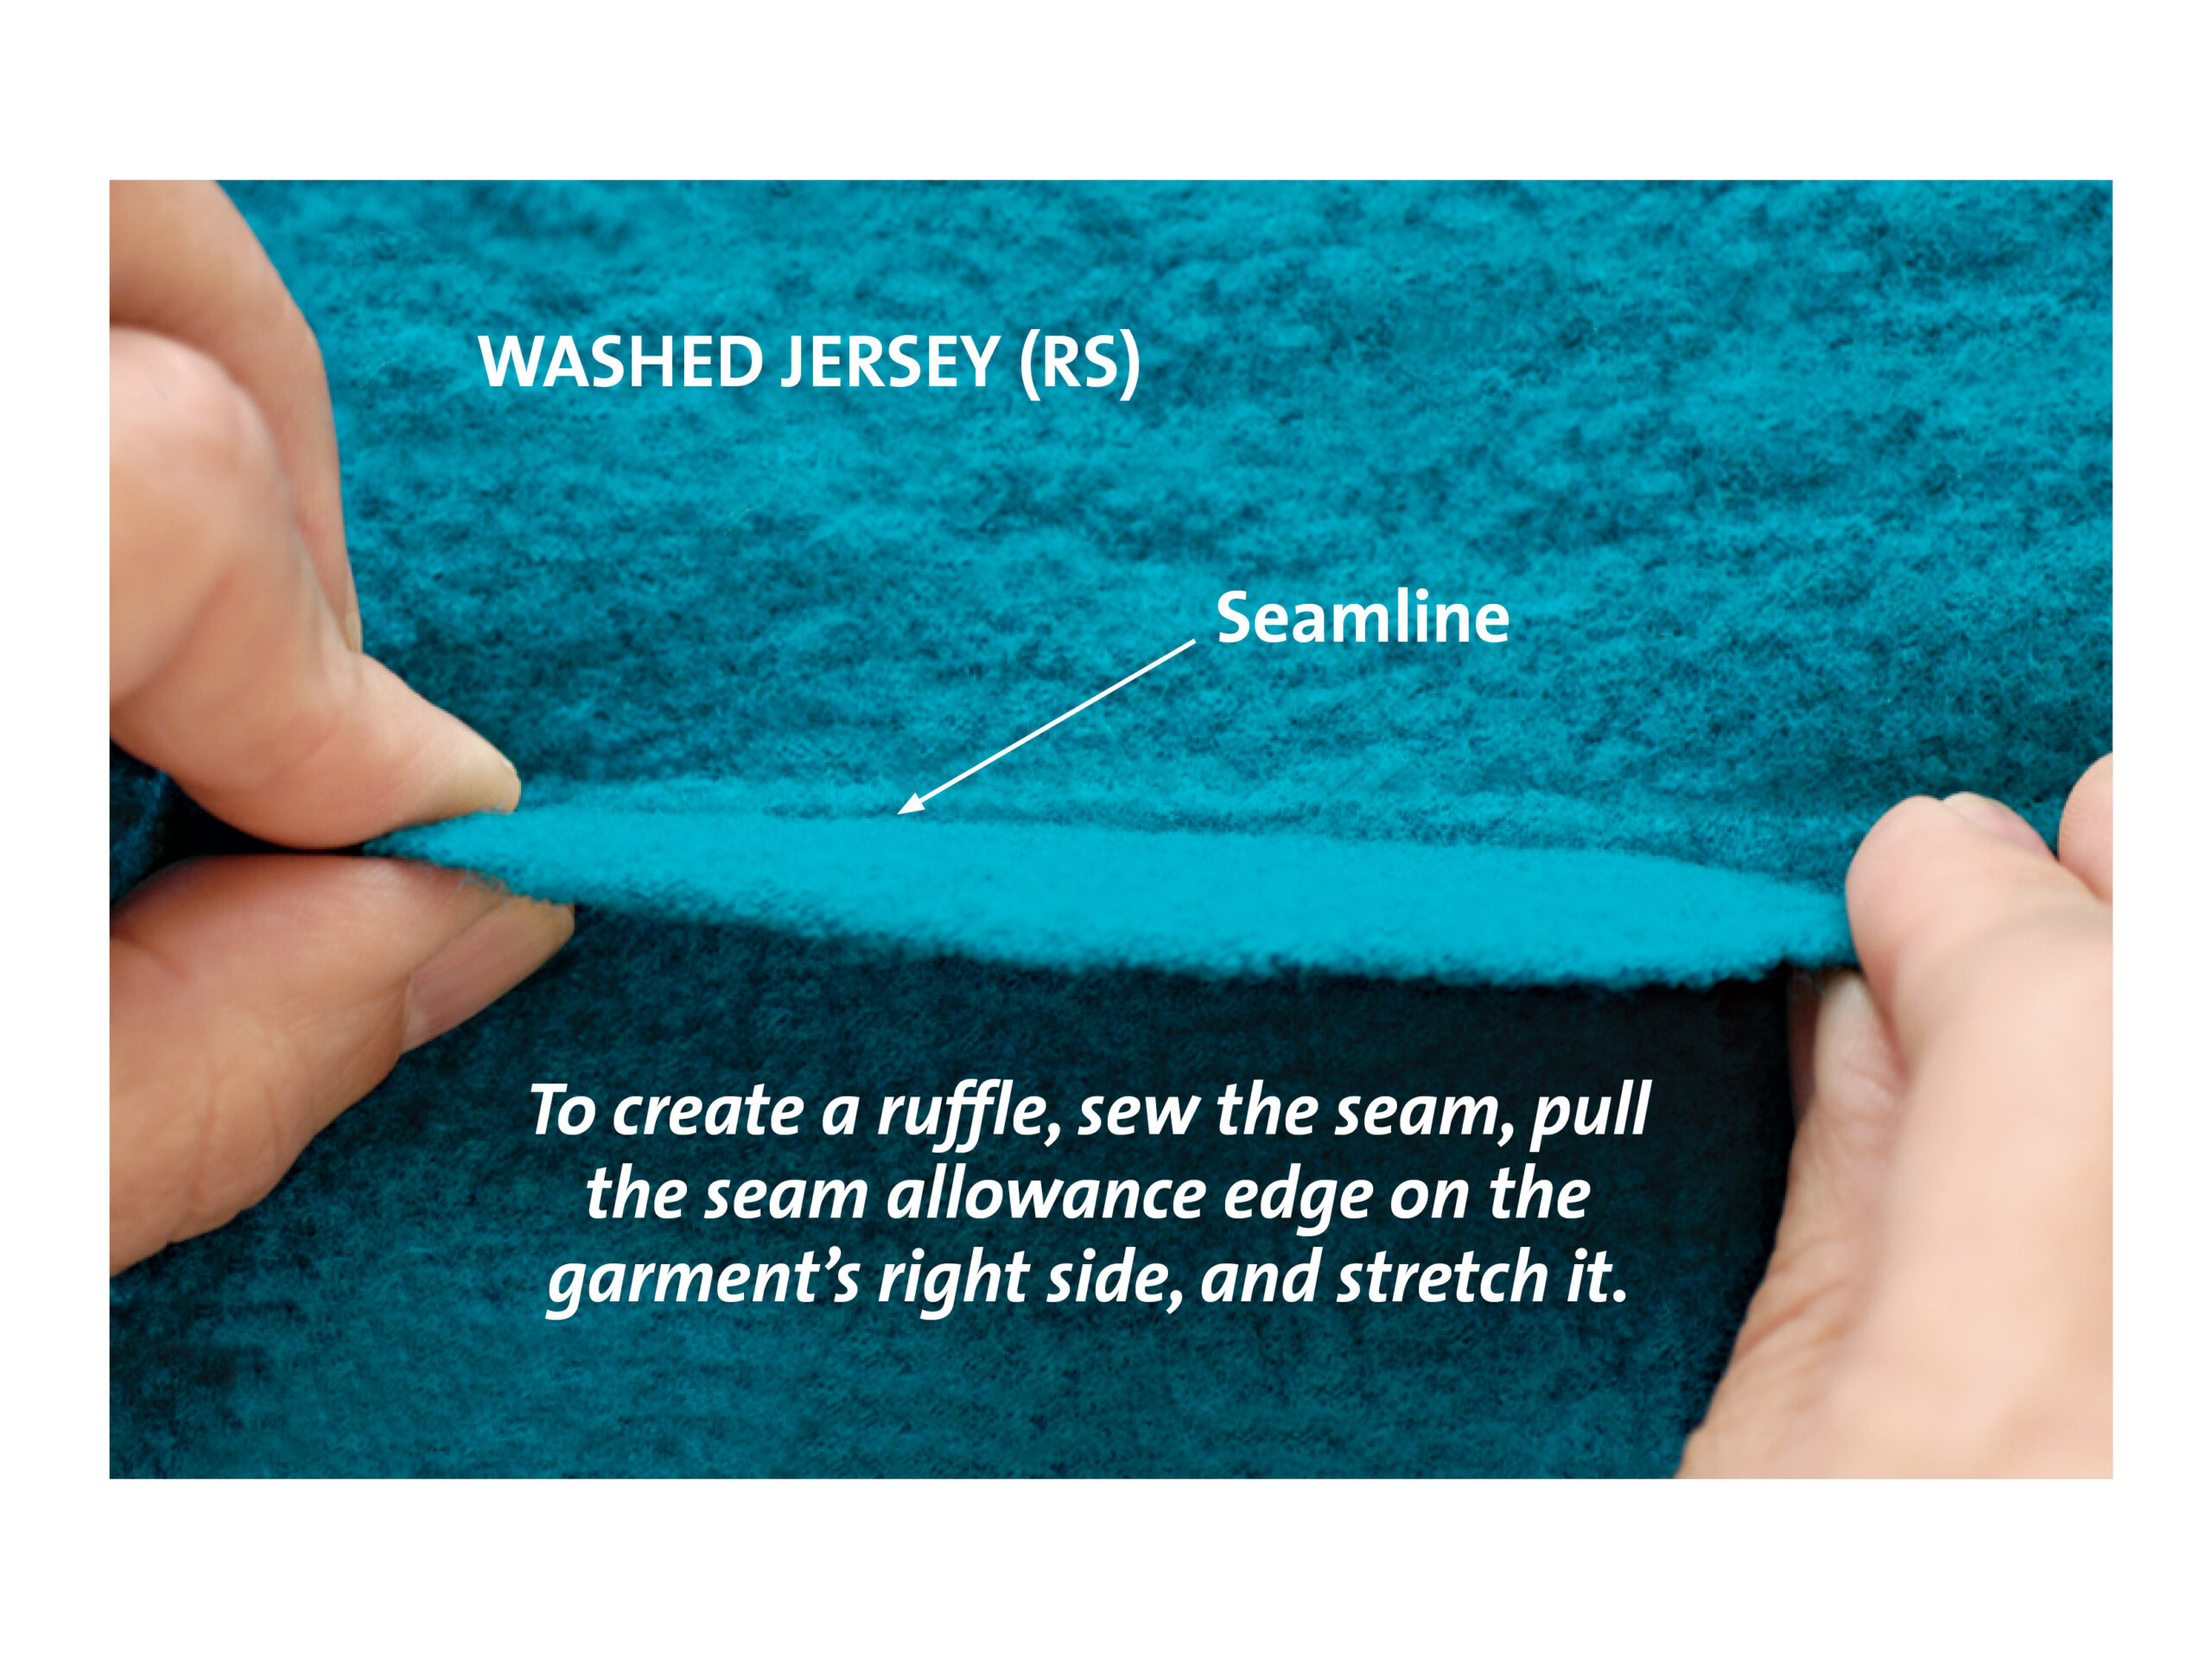
Add a ruffle
To create a ruffle along a seam, don’t trim the seam allowance from the lapped seam on the garment’s top side. Sew the seam once along the seamline, and then to create the ruffle, pull the seam allowance edge to stretch it. To hide the seam, place an unwashed strip of jersey over the seam, and topstitch it in place as shown below.
Apply zippers with ease
In these zipper applications, the seam allowance is trimmed on one or both sides to help deal with the wool’s bulk.
|
|
|


Sew an exposed zipper
To sew an exposed zipper in felted wool jersey, sew the seam below the zipper, using a lapped seam. Then mark and cut 3⁄8 inch off the untrimmed and trimmed seam allowance along the zipper length.
With the zipper and fabric right-side up, abut the fabric’s raw edges to either side of the zipper teeth. Use double-sided basting tape to hold the zipper tapes in place. Start at the zipper top, and use a zipper foot to stitch close to the raw edge ending at the zipper base. Insert the needle into the fabric, and pivot to sew across the bottom. Pivot again, and sew back up to the zipper top along the zipper’s other side. Repeat with another row of stitching approximately 1⁄8 to 1⁄4 inch from the first row.
|
|
|
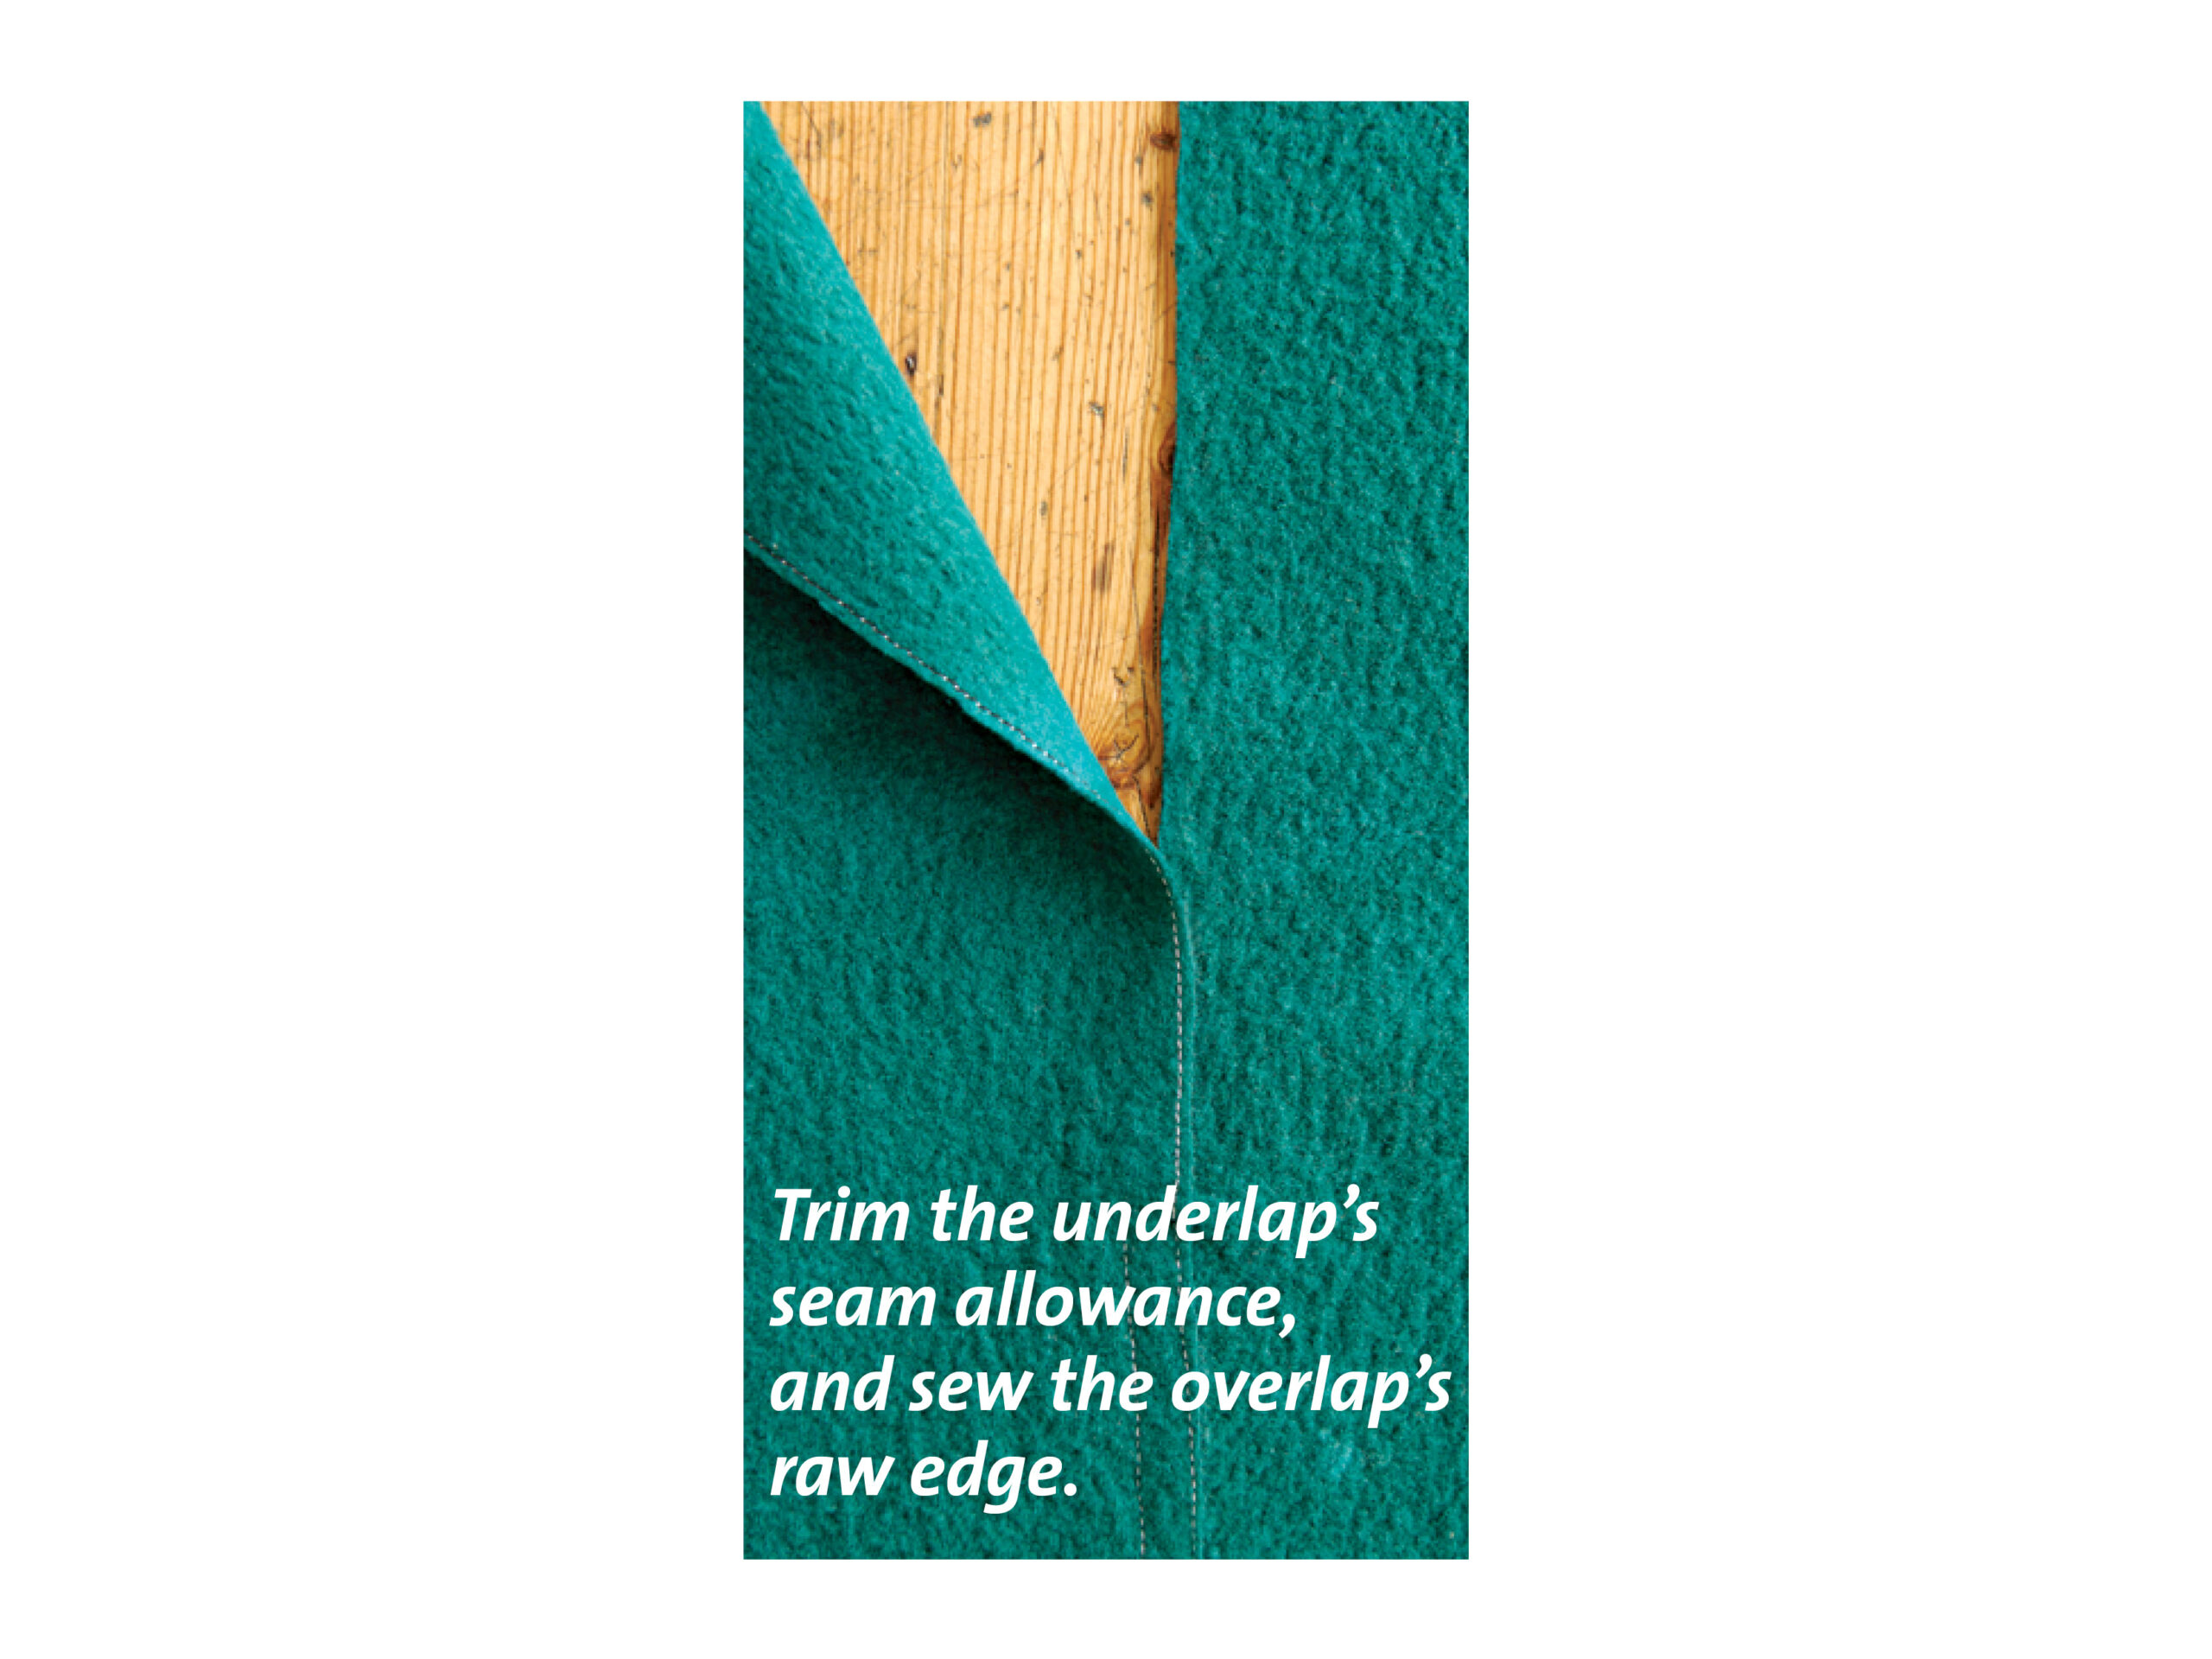
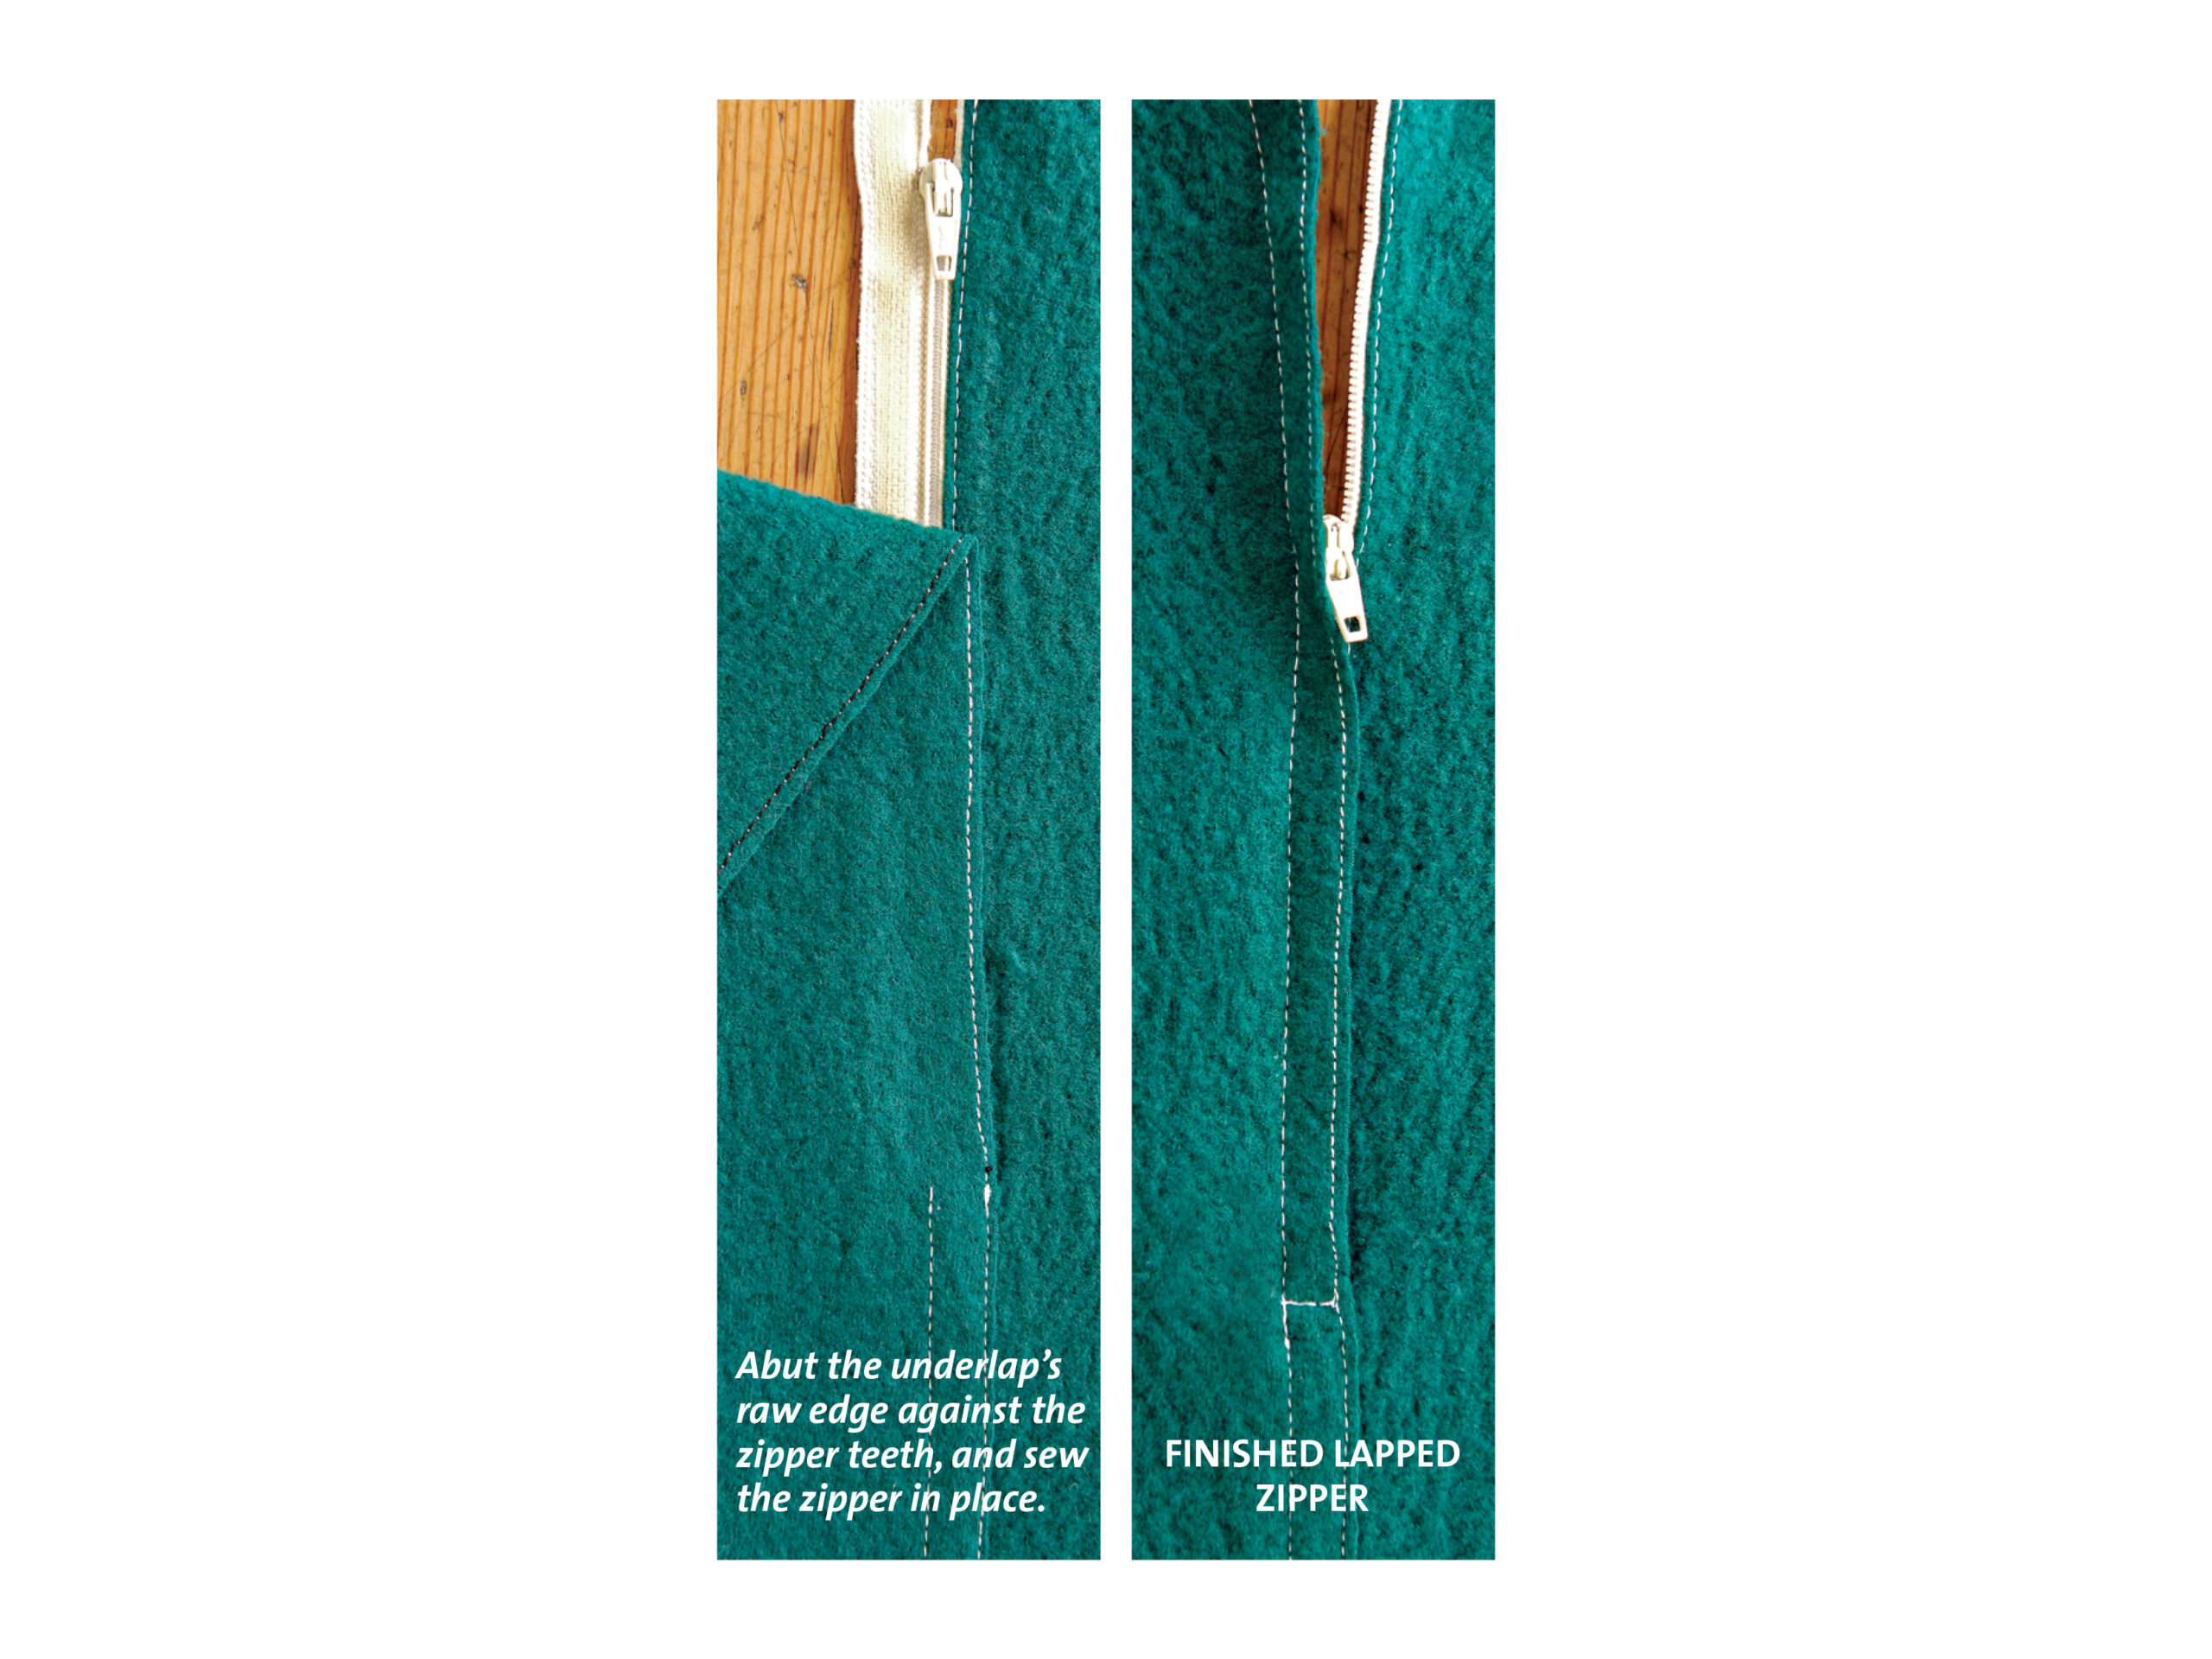
Apply a lapped zipper
To install a lapped zipper in felted wool jersey, sew the seam below the zipper with a lapped seam. Cut 3⁄8 inch off the untrimmed seam allowance along the zipper. This is the underlap side. The other side is the overlap side.
Edgestitch along the raw edge of the overlap (single layer only) to simulate a continuation of the double-stitched seam below the zipper opening.
With the fabric and zipper right side up, abut the underlap’s raw edge against the zipper teeth. Use double-sided basting tape to hold the zipper tape in place. Stitch close to the raw edge using a zipper foot.
Lap the overlap over the zipper teeth, aligning the raw edge with the normal 5⁄8-inch seamline. Use the double-sided basting tape to hold the zipper tape in place, and stitch the length of the zipper opening to secure the zipper. Align the stitching with the second stitching row of the seam below.
Linda Lee designs The Sewing Workshop patterns (SewingWorkshop.com).


Log in or create an account to post a comment.
Sign up Log in