
Add a Dramatic Pleated Sleeve
Make fanlike sleeves with prefolded fabric
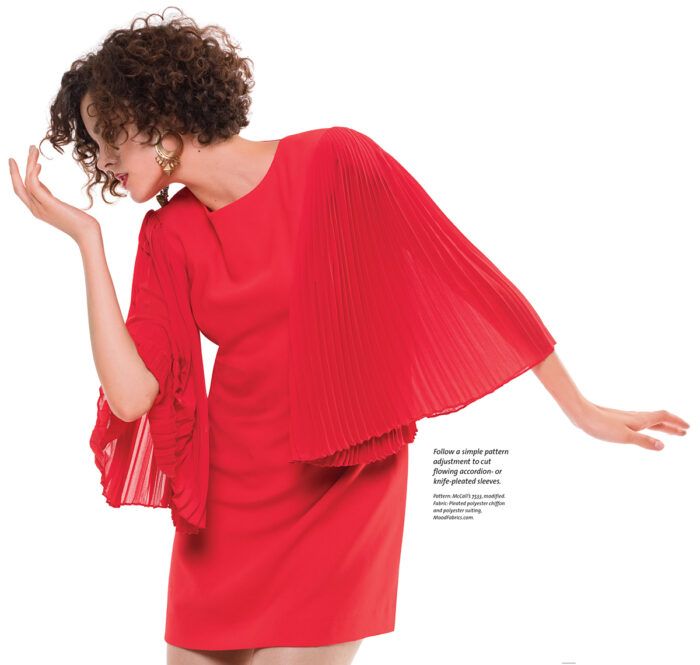
Pleats are having an extended moment in fashion. They offer volume that expands or collapses with the body’s position and movement. Pleats can be endlessly interesting, and they’re fun and forgiving to wear.
This pattern change is based on a ready-to-wear top I wore in my editor’s picture. Readers wrote in and asked about it. I realized the pattern adjustment is simple, and I discovered through trial that the fabric handling is fussy, but not difficult. This pattern manipulation works with fabrics bearing narrow, parallel knife pleats. I recommend polyester chiffon, which takes a permanent pleat, restorable even if you iron it out to sew a hem, for example. It would be difficult to maintain pleats in a natural-fiber fabric for this project.
Note that pleated sleeves take more fabric than traditional sleeves, depending on the fabric width, the sleeve length, and the pleat depth. You’ll cut the sleeves on the cross-grain, with every pleat folded. I found that 3 yards of fabric only covered a half-yard area with the pleats closed. The result is worth the extra fabric, however, for sleeves that swing and flow gracefully.
Redesign the sleeve pattern
Most of the sleeve volume comes from the pleats, not from a significant change to the pattern width. You’ll make the sleeve wider and its edges straight, at the same time slightly flattening the sleeve cap. The underarm seam, which is parallel to the grainline, is less obtrusive when it aligns with the pleats, and the wider sleeve pattern incorporates more fabric for optimal movement.
| 1. Copy the sleeve pattern. Trace it onto pattern paper and transfer the marks and notches. Trace the sleeve-cap seamline. Reduce the hem allowance to 5⁄8 inch wide. |  |
| 2. Cut the traced sleeve pattern. Remove the sleeve-cap seam allowance (to be added back later). Trim the excess hem allowance. |  |
| 3. Fold the new sleeve pattern in half lengthwise. Crease the center fold. | 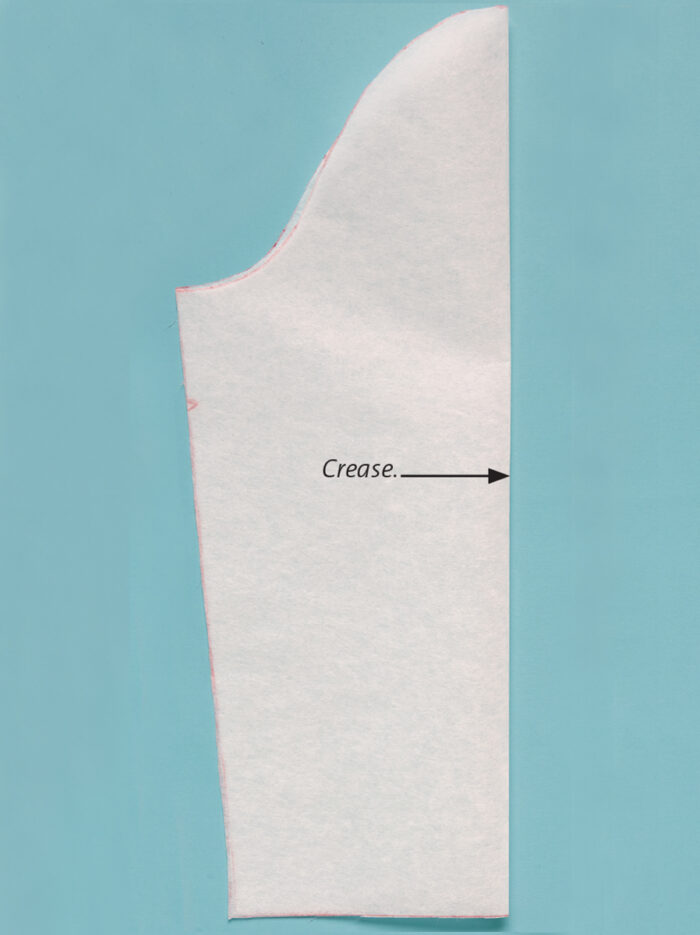 |
| 4. Mark slash lines. Unfold the pattern and, starting with the center crease, mark the pattern lengthwise at 2-inch intervals. |  |
| 5. Slash the sleeve pattern from the hem edge to the sleeve-cap seamline. Cut to the seamline, but not through it, leaving a “hinge” at the top of each slash. Place the slashed pattern over a new piece of pattern paper and open the slashes. Spread the slashes evenly until the sleeve’s underarm seam edges are parallel. |  |
| 6. Trace the spread pattern piece. True the hem to be straight and perpendicular to the sleeve’s underarm seam edges. Add the sleeve-cap seam allowance and replace the marks and notches. |  |
Prepare and cut the fabric
To achieve precise results in the armscye seam and include the maximum amount of pleated fabric in the sleeve, it’s best to control the pleated fabric carefully. To that end, use freezer paper and basting to hold the pleats closed while you cut the sleeves.
| 1. Arrange the fabric on the shiny side of a freezer paper sheet. Rough-cut a fabric piece for each sleeve, long enough and wide enough—with the pleats closed—to accommodate your pattern piece. |  |
| 2. Add another freezer paper sheet over the fabric. Press with a dry iron at a temperature setting your pleated fabric will tolerate. The freezer paper will gently adhere to both sides of the fabric. Baste the freezer paper and fabric sandwich. Machine-baste perpendicular to the pleats at intervals of about 3 inches. 3. Cut the sleeve pattern from the basted and sealed pleated fabric. Make sure the pattern piece is on grain, with the hem perpendicular to the pleats. Flip the pattern piece to cut the other sleeve. |
 |

| CONSTRUCTION TIPS
Once you have cut the pleated sleeves, here is some advice to prepare and install them in your garment.
|
Sarah McFarland is Threads’ editor.


How do you sew a french seam when the sleeve is already inserted?
Hi, Ju-Wien,
You can't sew the sleeve's seam as a French seam if the sleeve has already been inserted. However, you can make a mock French seam: Fold both seam allowances' raw edges in toward the seamline, and edgestitch them together along the folds. You may have to fudge this a little at the armscye end, if the allowances have been sewn in an open position.
Best,
Carol Fresia, Threads Senior Technical Editor