
Vintage Lattice Collar Created from Fabric Strips
Fashion an intricate lattice from fabric strips
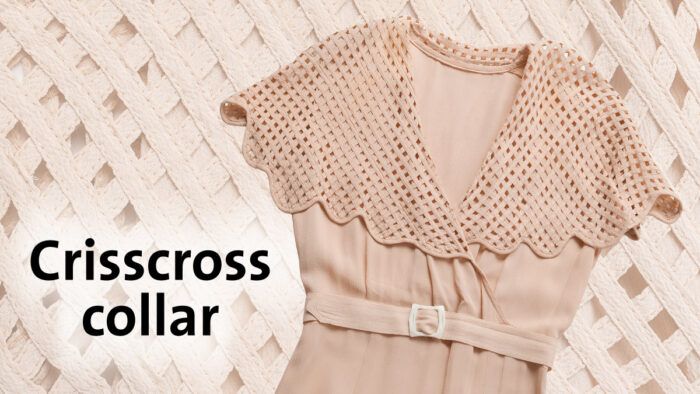
A lattice is an open-worked structure of crossed wooden strips or bars, often used as a foundation for climbing plants. When made of fabric, it can take the place of lace or other sheer fabrics. In the pale pink 1930s dress at right, a wide collar was made from a lattice with a scalloped edge. The lattice collar visually refers to flower-petal shapes as well as to the trellis that supports the blossoms.
Although the lattice appears to be woven, it’s less complicated than that. It was made of on-grain fabric tubes, flattened and arranged in perpendicular rows, without interlacing. Edgestitching secures the tubes to create the trellis effect. The collar was cut from a single layer of lattice “fabric,” and its edges trimmed and bound in a scallop pattern. Although it takes time to create the lattice fabric, you can use it for many details besides collars. From cuffs to partial or full garment panels, this technique adds clean-lined texture that can be as retro or modern as you like.
Make the tubes
The strips for the tubes are cut on the straight grain to eliminate stretching. Choose a woven fabric with some body; a smooth or slippery surface makes it easier to turn the tubes right side out after sewing.
1. Cut the strips. Make them 1-1/8 inches wide, for a finished tube width of 3/8 inch, and cut them along the lengthwise grain. To determine the number of tubes needed for your project, lay the pattern on a mat with a 1-inch grid. Count the number of 1-inch rows and columns. To achieve the tube width and spacing described here, you’ll need about six strips per four rows or columns. Cut extra strips to be sure you have enough. Make the strips as long as the longest and widest part of the pattern; you can trim them later.

2. Sew the strips. Fold each strip in half lengthwise, with right sides together and raw edges aligned. Stitch 3/16 inch from the raw edges to obtain a finished tube width of 3/8 inch. Finger-press the seam allowances open.
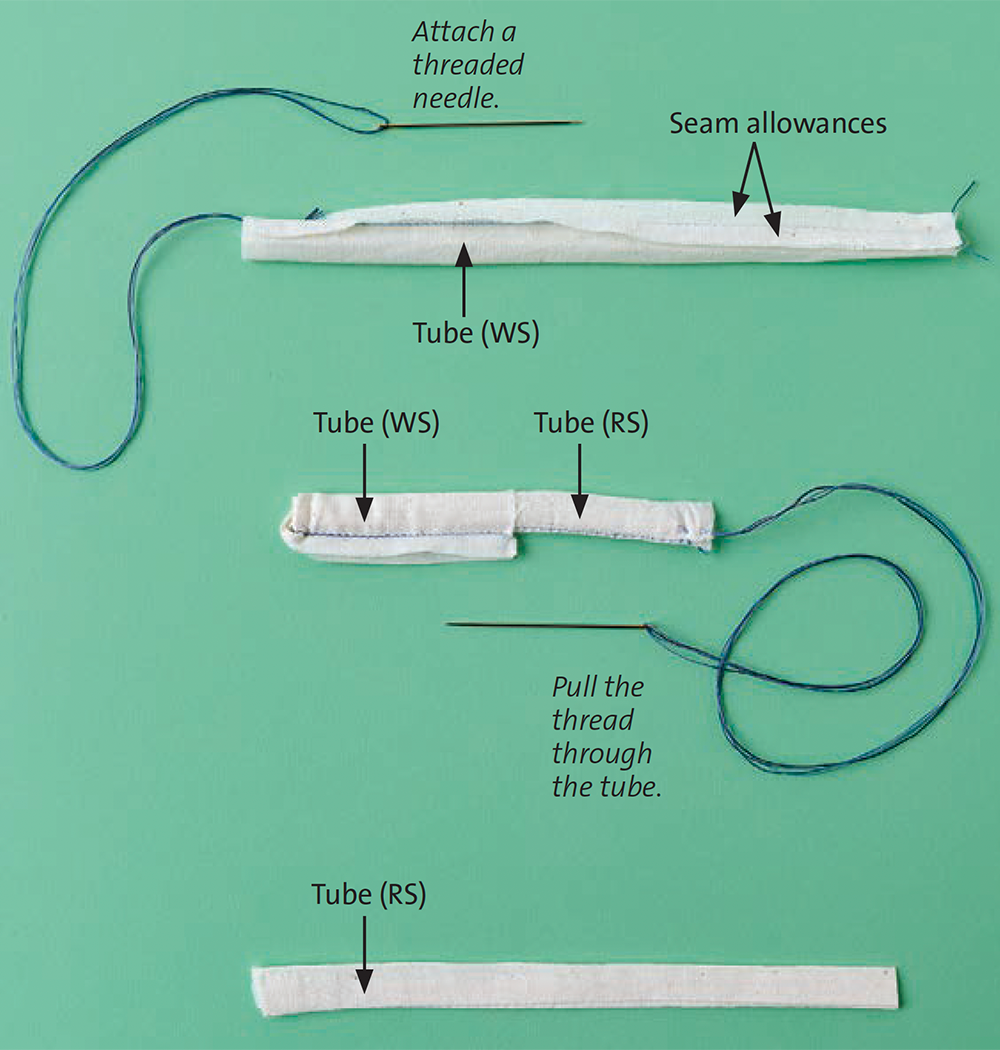
3. Turn the tubes. Thread a large hand-sewing needle with a double strand of thread. Secure the thread through the seam allowances at one end of the tube. Slide the needle, eye first, through the open tube, and pull it out the other end. Gently pull the thread through the tube to turn the tube right side out. Press the tube flat with the seam rolled slightly to the wrong side so it doesn’t show from the top side.
Form the lattice
You’ll draft the desired collar pattern, then trace it onto water-soluble stabilizer and apply the tubes to it.
1. Draft the collar pattern. Use your own design, or enlarge the small collar pattern below to the given dimensions. Draw the pattern on soluble stabilizer. I prefer the type that looks like nonwoven interfacing and has a slightly textured surface. Aqua Mesh by OESD or Wet N Gone by Floriani works well (RedRockThreads.com). You can machine-baste stabilizer pieces to create a sheet large enough for the 30-inch by 38-inch pattern. Mark the center-back and shoulder lines.

2. Begin basting the tubes to the stabilizer. Lay a tube on the stabilizer, with one edge aligned along the shoulder line. Baste the tube by hand or machine along its center. Lay a tube alongside the first tube as a spacer, and baste another tube beside it. Move the spacer, and continue basting tubes horizontally to cover the pattern. Leave extra length extending past the neckline and outer edges; you’ll trim these edges later.
3. Edgestitch the horizontal tubes. Straight-stitch along both edges to secure the tubes to the stabilizer. Then remove the basting stitches.
4. Add the vertical tubes. Align and baste the vertical tubes, as you did for the horizontal ones, starting at center back and moving outward. Then edgestitch along the tube edges, securing them to the stabilizer and to the underlying horizontal tubes. Remove the basting stitches.

5. Trim and rinse the lattice. Cut around the neckline to create a smooth curve. Then follow the manufacturer’s directions to dissolve the stabilizer. Handle the lattice gently throughout this process, and lay it flat to dry. Press the lattice to smooth it and ensure the grid is even and undistorted. Note: Pressing the stabilizer causes it to shrivel, so it’s important to rinse it out before trimming the lattice edges in the following steps.
Make the scalloped edging
The scalloped edge is bound with a shaped trim: Simple bias binding can’t curve adequately around the scallop shapes. The trim is cut in two layers, with a seam along the scallops’ outer edge.
1. Create the scallop pattern. Use the one at right as a guide, or create your own design. Extend it to the length of the collar’s outer circumference. In the example, the trim’s finished width is approximately 1⁄4 inch. It’s slightly narrower at the concave portions of the scallops, to reduce bulk. The pattern includes a seam allowance along the outer edge and a fold-under allowance along the inner edge. Add a bias grainline.

2. Cut the trim. Fold the fabric in half, with right sides together. Place the scallop pattern on the fabric’s bias, and cut two scallop strips. If you must piece the strips, do so at the narrower, concave part of the pattern. Stagger the piecing so the seams don’t align on the finished trim.
3. Join the layers. With right sides together, sew the outer-edge seam; vary the seam allowance gradually as marked on the pattern: 1⁄4 inch at the outer curve, and 1⁄8 inch at the inner portions. Trim and clip the seam allowances and press them open. Turn the trim right side out and press the layers together.
4. Press in the raw edges. Fold them under so they match on both layers and press flat, taking care not to stretch or distort the scallops. The trim is now ready to be sewn to the collar.
5. Cut the lattice. Follow the scallop pattern’s outer edge to shape the collar perimeter. Start at the collar’s right front edge; if there is an incomplete scallop at the opposite end, it will be concealed by the surplice overlap.
6. Attach the trim. Sandwich the lattice edge between the folded layers of trim; pin or hand-baste. Then sew the edges, either by hand with a slipstitch, or with a machine-worked edgestitch.


Tip: Trim shortcut
If your project has a straight or gently curved edge, you may be able to bind it with a bias strip.
Judith Neukam is a contributing editor living in Nebraska.


Thank you, I love this. I am going to try this as a yoke and part of a sleeve for a taffeta dress I am restyling/remaking for my sister's wedding. I never fit the bodice properly and I wore it 6 years ago. I intend to remake the bodice with leftover fabric using this technique. I will share a photo when it is complete. Michelle Frick Buffalo, NY
Please do share a photo--we would love to see your finished project!
Carol Fresia, Threads Senior Technical Editor