

The Amazing Expanding Waistband
Strategically placed elastic in a non-elastic waistband ensures comfort all day long
Do you ever wish you could loosen your waistband at the end of the day, even though it fits perfectly fine that morning? Most people’s waist measurement increases slightly as the day goes by, only to shrink again by morning, and many better-quality, ready-to-wear garments have expanding waistbands to accommodate fluctuations of up to 21⁄2 in. It’s easy to transform an ordinary waistband pattern into an expanding one without losing the professional look of a tailored band. The secret lies in two small sections of strategically placed elastic within an ordinary, smooth waistband.
How much room is enough?
First, you need to know how much your waist changes size on an average day. Measure your waist (at the level where you like your waistband to sit) in the morning, noting both your sitting and standing circumference, then remeasure that evening, both sitting and standing. If you feel that your measurements change weekly as well, measure several times over the course of a month. If your fluctuations are more than 3 or 4 in., you’ll need to consider an elasticized back band or perhaps a fully elasticized band (see Threads No. 54, pp. 36-37 for more detail). Here are my measurements, for example, AM, standing = 29 in.; sitting = 30 in. PM, standing = 30 in.; sitting = 31 in.
Use the largest measurement as the finished length of your new waistband, and the difference between the largest and smallest measurement as the amount of stretch, or ease, you need to add (31 – 29 = 2 in. of ease in my case).
Divide the ease by the number of seams
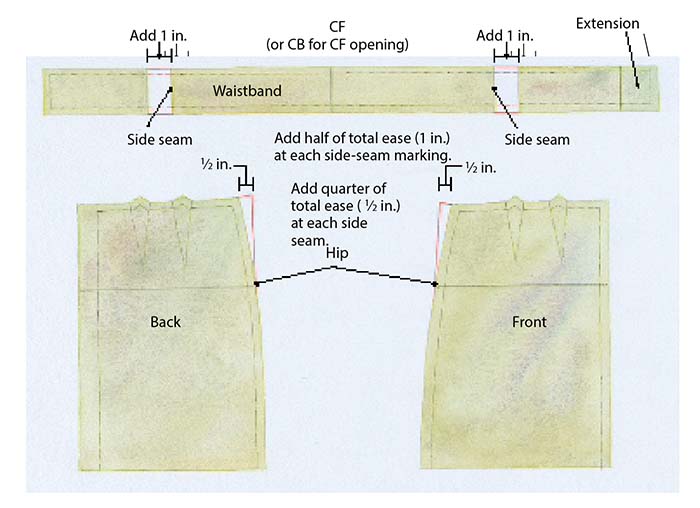
To take advantage of the extra length you’ll add to the waistband, you also need to add extra width at the vertical seams that cross the waistband. You’ll find complete instructions on making these simple changes to your pattern in the drawing at the upper right. To maintain the balance of the garment, it’s best to distribute the ease equally on both sides of the body, so if your garment has a center-front or center-back opening, add the extra room at each side seam. If you’re making a side-opening garment, you can put the extra at the center-front and center-back seams with the elastic positioned directly above. The construction steps for inserting the elastic and completing the waistband are shown at the lower right. Here’s to comfort!
Building in comfort
Altering for Expansion
These examples assume 2-in. total ease required, and center-back opening. Insert your own measurements, and add ease to centers for a side-opening garment, to personalize the directions.
Inserting Elastic
Interface waistband as you prefer and attach it, right sides together, to garment. Apply elastic to facing half of waistband.
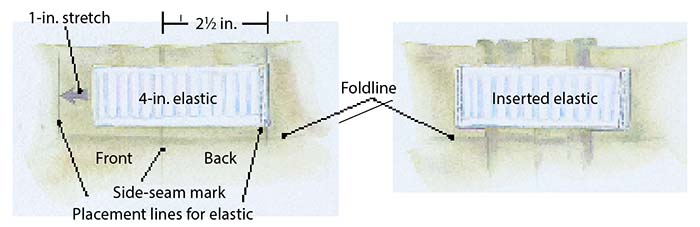
1. Cut two 4-in. pieces of no-roll elastic (no matter what your ease measurement is) that’s slightly narrower than the width of the finished band.
2. Add half total ease needed to 4 in. (1 in. + 4 in. = 5 in.), then mark the band facing 21⁄2 in. (half of 5 in.) on either side of each side seam.
3. Stitch ends of elastic to markings on waistband facing, creating 1-in. excess. Repeat on other side of band.
4. Finish waistband ends as directed in your pattern.Turn waistband facing under and stitch from right side in ditch of waistband/ garment seam, catching fold. Stretch elastic inside band as you stitch over side seams.


Log in or create an account to post a comment.
Sign up Log in