

Top Down, Center Out: Practical Pants Fitting
Try this logical and practical method
Fitting a pants pattern often takes a familiar pathway: You enthusiastically begin with a sewn mock-up. You evaluate the muslin and decide on needed alterations. In the next round of fitting, a different issue emerges and you correct for that. But instead of showing steady improvement, the fit may be even less satisfactory on a subsequent round. You’re on a frustrating downward spiral of pants fitting. Every fix has unintended consequences that affect another part of the pants.
A sensible approach
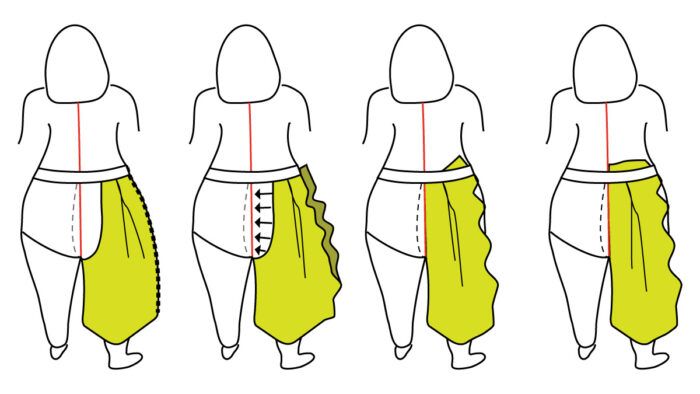
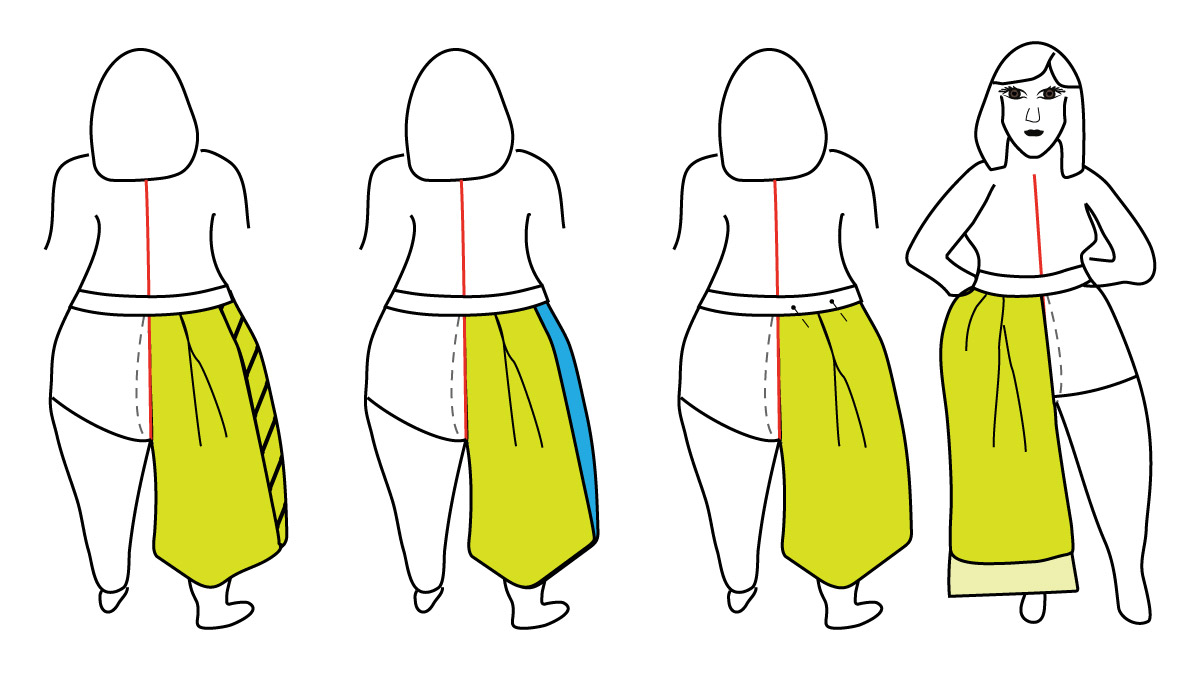
I’ve developed a fitting method I call Top Down, Center Out (#TopDownCenterOut), a holistic, body-neutral approach that takes you from pattern to garment with only one muslin test garment, or toile. As the name suggests, you’ll start at the top—the waistband—to set the crotch seam position, and then fit outward, working from the center out to the side seams.
This method is incredibly simple and realistic to execute solo. It makes pants fitting accessible for novice sewers and streamlines the process for established sewers. It makes it possible to fit any body shape in any pattern.
Fundamentals of fit
The most important principle in pants fitting is to respect the fabric grain, so the finished garment reflects the intended design. A lot of pants-fitting advice fails because, while it may smooth the silhouette and remove excess wrinkles, it ends up sacrificing the design in order to fit the body.
Accuracy and precision are also important. Pants must allow ease for body movement but also keep the ease correctly distributed around the torso and legs. Even a small amount…
Start your 14-day FREE trial to access this story.
Start your FREE trial today and get instant access to this article plus access to all Threads Insider content.
Start Your Free TrialAlready an Insider? Log in


So refreshing to see a bit of out-of the-box thinking on this topic! Got to try it!
No horizontal or vertical balance lines? All the adjusting and moving of fabric to create the perfect toile may skew the grainline if there's no reference point as to how the fabric has been moved, won't it? Perhaps I missed the part about adding HBLs & VBLs. I'll re-read the article to make sure I didn't miss anything.
I had the same thought and wondered if using a balanced stripe or gingham fabric (weaved that way not printed) might solve that issue if used for the toile.
She is talking about starting from a commercial pattern, which will have the grainlines on it. For my own adjustments, I have to add a high hip and shorten the center back. This cants the upper part of the pattern, so I have been using the original straight of grain in the legs, and extending it upwards through the altered upper portion. I then redraw the dart parallel to that. Since my body is curved, the sewn pants do hang on the straight of grain. I hope I have correctly understood your question and that this helps.
This seems quite easy and
I'm always open to new ideas but there is no mention on how and when to adjust the rise. Am I missing something?
I believe the waistband placement will determine your rise. Then moving the pant up or down to get the crotch placement correct. This is why she has us adding 2" to the top of the pant waist seam, to have enough to play with. This really seems like the most efficient way to fit that I've ever seen. Thank you Ruth and Threads!
The rise is kinda the whole point as I see it. You are adjusting the crotch level first and then attaching to stable waistband. Rise is then set exactly to comfort level.
This is so practical - and intuitive. The problem for most of us is that our bodies don't follow smooth volume lines like a ellipse, sphere or a cylinder and the transitions/proportions between those basic forms vary widely along the surface of the body. This method takes all of that into account along with how a fabric drapes across uneven surfaces. That is the key to a great fit that enhances a figure rather than pulling at an unusual transition point or exaggerating volume to cover up a difficult transition. And the waistband is so important to fit first like the shoulder line on a bodice - it creates a base for the vertical drape. I can't wait to try this method.
What an excellent article. I hope to see a lot more of Ruth in the future. She has a lot of information in her Instagram that could make wonderful full blown articles! She has the kind of technical approach that I wish I saw more often in the home sewing community. Please write more!
Hi,, Im dying to try this out.....one question though, obviously the waistband is key, so how do you consider the style of the trousers with where you decide your waistand is? for instance is it for example a high waisted pattern you fit your waistband where you would like a high waistband etc? you cant just have one waistband for all styles I imagine?
You would start with the waistband at your natural waist ( what you are referring to as “ high”). Once you have your pattern revised as she lays out, you can always lower the waistline to wherever you want and make a new waistband pattern that is the correct length for the new circumference. Hope that makes sense.