
A New Way to Pleat Fabric
Add texture to fabric using fusible interfacing, string, and a large cardboard builder's tube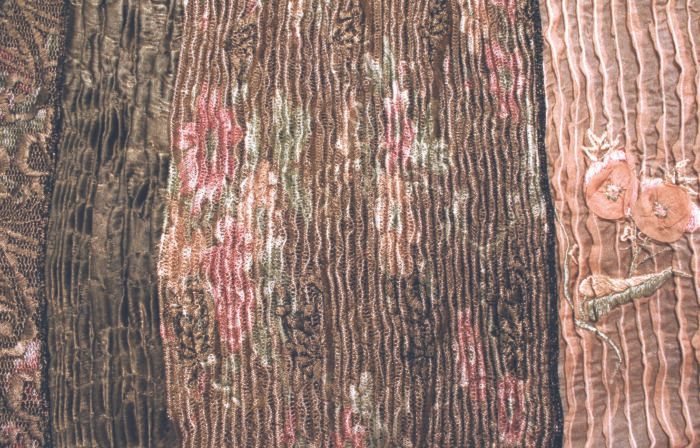
A couple of years ago, I learned of designer Janet Kaneko Loo’s pleating method for garment design inspired by the centuries-old Japanese method of dyeing, called shibori. In shibori, the fabric is tied, bunched, folded, clamped, or otherwise controlled so dye can’t penetrate the tightened areas, resulting in patterns on the fabric. Sparked by Janet’s idea, I set out to develop my own version of shibori pleating by winding string around a fabric wrapped tube, then pushing the fabric and spiraled wraps of string up the tube until pleat-like rows of fabric fold over the string. After some experimentation with this technique, I realized that I could get a wonderfully textured, three-dimensional surface that mimics pleating, with the texture secured by fusing interfacing on the back of the wrapped fabric before cutting it off the tube.
I then used the fabric, without removing the string, to piece with other pleated or unpleated fabrics and to create trim fabric, tame a large print, provide modesty in a sheer fabric, or add strength to a lightweight fabric. I’ll show you the pleating and piecing process in detail, and also explain how to assemble a garment in a way that finishes both inside and outside.
Shop at the builder’s-supply store
My pleating technique uses a tu be that’s roughly 12 in. in diameter and at least 2 ft. long, with a circumference of approximately 38 1/2 in. The tube’s circumference dictates the maximum length of your pleated strips-a larger circumference yields a longer strip, and a smaller circumference, a shorter strip. I’ve found that most builder’s-supply stores, such as The Home Depot, sell inexpensive 12-in.-diameter cardboard forms that are used as forms for poured-concrete columns, and they’re perfect for this process (note, however, that the measurements on these builder’s forms are approximate, so, to figure your final lengths most accurately, measure the form yourself).
While you’re at the supply store, also buy a roll of kite string and masking tape. And, of course, you’ll want to make a trip to the fabric store for fusible interfacing (I use nylon knit fusible) and fabric for pleating.
Pleating Fabric on a Cardboard Tube
Making shibori-inspired pleated fabric involves working on a cardboard tube (see text for size and source details). Note that all of the steps in the process are shown here on a single long tube for reasons of space.

1. Make fabric tube
Cut a n d seam fabric into a tube, using measurements at top right and 1/4-in. seam allowance.
2. Place tube on form
Pull fabric tube, face down, over cardboard tube, and tape fabric to top of tube with masking tape.
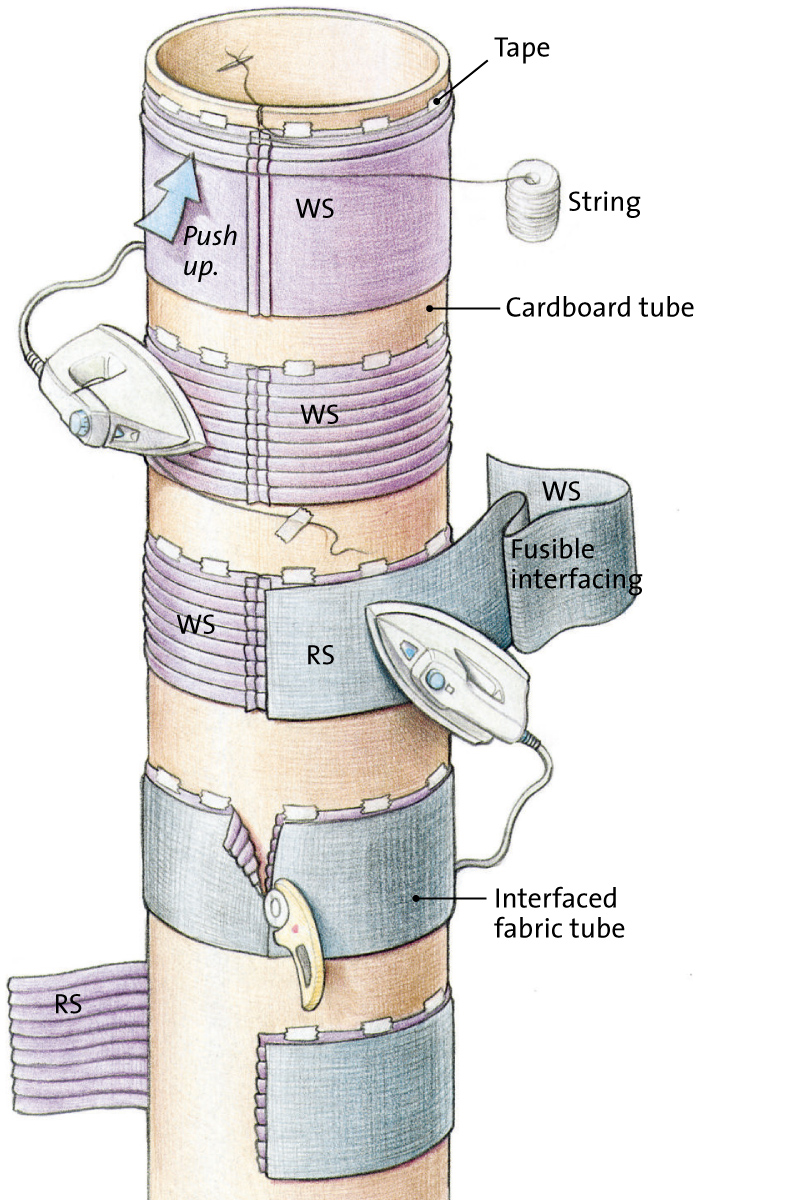
3. Anchor and wrap string
Anchor end of string to top of cardboard tube, and wrap string tightly around tube twice.
4. Make pleats
Push fabric over wrapped string to form pleats, repeating process until width of fabric is fully pleated.
5. Press pleats
After securing string tail to tube with tape, press pleats in one direction.
6. Fuse interfacing to pleats
Fuse interfacing (following manufacturer’s directions) to pleated fabric still on tube, starting at tube’s seam and working carefully around tube.
7. Cut fabric off tube
Cut through seam and strings to release fabric from tube.
8. Press fabric on both sides
Remove pleated fabric from tube and press on both sides.
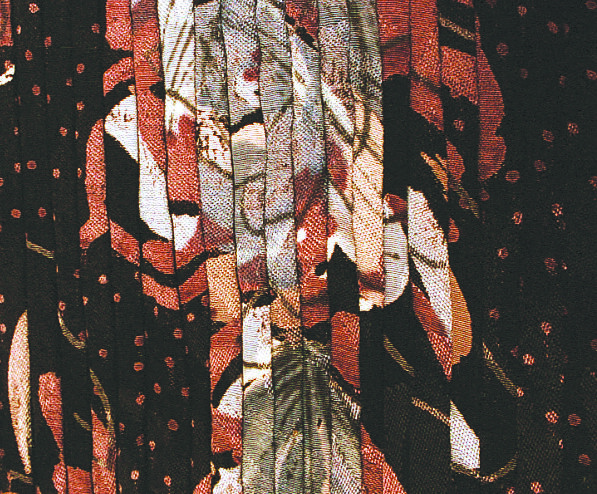
Soft, lightweight fabrics pleat best
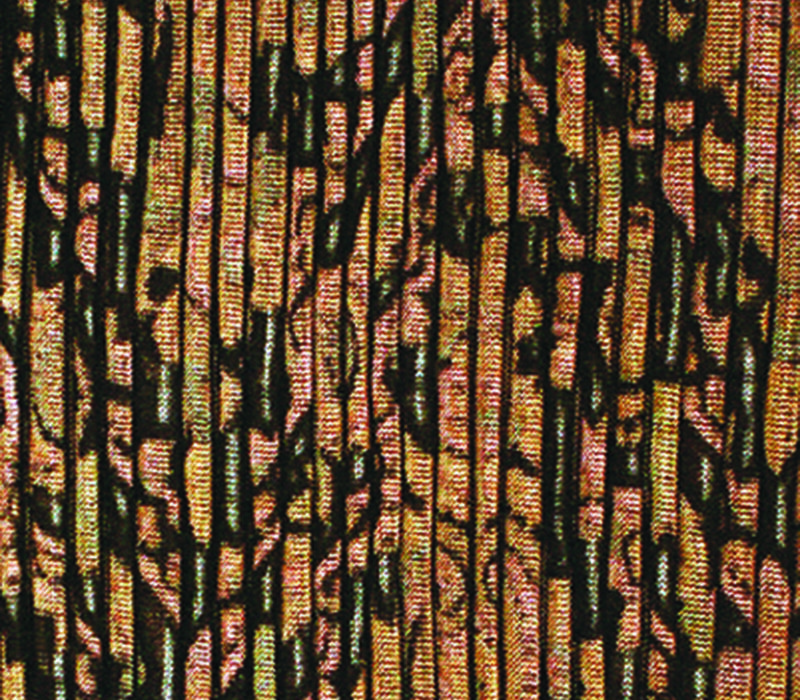
I like to use fabric that’s lightweight and made of natural fibers, such as silk and rayon, for pleating. I’ve had problems with shiny polyester not adhering to iron-on interfacing successfully, but I’ve seen very nice results from other synthetics. Soft, sheer fabrics pleat very well.
Experiment with various fabric scraps to get a feeling for how different fabrics-both solids and patterns-pleat. This pleating technique will make good use of that large, bold print that’s been in your stash for years. You’ll be surprised at how different patterns look when broken up by these textured pleats.
|
|
|
|


Wrapped string is at the heart of the process
In a bird’s-eye view of the process, this pleating technique involves making a fabric tube and pulling it over a cardboard tube, then wrapping the fabric with string, sliding the fabric over the string wraps to pleat it, and fusing the back of the fabric with interfacing to lock in the pleated texture, as shown in the drawing on p. 49. I suggest pleating test samples to explore the pleating process before using a special fashion fabric.
To make the fabric tube, first establish the length to cut the fabric by measuring the circumference of the tube and adding 5/8-in. (for two 1/4-in. seam allowances and 1/8-in. ease). Start with a piece of fabric 10 in. to 15 in. wide for your test sample, that’s cut to length on the straight grain (many fabrics pleat better when cut so the pleats run with the grain).
After cutting the fabric to size and with the right sides together, machine-baste the fabric’s short ends together using a 1/4-in. seam to form a tube. Then pull the fabric tube, wrong side out, over the cardboard tube. The fabric should fit freely over the tube, but without too much excess. If the fabric is too tight, it will be difficult to create pleats, and if it’s too loose, it will gather up rather than pleat.
Secure the fabric around the top edge of the tube with masking tape. Next, anchor the end of the kite string to the top of the tube with tape or knot the end and fasten it in a slit cut in the cardboard edge.
Holding the string taut, wrap it around the tube starting about 3/8 in. from the top edge. Wrap the string a second time around the tube, and then, with each consecutive wrap, push the fabric up over the string to create a pleat. The weight of the fabric and how closely you wrap the string determines the depth of the individual pleat and ultimately the width of the final pleated piece. Wrap evenly, with consistent distance between wraps if you want the pleats to be the same depth. Decide how densely you want to pleat the fabric. For example, the photos above and on the facing page show a variety of pleats from dense to sheer and shallow.
Make the pleats even, and keep the basted seam straight as you wrap (it tends to move during wrapping). Repeat wrapping and sliding up the fabric until the full width of fabric has been pleated. If the pleating is too dense and pleats bunch up over each other, the interfacing won’t hold them in place. If you don’t like the pleated results, put more or less space between the string wraps, or unwrap the string and start again.
When you’ve finished pleating your fabric, iron the pleats in one direction on the tube. Then, starting at the seam, fuse the nylon tricot interfacing to the back of the pleated fabric, as shown in the drawing above. Follow the manufacturer’s instructions for fusing, working around the tube and back to the seam. Then cut through the string wraps and the seam to release the pleated fabric from the tube, and press it again on both sides.
Before you continue, decide if your pleated creation is going to need any extra help or support in order to hold the pleats secure. For example, I pleated a patterned net lace that didn’t want to stay pleated, so 1 anchored the pleats by freemotion machine-stitching over the pleats to secure them.
Variations on Basic Pleating
The drawing above shows how to pleat a single fabric, but you can also pleat more than one fabric at a time or piece several fabrics to create the fabric tube, then selectively pleat the pieced fabrics.
Piece and pleat as one

Sew the fabrics right sides together; trim the seam to 1/8 in.; and press it flat. Form the fabric tube as usual and pleat. The results look like striped pleats.
Piece and selectively pleat fabrics

Piece the fabrics together to make the tube, then pleat some sections and leave other sections unpleated.
Mirrored pleating

When you want two mirrored lengths of pleated fabric at the center front or back of a garment, prepare and pleat the fabrics, then press the two sides in opposite directions before fusing with interfacing.
You can piece the pleated sections, too
Fabrics pleated in this way aren’t large enough to cut a whole garment from one section But even if it were, pleating changes the hand of the fabric so it no longer drapes as it did when unpleated. Therefore, a garment made entirely of this pleated fabric would likely look stiff and unpleasant. Consequently, the solution is to strategically piece the pleated fabric with other fabrics, whether they’re coordinating, pleated, unpleated, or complementary arrangements of texture, color, and design. Fabrics can be pieced before or after being pleated. When piecing fabrics after they’re pleated, I like to join them with a seam on the right side to clean finish them, as explained in the drawings on the facing page.
You can incorporate the pleated fabric into garments in various ways: (1) Pleated fabric pieced to flat fabric, (2) pleated fabric pieced to pleated fabric, (3) pleated fabrics cut diagonally and pieced together to create a chevron effect and (4) pleated fabrics cut and pieced in different directions.
|


Choose a simple pattern and design your garment
You can incorporate pleated fabric into almost any garment. I suggest choosing a very basic jacket or vest pattern without darts or a collar. To help design and coordinate the placement of your pleated inserts, draw the areas you want them to go on your pattern.
As you can see in the detail photos at left, the pleated sections of your fabric don’t have to run parallel to each other. And, likewise, not all of your pieced sections need to be pleated.
Usually pleating adds enough weight to the fabric that the garment doesn’t need extra lining fabric. The fusible interfacing holds the pleating secure and serves as an attractive backing, which nicely finishes the garment’s inside. But if you want the fabric to have more weight, interface each piece of fabric with another lightweight nylon tricot interfacing.
The way I piece the pleated sections together finishes the inside of the garment and adds one more embellishment element to the surface: Cut your piecing shapes to match the piecing designs you made on your tissue pattern, adding a 1/4-in. seam allowance to each cut edge. Using the Hong Kong method described in the drawings at the bottom of this page, finish the seams on each pieced section. After piecing the fabric, lay the pattern piece over it to make sure your design lines match at the seams, and then cut out the pattern’s shape. Then sew and finish the actual garment as you normally would, using a serged, flat-felled, French, or Hong Kong seam finish, whether mine or a traditional one.

Try it out!Making pleated fabric to piece with other fabrics for a pillow is a great way to try out this process. Since the 9-1/2-in. by 40-in. fabric I started with was too small to use a builder’s tube, I wrapped and pleated it instead on a 3-in. diameter mailing tube, which worked fine. Then, using the “Hong Kong” finish described on the facing page, I joined the pleated and flat fabrics. |
Finish the edges with lace binding
To finish the raw edges of the neck and jacket fronts, I like the results and weight of a wide lace binding: First, fuse interfacing to the wrong side of the lace, then cut strips 2 1/2 in. wide and long enough to complete the binding. I don’t cut the the lace on the bias because, generally, it has enough stretch to go around any curves. Fold the lace strips in half lengthwise, wrong sides together, and press. Sew the lace to the garment’s edge from the right side the same way you would sew bias binding with a 1/4-in. seam allowance,then wrap the lace binding around the seam’s raw edge and stitch by hand to the back.
Once your remarkable garment is assembled, be creative with closures. I love to shop in antique and thrift stores for interesting buttons or earrings to use as closures on my jackets.
Shibori pleating is a process to have fun with. An element of the unexpected is always present, and the opportunity to combine fabrics and embellishment is rich with possibilities.
My Hong Kong Seam Finish Sit on the Right Side
This method sews the seam to the garment’s RS and encases it in lace to look like a piped embellishment, clean-finishing the inside.

1. Stack fabric sections WSs together. Top with lace strip WS up, cut 4 -in. -wide and as long as the longest seam. Seams will be pressed toward the bottom fabric when finished, so plan your layout accordingly
2. Stitch a 1/4-in. seam through all three layers, and trim seam allowances (s.a.s.) to 1/8-in.
3. Press lace over and wrap snugly around s.a.s.
4. Stitch-in-the-ditch.

5. On reverse side, trim unbound lace close to stitching line (save it to use on next seam).
6. Press seam toward its unfinished side, and edgestitch free edge to hide lace ‘s raw edge and complete binding.
Patricia Congleton teaches and designs her remarkable garments in Diamond Bar, California


Log in or create an account to post a comment.
Sign up Log in