
Learn to Sew Artistic Buttonholes
Add embroidery, beads, or both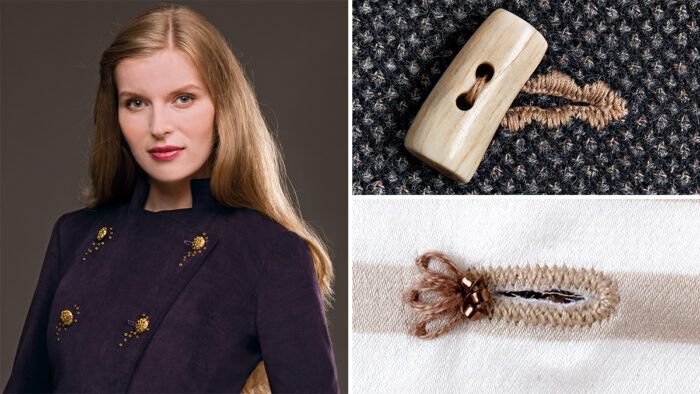
Buttons often serve as decorative elements on a garment, and they deserve equally attractive buttonholes. A great way to enhance buttonholes, whether stitched or bound, is to embroider or bead the openings, or even combine the two. I have come up with several creative ways to beautify buttonholes.
Before working on a garment, test the buttonhole embellishment in the chosen fabric to make sure it pleases you and that it is the right size to complement the button.
If you can sew whipstitches, buttonhole stitches, blanket stitches, straight stitches, and chainstitches, you already have the necessary skills for embellishing buttonholes. I’ll show you how to use these simple hand stitches and others, as well as beads, to add interest and detail to buttonholes.
There’s no reason buttonholes must be purely functional. Embellishment puts extra emphasis on the garment’s closures and turns them into decorative, eye-catching elements.
Prepare the base buttonhole
Most quality sewing machines make even, neatly stitched buttonholes. You can sew the buttonholes by machine or by hand, or by combining the two. Test these options on the selected fabric to evaluate the results.
Machine-stitched or hand-worked buttonholes
|
|
|


| Sew a base buttonhole by machine or by hand before adding embellishment |
I prefer to work a hand-stitched buttonhole atop a narrow machine-stitched buttonhole, because the machine stitches compress the fabric and eliminate most fraying when the buttonhole is cut.
Sew the base buttonhole to the necessary length by machine with a short, narrow zigzag or satin stitch.
If you create the base buttonhole by hand, first straight-stitch a rectangle to delineate the buttonhole shape. Then cut the opening, remove a few threads from the edges, and hand-sew closely spaced blanket stitches.
Choose a thread
Base buttonholes may be stitched with standard sewing thread or with buttonhole twist. Buttonhole twist is strong and smooth and is ideal for sewing hand-stitched buttonholes.
Silk buttonhole twist creates a particularly beautiful buttonhole, but it can kink and twist easily. To reduce snarls, thread the needle before cutting from the spool, then let the thread hang for a few seconds to unwind; run your fingers down the thread a few times to smooth it, and knot the end.
The fabric’s weight determines how many thread strands are necessary. Use two strands of regular sewing thread on a lightweight blouse. Use two strands of buttonhole twist on a winter coat in a heavy, lofty fabric. Make a test buttonhole to help determine the best thread type and the number of strands to use.
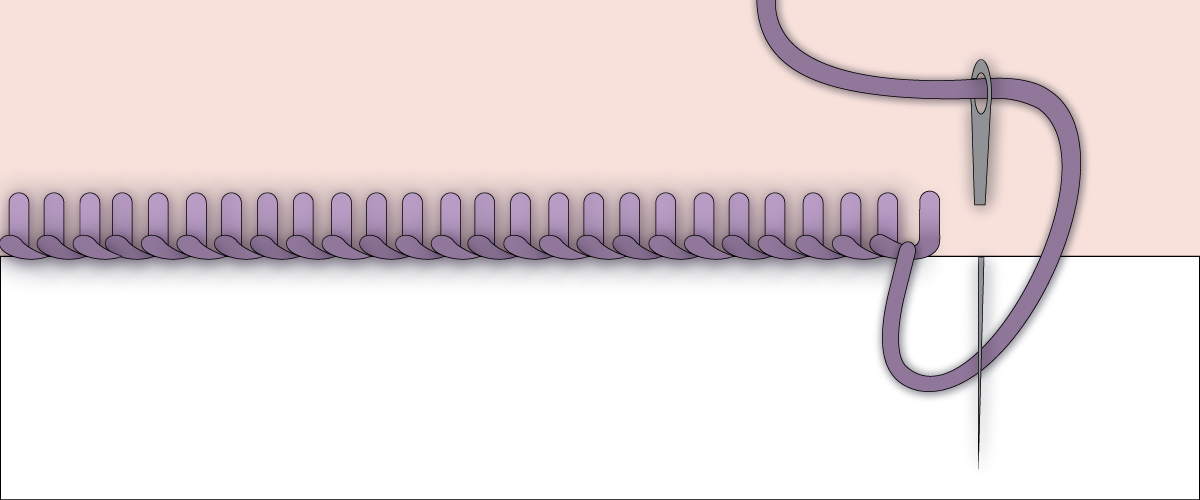
A whipstitched buttonhole

The simplicity of whipstitched buttonholes can be pleasing on a simple garment. Create a chevron effect by slanting the stitches in the opposite direction on each half of the buttonhole. Or slant them in the same direction across the buttonhole opening for an interesting railroad effect. Use the same thread color for each side of the buttonhole, or use contrasting colors.
Secure the thread at one end of the base buttonhole, on the garment’s wrong side. Whipstitch along the first buttonhole edge to the opposite end; secure the thread on the wrong side. Repeat on the second buttonhole edge.
|
|
|


A scalloped buttonhole
Variations on a blanket stitch can create scallop shapes. It’s as simple as sewing the stitches in different lengths.
For high-profile scallops: Start at one buttonhole end with a few stitches about 2.0 mm long, increase the stitch length to about 5.0 mm, then decrease the stitch length again, creating a rounded “peak” about
1.0 cm long. Repeat, continuing around the buttonhole end and along the remaining edge.
For scallops with a slimmer profile: Stitch in the same manner as described above, but with blanket stitches from 1.0 mm to 3.0 mm. This yields a shorter “peak” about 0.5 cm long.


Tip: Extra support for heavy buttons
Use one strand of Nymo (a thin, strong beading thread) with two strands of sewing thread to attach buttons to a garment.
A checkered buttonhole

Sew blanket stitches with different-colored threads to create a checkerboard effect. This visually blends buttonholes on plaid or printed garments, which, when sewn in solid colors, can be obtrusive. Use two threads that match the plaid or print colors to make the buttonhole blend into the fabric. For tweed fabrics, use two strands of sewing thread in the tweed colors.
Thread two needles, each with a different color. Knot one thread and secure it on the garment’s wrong side at one buttonhole end.
Sew a few blanket stitches in the first thread color. Skip an equal-sized space for the second color, and sew the same amount of stitches in the first thread; continue alternating blanket stitches in the first thread and blank space for the second thread to the end of the buttonhole. Repeat on the remaining edge.
Knot the second thread and secure it at one buttonhole end on the wrong side. Pass the second thread under the stitches on the wrong side to the first blank space. Pass the thread through the top of the last stitch made in the first thread, and sew blanket stitches in the second thread to fill the space. Continue in the same way around the buttonhole in the second thread.
Once the buttonhole is complete, anchor both thread ends on the garment’s wrong side.
A framed buttonhole
Don’t limit embellishment to the buttonhole itself. There are many ways to create “frames” around a plain buttonhole to draw attention to the button. Use multiple strands of shiny silk or rayon thread or embroidery floss, or stitch beads to frame the buttonhole.
Running stitches

Sew running stitches in a shape that contrasts with the button’s shape, such as a triangle or rectangle, and in a color thread that draws attention to the button.
French knots
 |
 |
A scattering of French knots in metallic thread can frame a crystal button in a fabulous way. Or substitute seed beads for the French knots.
Chainstitches
 |
 |
Chainstitches create a fancy frame with a raised texture, which creates a beautiful interior finish on a bound buttonhole.
After sewing a bound buttonhole, chain-stitch around the opening’s perimeter on the wrong side, securing the buttonhole lips’ raw edges to the garment’s wrong side. Add a few lazy-daisy stitches (see below) to reinforce the buttonhole and cover any cutting errors.
To show off this embellishment, work the bound buttonhole to the garment’s right side instead.
Lazy-daisy stitches
 |
 |
Embroider a whole or partial lazy daisy at one or both ends of a standard machine- or hand-stitched buttonhole.
There are many ways to play with a lazy-daisy stitch:
- Sew it in thread that matches or contrasts with the buttonhole thread.
- Stitch a half lazy daisy at just one end of the buttonhole (shown), or at both ends.
- Stitch a whole lazy daisy at one or both ends.
- Stitch a large, whole lazy daisy centered on the buttonhole, making the button its center.
- Add a few beads to accent the petal shapes, either at the petal points or at the petal bases (shown at right).
Ruth Ciemnoczolowski teaches creative sewing and embellishment techniques.


Log in or create an account to post a comment.
Sign up Log in