
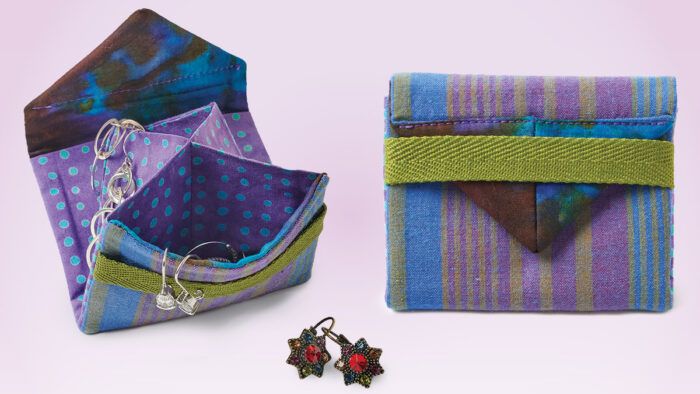
DIY Project: Earring Envelope
Sew a stash-busting holder for trinkets
Sometime in my early 30s, I was informed by my mother that we, meaning my family and the families of my four siblings, would no longer be buying Christmas presents. We would instead be making all of our holiday gifts. Sounds charming, doesn’t it? What followed were years of brain-wracking to come up with yet another handmade something that could be put together in less than two weeks, because—even though we knew Christmas would come around at the same time every year—we never got it together before December 15. But mom was resolute, and no amount of whining or pleading would move her. The tradition was established.
A few years ago, I came up with one of my most successful handmade designs: earring envelopes. I made a batch of them for all the women and girls; they are great for anyone who wears earrings, of course. They are quick to sew and truly scrap-busting projects.
These diminutive portfolios include five small pockets and are perfect for packing jewelry when you travel. You can customize the measurements if you want to make an envelope for lingerie, scarves, or other flat-folding items.
I stocked each of mine with a pair of earrings that I was no longer wearing. Christmas afternoon turned into an earring swap meet as everyone picked out their favorites. Whether you sew these to give or as a present for yourself, I hope the making and giving create a warm memory. Happy handmade holidays.
Cut the Fabric
Start by cutting the outer and inner layers. Now is the time to revise the dimensions if you prefer a different size or shape.
Materials
Choose three coordinating fabrics: pocket insert, lining, and exterior. Quilting cotton or other lightweight, stable fabrics are best.

Cut and mark the fabrics as follows:
Pocket insert: 10-1/2 inches by 8-3/4 inches; mark the short edges A.
Lining: 8 inches by 3-1/2 inches; mark stitching line B at 2-3/4 inches from one short end on the fabric’s right side.
Exterior: 8 inches by 3-1/2 inches; mark the ribbon placement 3⁄4 inch from one short end on the fabric’s right side.
Lightweight fusible batting: 7-3/4 inches by 3-1/4 inches; center and fuse it to the exterior fabric’s wrong side.
Ribbon: 3-3/4 inches; choose a ribbon or trim that’s about 1/2 inch wide.
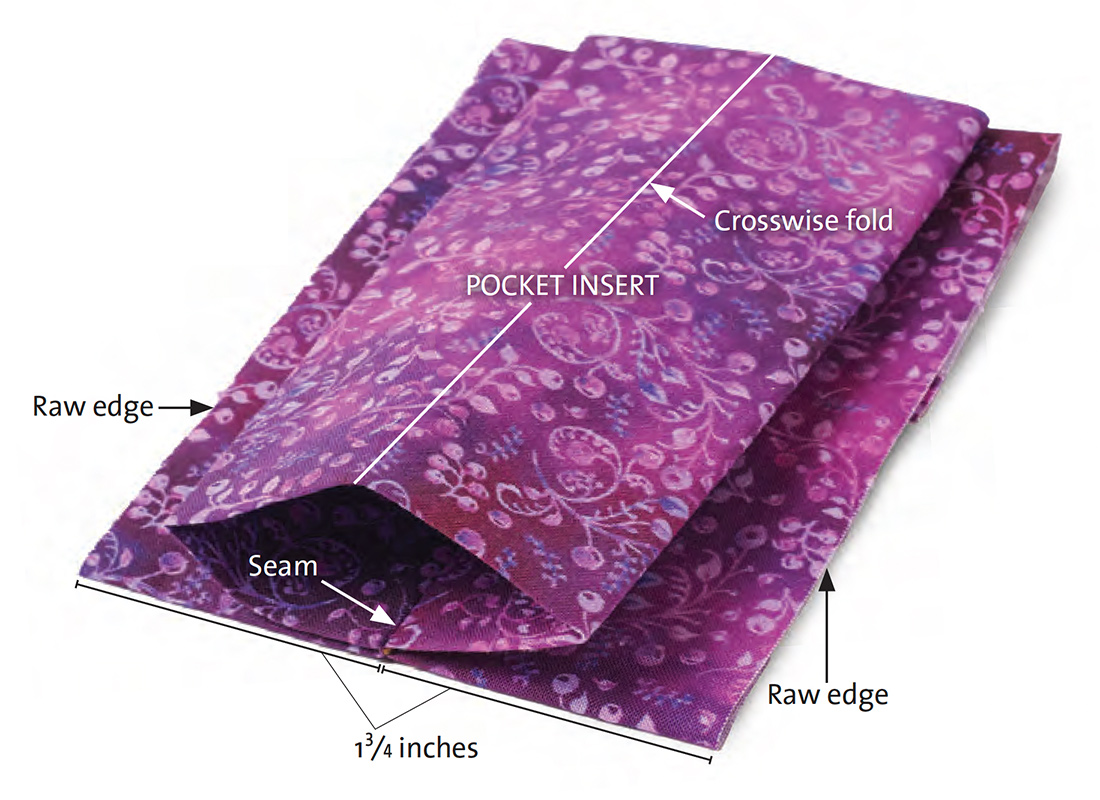
Prepare the Pocket Insert
Clever folding turns a fabric tube into a series of pleated pockets. All seam allowances are 1⁄4 inch wide.
1. Create a fabric tube
With right sides together, fold the pocket insert piece to align the two A edges. Sew seam A to form a tube, and press the allowances open. Turn the tube right side out, centering the seam on one side. Press the tube flat.
2. Fold the tube in half crosswise
Make sure the seam is on the inside and the raw edges are aligned. Draw a line parallel to and 1-3/4 inches from the raw edges. Stitch along the marked line.

3. Separate the raw edges
Pull them apart and center the tube’s crosswise fold on the seam you just sewed. Press the work flat.
Assemble the Envelope
Attach the pocket insert, then join the exterior and lining layers.
1. Mark the pocket insert
Draw a line, perpendicular to the raw edges, to mark the horizontal center.
2. Position the insert on the lining
Place it on the lining’s right side, with its center line aligned to line B. Pin, then sew along B.

3. Pin the ribbon
Lay it on the placement line you drew on the exterior piece. Pin the ends, aligning them with the long edges. The ribbon doesn’t lie flat; the ease provides room for tucking the envelope flap later.

4. Join the exterior and lining
With right sides together, pin the lining to the exterior piece along the long edges. Make sure the pocket insert and the ribbon are at the same end, and pin that end closed. Stitch the long edges, catching the pocket insert sides and the ribbon ends in the seams. Then stitch across the pinned short edge, without catching the pocket insert in the seam. Leave the remaining short end open.

5. Turn the work right side out
Trim the seam allowance corners, turn the work through the open end, and press it flat.

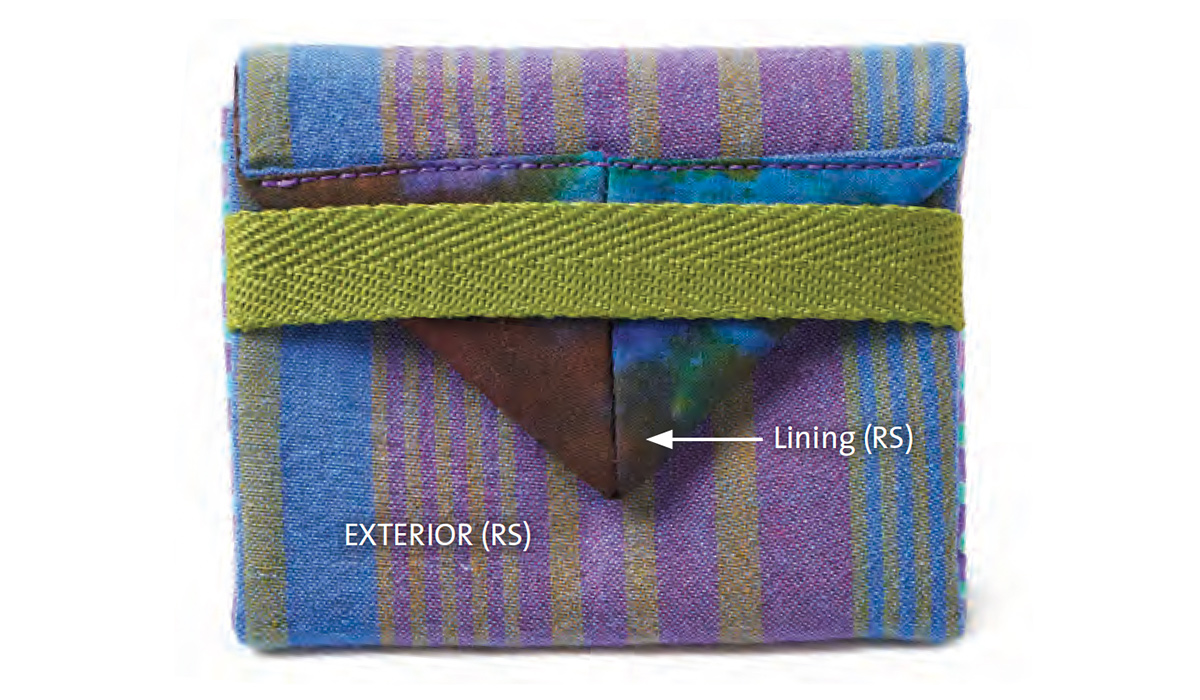
6. Sew the flap point seam
With the lining sides together, fold and pin the open end in half. Sew this seam.

7. Complete the flap point
Press the seam allowances open over a point presser; clip into the fold to flatten the seam allowances thoroughly. Turn the flap point so the lining shows on the exterior. Press, then edgestitch to secure the flap edge.

8. Slipstitch the pockets
Fold the envelope closed to align the inner pocket side folds, then slipstitch them together. This forms the five pockets.

9. Press to finish
Fold the envelope closed, tuck the flap point under the ribbon, and press.

Becky Fulgoni never lets an opportunity to be creative pass her by. Read her contributions at ThreadsMagazine.com
Photos: Mike Yamin


Am I crazy, or does the fabric change in the photos during this project? I ask because I was trying to follow based on the images....
Images with similar fabrics would make it so much easier to follow!
The fabric for the finished piece is different, as the item was made from scraps. However, the same set of fabrics is used throughout the steps. We chose different prints for the lining, pocket insert, and outer fabric so you can tell them apart, as well as working with quilting prints, which have a clearly different wrong side.
Carol Fresia, Threads editor
This is a unique design and really fun to make as well as a way to use some scraps. I'm having a problem with the line on the lining fabric where you sew the center of the pocket insert. It seems to be a little high. Shouldn't it be at least 2 3/4 inches down? The picture looked like the pocket top was about 1/2 inches from the top edge, so that it what I did and it worked well. I made a second one to check my process and this time left out interfacing on the the top 2 inches to eliminate bulk in the triangle fold over part. I also plan to add a snap at the point for extra security. Thanks Becky for the idea.
Indeed, the seam that joins the pocket insert to the lining, shown in step 2, should be 2 3/4 inches from the top edge, as marked in the cutting instructions. It may not look to scale in the photo--I'm not sure why as I did measure and place it there!
Your idea of omitting the batting in the point section is smart. I also found, when making a set of these, that you get better results with a very thin and light batting. I had a couple of varieties in my stash (unmarked--I have no idea what they are, I'm sorry to say!), and the thinner polyester type worked better.
Carol Fresia, Threads editor
I found it a little difficult to follow with the different fabric choices. I tend to learn more from video demonstrations than written directions even video without narration. I get the gist of it and will likely have to try one to figure out what this person is describing. Cute idea for scrap use though. Fun gift for Christmas.
I am just a hobbyist, not a designer or math professor. This seemed like a cute, easy project but the directions are so very poor that it hasn't been much fun. I came to the website to see if there was clarifying information and was feeling pretty stupid for not being able to figure this out but reading the other comments tells me I am not alone. Another photo at point 2 and 3 would be helpful and a final product in the example fabrics should be included.
After a while... Completed two of these. The suggestions above by osewviolet should be considered when making this project. Reducing bulk in the flap and a snap are very good improvements.
These first two will work well for storage since they aren't fancy enough to give as a gift. I will definitely make this again, next editions should be pretty enough for gifting and I will move forward in my sewing wiser for the experience. Thanks ya'll!
kshavo,
Thanks for your comments. I was pretty excited about the idea and felt a bit uncertain in creating it, hoping it would just come to me as I made it. Some did, but other parts did not. I agree that photos of the other steps should be included even a short video would have been really awesome. I can see these being a great scrap buster and quick and lovely gifts for any occasion. I have been sewing for a good many years, create everything from custom men's shirts, Quaspeks/Kuspuks, vintage style aprons/dresses. I typically can follow any instruction very well. This one just baffled me a bit.
Hi, kshavo,
I'm so glad you persevered and figured out the process. It's not too tricky once you have the fabrics in hand and are manipulating them. We'll try to add a photo of the finished piece in the step-sample fabrics. I gave that sample away already but I think we have a shot of it somewhere!
One of the things I enjoyed most with this was digging around in my stash and coming up with interesting fabric combinations. I don't wear that many prints or bright colors in my clothes, so it was fun to play around in this small format.
Best,
Carol Fresia, Threads editor
So disappointed. I attempted to make a few of the envelopes forChristmas gifts but the instructions were so awful that I was not able to complete them. I have been sewing for many decades making much more complicated projects successfully. The instructions just aren’t clear or accurate. I wish that the author would clarify the instructions so that I could complete the envelopes as it’s really a great idea.
I enjoyed making this and appreciate the design. I did not have any trouble with the instructions, but having read other reviews was super careful to pay close attention. A great little gift to hold a small item. Am planning to make myself one for weekends away.