
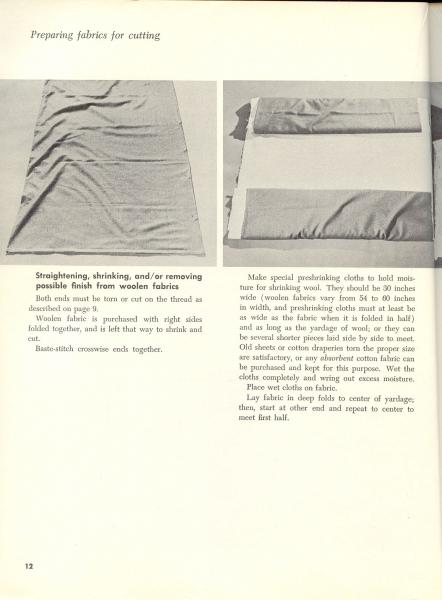
1959 BISHOP preparing fabric for cutting
rekha
| Posted in General Discussion on
Well, I received this book a few hours ago and I just had to share this information with you about truing fabric which is really an adjunct to the thread on Blocking cloth.
I know some of us have difficulty with the print size, so if you right click on the jpg, and open it in a new window you will be able to enlarge them for easy reading.
Happy reading
Edited 7/30/2008 9:00 am ET by rekha


Replies
Are you finding the information in the book as helpful as I have Rekha? Thank you so much for posting this information.
Altho I considered myself an experienced seamstress, I found that I still had a lot to learn. Straightening the grain, or blocking your fabric often will help avoid so many sewing and fitting problems that crop up due to crooked fabrics. The other one is checking to make sure pattern pieces are truly placed on the straight of grain, and that the fold in fabrics is also on straight of grain. It even makes a difference in how a finished garment looks. I always check sale fabrics to see how straight the grain is as it is unrolled off of the bolt. Sometimes it cannot be straightened, and no matter how cheap, it isn't even good for a muslin if it cannot be trued. Cathy
Edited 7/30/2008 10:50 am ET by ThreadKoe
I just had a shufti and so far the method of truing has be an educational step for me.
The treatment of woollen fabric, however is familiar to me, my mother used to and still does prepare/wash the fabric the way Bishop has described.
I tried to look for any help on resolving armscye problems - couldn't find it in the index.
I am new to this Forums site. However, I had been trained in Bishop Method of Clothing Construction (BMCC)over 30 years ago. I had the wonderful opportunity to learn under the late Kitty Rotruck and the now retired Marie Kehr, whom I consider a dear friend to this very day. I was recently contacted by an on-line sewing friend and she told me about the Bishop discussion on this Forum. Although I have subscribed to Threads for so very, very long----since the beginning of publication, I have never bothered to log onto the Forum. Actually, time is usually my problem. I am a certified educator for Wild Ginger also. In regards to the armscye problem (and I am so happy to see you used the term 'armscye' and not arm hole!!) exactly what is the problem? Maybe I can help. I don't see a description of the exact problem.
If anyone who is getting used to the fabric straightening and grain line, etc and have a problem with knits, let me know. Marie Kehr taught such a wonderful class in the 1970's on strainghtening knits. Yes, the Bishop book is a treasure. Despite some of the quick methods of sewing, never lose the book. You will refer to it time and time again.
As a note--the Bishop Method of Clothing Construction Council (BMCCC)disbanded about 3-4 years ago. However, there are still some chapters that still meet. If you can find one, you will learn a great deal from these ladies. Since the BMCCC was all volunteer, and members aging, the vote to disband was hard coming. I had been a member for over 25 years. Unfortunately, I lived over 800 miles from the headquarters and didn't contribute to keeping it running. The women who put in so many years volunteering to keep the Council going should still be thanked to this day.
Gansettgal
Wow, wow, and more wows and welcome.
Re armscye + shoulders I usually have difficulties with the patterns.
I think I have sloping shoulders and they are shorter than the commercial patterns.
My upper arm is getting fat because of lack of use; I usually get around that by dividing the area into three and slit along the grain line to get down to the elbow. With that I am usually able to add width and compensated on the front and back by lowering the armscye.
BUT do tell me about Wild Ginger: its price, modules, memory requirment.
Please do tell us your method of truing knits - most will be interested
Rekha:
I can't take a great deal of time right now but I will put aside some time tomorrow (July 31st) and give you a run-down on straightening knits. And RE Wild Ginger, go to http://www.wildginger.com. Click on the free demo. It will give you some idea of what the programs will do. They all work the same. Click on the PMBoutique---that's for women. You will not be able to print out a pattern but you will be able to see how it works. Also, you can get a free program called Wild Things. It's accessories and it is free--absolutely free. You can download that and print out some simple patterns to get the feel for the program. It's wonderful. I bought it in 2/04 and wanted to know more and that's how I became a CE. But it is so easy---you don't need much help. Also, they have a fantastic tech support by the name of Karen. She answers within minutes sometimes. One time she answered me on Easter Sunday!!!
I'll be back tomorrow---I have to go wash a part of my house so workers can do some work tomorrow.
Gansettgal
Rekha:
Here is some information on straightening knits. Knits have a grainline. You have to find the lengthwise straight of grain (LSTOG) or the crosswise straight of grain (CSTOG). You cut on this line. You should see a pronounced grainline. If you cannot see a grainline, then get a large T-square or L-square. You can also you lines on your blocking board, if you have a board with a 1" or 2" square grid. Pin the grain-perfect edge to your blocking board. Line up your edges. If there is some bubbling fabric, which means the fabric isn't on grain and most likely it has been stretched. Usually one edge of knit fabric is stretched. Using the heat of a good steam iron and a damppress cloth, you can shrink back the stretch side. This takes a little bit of time but if you are making a nice garment, take the time to do it. If you are making just a t-shirt out of some interlock knit you may find this too much trouble. However, if you have a nice top/dress/pants and you are going to take care in making them, then I recommend straightening your knit. Otherwise, your knit garment may 'grow.' EX:
Back in the 1960's my mother purchased an adorbale knit top that had an exposed zipper. This was a summer garment purchased at a very nice boutique. She wore this top for many summers. However, the exposed zipper in the center of the garment kept moving over towards her left shoulder. Every summer, after several washings, it appeared the zipper was moving over. Eventually she could not wear the top anymore. This was b/c the zipper was sewn in 'off grain.'
Have you ever had a pair of jeans and the side seam kept moving? That is b/c of the jeans being cut off grain. I won't go into how that happens in the industry but it occurs due to the process of cutting multiple layers at one time.
So all of you sewers, if you are taking the time to sew a nice garment, take time to prepare your fabric. Always prepare it before cutting and do it in the manner in which it will be cared for after construction: dry clean before if you are going to dry clean the garment and this includes linings and paddings; wash in cold water if that is the way you will care for the garment; lay flat to dry if that is what you will be doing etc. If you are going to wash and dry int he machine, I suggest you put your fabric through twice.
This is all information you learn in BMCC classes. I never, ever forget what Marie Kehr's mantra was in her classes: "The fabric will tell you what to do. " I have used that for so many classes that I have taught. Always test---test your interfacings to the fabric; test making buttonholes; etc., etc., etc.
I hope this helps.
Gansettgal
Gansettgal, thank you for taking your valuable time to give us this information. Yes, we have been spending a lot of time discussing the merits of the Bishop methods in several Forum posts in the last few weeks. One reason was we liked the explainations of why we were doing things. Another was the clear descriptions of the steps. There is still a lot of valuable information in Edna Bryte Bishop's Books, and I am glad to be able to "speak" now with one of her teachers. Cathy
To clarify---I use and teach the Bishop method. However, I am not a certified BMCCC teacher. I do, however, keep it totally true to Bishop. By the time I had the time to become certified, the Council was disbanding. I have all my notes from classes and I was so very fortunate to study often with Marie Kehr.
I hope Bishop continues. There are many 'learnings' that are now in commercial pattern instruction sheets that come directly from Bishop. For years and years, nobody really taught straightening fabric or the why to do it. Now, that's all you hear. I only wish Mrs. Bishop could be around---she made sewing so easy for so many and for generations to come.
Gansettgal
Pardon my misunderstanding, however, your training,is as good as in my eyes, having learned with the best. So many very basic, critical steps are glossed over, not taught, or not explained totally now. Even when I was learning in college(25 yrs ago), there were things I had been taught in high school that I just knew to do that were not taught in basic sewing to the new sewers. I really believe now that my grade 10 teacher was teaching the Bishop Method. Cathy
To those of you who are following the Bishop thread, and if not this is good information for anyone who sews: When commercial clothing manufacturers cut fabric for a garment, they cut 100's of garments at one fell swoop. The fabric is stacked in a pile; workers straighten the fabric by pulling at the edges and trying to pull the fabric so it will lay flat. Now picture this----pulling on a pile of fabric several feet high. Sure---uh huh, you can do that! Yeah, right!!!! When the fabric is piled, an electric heated knife, or blade, cuts the fabric for the garment. Many pieces of fabric have a fold in them. Don't think they don't. Then the garments are sent to the seamstresses who sew only one or two seams. I am sure you have seen pictures of film of manufacaturing sewers who work for 'piece work wage' sewing very rapidly. You don't really think they look to see if the pieces are of equal width/or length, do you? Of course they don't. They just stitch up the seams and send the item down to the next person who sews on the pockets, zipper, waistband, etc.
Because of this process of manufacturing, many items are not on the straight of grain. This happens so often in jeans manufacturing. You've probably all had a pair of jeans that look great. You wash them and after several washings you don't know if you've had too much to drink or your body is making a sharp turn around the corner b/c there, before your very eyes, the SS of the leg is twisting to the front or back. Right? Has that happened to you? In my many years of wearing jeans, it has happened, believe me. And it doesn't matter which brand you buy. It happens in all of them.
So, the next time you see something like this, here is the reason why. Hope this explains a little bit.
gansettgal
Oh, are you ever right! Another reason to make our own jeans. I've also noticed on RTW that, because of the construction procedures you've mentioned, not only is the grain not straight, but I've also found sleeves & legs to be uneven in length, collars not straight & centred, with uneven tips, & pockets on tops & jackets at uneven heights (not visually even) - not to mention stripes & plaids not matched - another reason to make our own clothing. Thanks for the insight.
Gloria
You've got me hooked on Bishop.
After having read sooo many of the books by people who claim to 'know', I find Bishop a very welcome change, in that nothing is assumed.
I wanted to scan all the pages on ideas of embellishment and list it here. If a lot of you is interested I shall do that.
Usually one edge of knit fabric is stretched. Using the heat of a good steam iron and a damppress cloth, you can shrink back the stretch side. This takes a little bit of time but if you are making a nice garment, take the time to do it. If you are making just a t-shirt out of some interlock knit you may find this too much trouble.....Gansettgal
Pearls of wisdom. Lucky I got hold of Bishop book.
...the jeans being cut off grain. ...due to the process of cutting multiple layers at one time. Gansettgal
I didn't realise that mounted bolts had anything to do with cutting. I can understand that with any thick fabric, cutting several layers of fabric will create problems.
I have already written too much!!!
Rekha, as long as we are willing to learn, we will find our horizons expanding. If you feel like posting pics, I would be happy to see them.FYI- Another reason that fabric goes off grain and needs to be straightened is that when the greige goods, or raw fabric is processed for printing or colouring or other finishing treatments, it is often rolled back and forth and re-rolled into rolls several times. The machines that do this grab the fabric by the selvedges. If the fabric doesn't grab equally, it can twist as it is rolled up. This causes it to go off grain. When the fabric is measured off the larger rolls, they use a machine to measure and roll it again, or to fold and put it into bolts. Again, it is possible for it to be pulled off grain as the fabric is under tension. Even once it is in the store, if it is put from the roll onto a bolt, it can be put into a bolt off grain under tension. Even gravity will twist a bolt or roll tighter as it sits on end and pull the grain off over time. You will see this as diagonal drag lines on the bolt or roll of fabric. Cathy
Is this true all across the board or are the 'expensive' fabrics manufactured with more care?
I'll get started on the Bishop embellishments, there are quite a few pages so it's going to take me some days. However, your 1966 edition must have similar pages too.
Rekha, I can't make a generalized statement across the board, however, Better quality fabrics are going to have been checked better before leaving the factory. Embellished fabrics will have a short run and will have been handled more carefully. The majority of fabrics will be fine, but if you are a bargain shopper, you need to be aware of this. Even the best quality silk, stored on a roll on end for an extended period of time may develop a grain problem however. This is also the reason why you need to straighten the grain on fabrics. Like I said most will be just fine, but even a fabric that is a little off grain, will impact the hang of the fabric in the finished garment, the ease of sewing and the fit. Yes, my book did have some wonderful embellishments that I posted a few of. I am wondering if yours has some different ones.
Cathy
That is a revelation. The clear implication is that one must 'rest' the fabric after purchase so it can recover from having been pulled and distorted.
wonderful embellishments that I posted
Which thread was that?
1966 Bishop Book Excerp http://forums.taunton.com/tp-gatherings/messages?msg=8702.2
This link is for the post if it works, I am not too good at links. Cathy
I had seen those.
Pardon my amnesia - taking some kinds of medication has this effect.
Barring the carded yarn, the rest seem different from the '59 bookd
Oh good, then I am really curious now. Those were just a few that were in my book that I thought were really kind of timeless. Cathy
My scanner from ebay is from year dot, so I shall take some time and post it tomorrow.
You mentioned in one of your posts that you had dug out your 1959 edition. Did you not compare or haven't had the time?
No, I only have the 66 edition. It was GailAnn who has both. I am hunting the 2nd hand stores for the 59 edition as I am not an online shopper. Cathy
OK.
I have finished scanning and am starting a new thread just dedicated to that topic.
See you there.
I am eager to "talk" to someone about armscye and sleeve fitting problems. For starters, how do patternmakers decide where to place the lower notch on the sleeve and armscye? Besides having the grainline exactly straight on the length of the sleeve, and the crossgrain parallel to the floor, what other fitting guidelines do you have? Maybe my problem is that I don't know exactly how a sleeve SHOULD fit and hang. I seem to have problems from the lower notch and down under the arm. There seems to be excess fabric there on a sleeve that fits up higher under the arm, like Burda patterns. If I take fabric from the sleeve, then it is not easy to raise the arm. Any advice? Deeom
Sorry to butt in, but I couldn't help responding.
Human gross anatomy has been studied for hundreds of years and a general consensus exists about various measurements.
The notches represent the spot where the arm leaves the side of the body, usually 4".
I would suggest you read two books
The Perfect Fit ISBN 978 84543 0580 (2007) This book has a lot of colurful photos of the type of body and how to make alterations
Fitting and pattern alteration written by Liechty et al 87005 775 8 (1992)This book gives comprehensive details with plenty of illustrations
Thank you for the input. I have the Perfect Fit book and will look through it again to see if I can glean any new information. Deeom
My suggestion is that you draft a sleeve pattern for you and then you can adjust to to various patterns you use. Since I have used Wild Ginger's Pattern Master Boutique for almost five years now, I don't worry about how a sleeve fits. All of their patterns, when you draft them in the program, draft to your body's measurement. But I will attempt to help you here.
First, measure your bicep. Someone will have to do this for you. Raise your arm to a 90 degree angle. From your shoulder to elbow should be parallel to the floor and your elbow to wrist, perpendicular. This is just a plain old raise your arm angle. Now, measure your bicep. If you have "angel wings" (as I have) measure them---loosely have the tape go around your arm. Don't tighten this. Just have the tape against your skin. That is your bicep measurement.
Now, to save time, use a sleeve pattern you have used in the past that has fit you fairly decently. Measure the bicep area. See how close it is to your measuremnt. Trace the pattern piece, as is, and keep it in tact. Alter the traced piece.
If you have to increase the sleeve girth (amount of fabric around the sleeve) a small amount, then you can add what you need. If it is a small amount, you can do this by adding the amount to the front of the sleeve from the hem edge to the top of the sleeve curve. Or, you may divide the amount into 1/3 to the back, and 2/3 to the front. I would do this if you need to add 1 1/2 inches or less.
Now, if you need to add more than that, Then split the sleeve in equal amount from the top center. You do this by dividint the sleeve into thirds. Cut on each of these lines and then insert equal amount of paper the increase the pattern. The added girth should remain in the lower part of the armscye. You should be able to ease in as much as 5". But, if you have a problem with this, you can dart the sleeve below the notches--this would be a tiny dart from the notch to the underarm sleeve SA.
Tell me, do you have wrinkles that are pointing to the top of the cap? (The crease will always tell you where the problem is---no matter what you are fitting, if there is a 'smile' in the fabric, it will point to the problem.) You may have to raise the sleeve cap. This often happens for someone with broad square shoulders or if you are using a shoulder pad and didn't allow for that in cutting out the pattern. To solve this, mark how much you need to raise the sleeve cap and then put the top of the sleeve at that point and pivot your back to trace the cutting line and the same with the front.
I hope this answers your question. Also, when constructing a sleeve, you only press the sleeve cap. You never press the entire sleeve. Just put the cap on your ham and from the right side, just touch the tip of your iron to the top of the cap. A couple more construction tips: 1-- after you have put in your sleeve and it the way you want it, if there is a slight pulling, stitch again on the stitching line to reuniforce and cut away the fabric at the underarm to about 1/4". The excess fabric will be gone and the SA will stand up straight into your armpit. Also, when you ease in your sleeve, be sure that the sleeve is on the bed of the machine. Let your feed dogs do the easing in by holding the garment taught, sleeve on the bed of the machine, and the feed dogs will ease in the sleeve. You may already do this but it is a good tip to include.
I am going to reread your request. I may have interpretted incorrectly so I will look for my errors.
I hope this has helped.
gansettgal
Oh, and
Deeom:
I reread your post and I think I have addressed your problem. I think the extra fabric under your arm is due to fit.
Try my suggestions and let me know how your sleeve turns out. If you need to see a drawing, send me a private e-mail and I will make a drawing, scan it, and send it to you. If I were good at these Forums, I could do that but I'm not. Can I do that here?
gansettgal
Thank you very much. You have given me much to think about and do. Will get back to you when I get a chance to sew the sleeve. Deeom
Gansettgal, it's me, Donna Kaye Childress! We are SO HAPPY to have your wisdom and guidance, I can't begin to tell you! I can see all your responses to your post. Wow, wow, and more WOW! If you leave us, we will HUNT YOU DOWN, GAL!
I am SO HAPPY you have joined us. We NEED YOU! Thanks!
By the way, gansettgal, I shall give you the privilege of announcing that Marie Kehr will republish her book on fitting. I'm quite sure you have the title, etc. I spoke at length with Marie the other night....donna kaye
P.S. If you need any further info on this, don't hesitate to post me!
This post is archived.