
Hi,
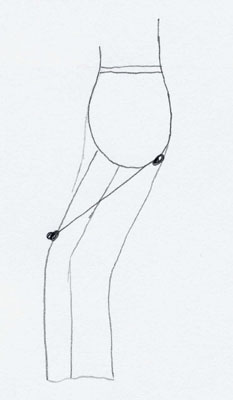
I am struggling with a pants fitting problem. When the pants drape nicely back and front I get a large wrinkle from my backside (see drawing) along the inside of my tight ending on top of my leg as soon as I bring a leg forward to walk or sit down. When I sit there are many wrinkles from the crouch angling toward the outside of my knee across my tight. The only way I have found to reduce the wrinkling is by making the crotch seam shallower. This however adds fabric that billows below my behind when I stand straight. It also cuts (slightly but) unattractively between my buttocks.
None of many articles I read on pants fitting cover this. It seems pants I purchase have a varying degree of the same problem. Is this unsolvable or is it just my shape?
Solveig


Replies
Have you read Peggy Sager's article in this month's Threads? She gives a very easy approach to fitting crotch length of pants. It sounds like you don't have enough crotch length in the right places. (Not the same as crotch depth, which it sounds like you tried to adjust) Also, explore different pattern companies. Crotch curves vary tremendously. I've had best luck with Burda, but it depends on your body. Sandra Betzina did an article in Threads sometime this past year, also, which goes into the crotch length adjustments. Good luck!
When you sit, does the back waist of the pants also pull down? If so,
I think you may need a longer crotch curve because your body is thicker front to back than the pattern was designed for.
Two measurements to check:
The first measurement to is done by sitting on a flat, hard
surface. Measure from a tightly tied waistline string at the side seam position, over your hip and then straight down to the chair. Now
measure your pattern from side seam/waistline intersection down to
the crotch level. That will tell you if the torso needs to be
lengthened or shortened. Do that first.
Now the second measurement: again with that tightly tied, non-moving string tightly around your waist.
Measure from center front to center back, between your legs, from waist to waist string position. Now measure your pattern's
crotch curve... I bet it's shorter, and you'll need to increase the
length of the crotch extension to match (and when you measure the pattern, don't forget you have to deduct the seam allowances) (and
you need to add a bit (usually about an inch) to your personal measurement, so the curve isn't skin tight!)
Example: personal crotch length measurement is 29", add an inch
for ease = 30". Pattern crotch length (minus the seam allowances)
is 28"... so this person needs 2 more inches of crotch extension than the pattern gives.
These measurements will be much more accurate if you have a helper,
which I highly recommend.
Also, a fleshier figure may need even more crotch extension proportionally than one that's not well padded, so if adding to the
crotch length doesn't cure the problem completely, add a smidge more.
You may also need a bit more room in the thigh for a fleshier figure,
but I'd work on the crotch curve first.
There's also a by guess and by gosh approach to this, if you've got
a muslin. Open the crotch seam side to side, extending slightly
down the inseam. Sit, and see if you've now got room. Crouch, and
with a mirror, estimate the size of a gusset that you'd need to
fill in the space. Add the gusset and refit. The gusset gives you
the crotch extension.
And a third measurement to get if you've got a helper and that
waistline string anyhow... waistline string CF to floor, and waistline
string CB to floor. This will tell you if you've got a tilted
waistline.
If you'd like to draft your own pants pattern instead of patching
a commercial one (it takes me less than an hour to draft pants by
hand, and I'm not that fast!) -- the book I'd recommend is Connie
Crawford's Fashion Your Own Pants The Simple Way. It's based on
her years of teaching patternmaking at Fashion Institute, and it's
very step by step and easy to follow. If you're over about a size
18 pattern, you may want her "mature figure" draft, which changes
the proportion of crotch extension to hip, accounting for those of
us with a bit more padding. <g> http://www.fashionpatterns.com/books/fashion_pants.html
I honestly find it faster and easier to draft from scratch
rather than try to fix a commercial pattern.
Kay Lancaster [email protected]
Thank you! Thank you! Have for years struggled with a similar fitting problem, but crotch length is not anything I had ever found discussed before in all the pants fitting articles I have read. Using this information, I redrafted my pattern by adding a 2" at the top triangular gusset to the inner back leg, tapering to just below the knee. The back now looks 2 sizes larger than the front. However, the side seams fall straight, no "smile" wrinkles across the pants at the crotch depth, and I can walk and sit in them comfortably. I have a generous rear, and large thighs, but a flat stomach, and also my waist slopes 1 1/2" inches from back to front. This was the last piece of the fitting puzzle to achieve a perfect fit. Have now got a dress pant pattern, and a jean fit and cut pattern. RTW has always only sort of fit. I may rarely buy pants again.
KarinS
"I may rarely buy pants again"... yep, that's the true problem. Now I
have to make pants for DH, mom, and me... no escape to RTW. <g>
Kay
Perseverance pays off!!!! Good for you!
Hi Kay,
Thank you very much for your advice. I believe you must be right about the crotch length being to short. I will try again this evening.
One issue of Threads had an article on drafting your own pants pattern and it seemed very complicated. Would you say that a pair of pants based on a pattern drawn from scratch normally fits better than a pair based on a commercial pattern that has been modified to fit personal mesurements? Or is the end result about the same?
regadrs,
Solveig
I find drafting much easier and less complex than trying to alter,
though now I understand what measurements control what fit elements
in pants, I have an easier time altering. However, it's rare that
my drafted pants need more than a very minor tweaking (perhaps
1/4" here or there) to fit someone nicely, whereas a commercial
pattern usually takes me at least two, and sometimes three, muslins
to get right.
I can get both to fit, but I can get the drafted pants fitting with
my sanity and patience quite intact. That's not always true for
commercial patterns. <g>
Kay
Dear Kay,
I am still struggling with fit in pants. Do you know a book to reccomend that would spell out how to draft a pants pattern? I think I am ready to try.
Nancy
The draft I use is Connie Crawford's... it's pretty easy to follow,
as she developed it (and the instructions) through many years of
teaching at FID.
http://www.fashionpatterns.com/books/fashion_pants.html
It has the basic women's draft, followed by ones with changed
proportions and ease for "mature figures" (which you probably want
if you're deep bodied front to back) and men's drafts, and instructions
for taking the basic fitting pattern and modifying it for trousers,
jeans, jumpsuits, etc.
There are two things to know about drafting by hand: it's a lot
easier if you're working on squared paper or on paper that's
been taped over a 1" grid --- keeps things lined up nicely and straight!, and the other thing is that the draft is only as good
as your measurements. Having someone else carefully take your
measurements is the one best way I know of to produce a good draft.
Make sure that the waistline marker string doesn't move during
measurements, as that's your "starting mark" for most of the others.
(Elastic will move; strings move on some bodies, so a dot on a bit
of tape at waist/CF, waist/CB and waist/side seam works well for them).
The measurements you'll need are:
waist
hip (for some folks, high hip and full hip are useful)
waist to seat of chair over hip ("chair depth" -- torso length)
center front waist to floor
center back waist to floor
inseam
total crotch length (CF waist to CB waist, through legs)
finished width of pants at hem (whatever you like)
You may want to subtly contour the side seam of your pants --
basically, anything goes above the knee level, but below the knee
level, what you take out of the side seam has to be matched by
taking a similar amount out of the inseam, or the pants legs will
twist. It's amazing what just a slight (maybe 3/8" deep?) gentle
S curve will do to the appearance of the pants.
Kay
One other thing to mention about drafting your own patterns is to have good tools. There is a ruler called a "hip curve" that actually looks like the curve of a hip. Also when drafting a pattern it is always good to have a french curve to make your angles nice and smooth.
Alisa
<drags toe in dirt> Actually, I have a confession to make... I've
got hip curves, etc, but rarely use them... I have an easier time
cutting the curves I need "by eyeball" than finding the right
sections of french curves. Can't draw curves well, but scissors just
seem to do what they need to do. I don't understand it, either.
I dot in a few intermediate points and then cut.
There is a relatively inexpensive combination curve/ruler called
something like Fashion Curve -- clear acrylic, about 15" long, iirc,
roundish head on one end, long straight tail with a curve on one side,
red markings.
The one ruler I do use a lot when drafting is a 6x24" gridded quilting
ruler.
But Connie, who was my basic drafting teacher, seems to prefer
the narrower, thinner C-thru ruler and an old Dritz curve that
looks like half a heart, is quite thin -- thinner than a credit
card. She points out that you can snug a pencil up to a thin
guide much more easily than a thicker one.
Another good book is Margaret Islander's "Pant's, Etc." We used this one for a course as part of Diane Martin's Master Seamstress program offered thru URI"s continuing ed. program. We all made a muslin first and then a great pair of slacks from there! Also learned what was involved in changing that basic pattern into any other pant style. Anyone in the Rhode Island or nearby Mass. and Conn. area could benefit greatly from this course! It sure helped me personally and also teaching my own students!
Kay,
When I was is college (my BA is in Fashion Design), my pattern-making instructor was Helen Joseph Armstrong. I don't know if that name is familiar to anyone else or not, she's published some incredible books on patternmaking. Anyway, she was VERY PARTICULAR about our tools and methods. (i.e. we cut our patterns from tag board & if she could run her finger around the edge & feel a nick where your scissors had stopped and started again, you had to make that piece over...she always suggested that we do all our cutting with the bottom side of the scissors resting on the table, no holding things in the air to cut, not accurate enough).
Anyway, just said all that to say, the reason I use the hip & french curve is based on what was ingrained in me while a grade point average was hanging in the balance. Their habits I've kept since then. I know what you mean about "eyeballing" it. After you do patternmaking for so long, you just start to see the curves the way they should be. I would still recommend the rulers to someone starting out, to use at least until you get a feel for it.
I've always drafted my own pants patterns as well. No matter what size I am (8 before having 3 kids in 3 1/2 yrs, 16 after, ...working towards a slightly less ample "back porch") , I've always had a 16 inch difference between my waist & hip measurements. I've never been able to buy RTW pants that I wasn't able to put my elbows down into the waistband of !!!
Here's my pattern making confession... I also use the clear plastic quilting rulers, especially to mark seam allowance. I mark the seam allowance in ink pen (whispered) because it flows so smoothly, but because it doesn't go right up next to the ruler, I then cut the pattern piece out just inside the marked line.
Alisa
I simply can't imagine not using a proper tool for drawing my curves, etc. My first pattern class taught eyeballing it, but I always found it to be horribly inaccurate. But you're right, with experience, you learn to see the curves. What I generally do is sketch them in lightly with a pencil and then go over it with the proper ruler. I use a c-thru ruler for seam allowances....either the 18" x 2" or 5 cm x 50 cm, depending on if I'm working in metric or imperial (usually metric, as it is far more accurate).
I also had teachers in design school that would check our cutting as you mentioned. Oh, the things you can get away with as a home sewer!
This post is archived.