
I have recently discovered David Coffin’s book on “Shirtmaking” and have been devouring all his recommendations for making my husband a shirt. The book is fabulous with detailed descriptions and photos as well as user friendly. I must admit it has helped me become obsessed with making a really well fitting shirt.
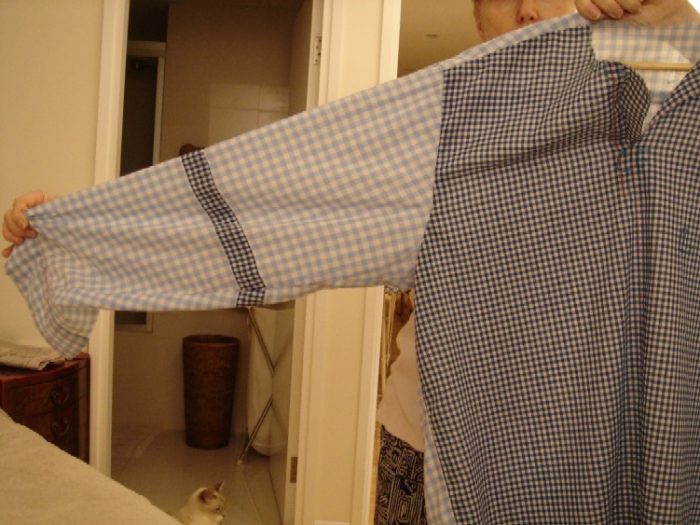
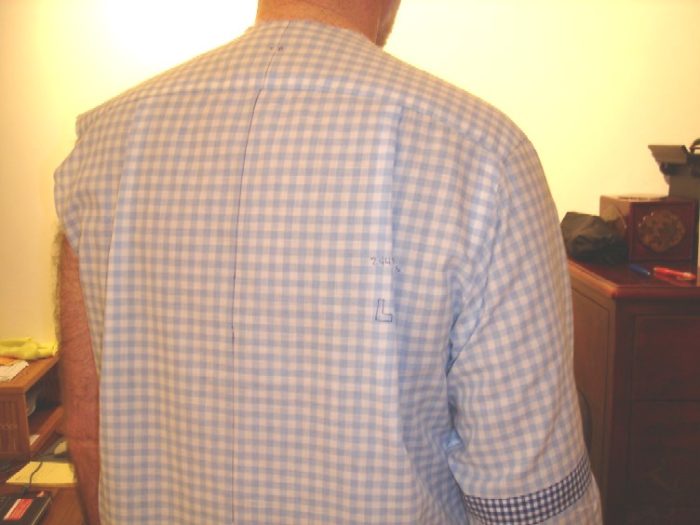
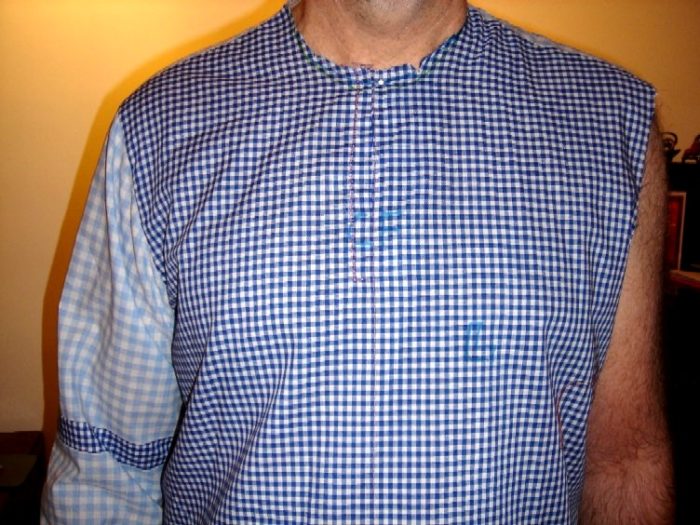
After reading about proper fit I had my husband try on multiple dress shirts and found that even the shirts made by a local tailor were not fit properly according to the books guidelines. I have now followed the books instructions and have successfully fit the shirt with the exception of the sleeve. I am finding that the sleeve has too much fabric at the bicep area. I changed the sleeve pattern by altering the sleeve gusset point, but the fabric folds still seem too bulky. I have taken 3 photos to send as I need advice to get a better fit. The photos show my test fabric shirt. The comfort of the sleeve and the fit of the shirt front and back are fine. I am wondering if I should lower the arm scythe to remove the folds. Any suggestions are welcome.


Replies
mmmmmmm I remember reading in a fit book that what works is right. I would shorten the length of the shoulder seam by taking a dart or tuck out as he seems to have sloping shouders and maybe take a tuck down the center of the sleeve as maybe the biceps measurement is just too big . Once I stopped worrying about theory and followed my intuition I actually got better at fit. There are proper ways of taking fabric out of seams and out of sleeves and these need to be followed so that you get the alteration without unwanted side effects however just fiddleing while your man stands still will give you the hint as to what needs to be done .
I will work on it, thanks.
I agree that you may need to take the shoulder seam up a bit (baste and fit). However, the problem with the sleeve is that it needs to be longer at the cap. In other words, the area from the underarm to the cap is too short. So, you can cut the sleeve down at the underarm. It looks like you can easily lose an inch, possibly more. I can't tell if the armsyce (on the body of the shirt) is too small. Be careful cutting that part down, since when too low, it will make the shirt really uncomfortable- the sleeves feel too tight and they pull when raising the arms. Try taking the sleeve seam in (baste) just enought to make it fit. Try it on and see. Your husband is really patient to let you work so hard to perfect his shirt. What a work of love!- Janet
Janet, thank you very much for your reply. I will definately try lengthing the sleeve cap. I am having such fun working on this pattern that I want it to turn out right. My husband said he had no idea how much trouble making a shirt can be. I cannot wait to hear how much better his well fitting shirts will feel. Let's hope I make it to that stage. I am working on a shirt with short sleeves today. Will let you know how your adjustment turns out. I really appreciate your time in writing. Cheri
Hi,
I just read about the shirt you are working on for your husband. I bought a shirt for my husband and he told me to buy 32/33 arm length. We discovered he wears 34/35. He suggested I make it into a short sleeve shirt. We live in the south and the store didn't have any short sleeve dress shirts. Anyway, in the book you are talking about, does it have any suggestions about the hem finish to the sleeve. I have seen some that have a tuck about an inch above the hem for looks, I suppose. I would appreciate any help on how I should make this look.
Marcy
Are you possibly suggesting a cuff for your finished sleeve hem? If so, you have to cut the sleeve twice as long as the finished length you desire. Finish the raw edge before tucking it to the inside of the sleeve. Fold finished fabric to the outside of the sleeve (about 1 inch of fabric) and this should make a cuff. Tack at seam to keep in place.
I suppose it is a cuff that is sewed down at the top. That will definitely work.
Thanks!
Best of luck in your project.
Thanks. Now if I can just find the time. I'm at work right now. Maybe over the July 4th holiday.
Short sleeve from long sleeve -
cut the sleeve about 1 3/4 inch longer than desired.
fold 1 1/4 inch hem to inside, then fold again to the inside along the cut edge.
now topstitch 1/4 inch from this second fold (encasing the raw edge)
unfold and you should have a small (1/4 inch) flap to press up (away from the hem edge)
I think this is called a mock cuff, it is a lot easier to press flat than a true cuff, you choose!
One possible trouble spot is the taper of the sleeve; when you fold up the hem it probably will not be the same width as the sleeve at that point. pick out the sleeve seam a bit at the cut edge and fudge it a bit under the arm but make sure the outer side of the sleeve is smooth.
My husband has a desk job and wears out the elbows of his shirts before any thing else so I never buy short sleeve shirts, but wait and make them out of his long sleeves gone bad ones.
Becky
Hi Becky,Thank you so much for the detailed instructions on shortening the sleeves of a long sleeve shirt. I have copied and printed them and hopefully, have time to do that this weekend.Much appreciated,
Marcy
thats very interesting about lengthening the sleeve cap . The wrinkes do point to the problem dont they ? The wrinkles on the bodice are due to the actual arm hole being too small arent they ?So would you cut the hole a little larger by scooping out in the front armscye?
The way I would determine the best line for the armscye would be to put the shirt on your man, then carefully clip along the curve. It will begin to release the stress and you will be able to see where the line should be placed. Also check to see if it is the right size at the chest-if it needs a little more or less at the side seam. Wish I could come over and help you!- Janet
I worked all day Sunday problem solving that sleeve and never did get it to lay straight. I do wish you were here to help me too! First try: Cap Ht increase from 4.5" to 5.5", Cap length was 4" > cap length. I then reduced the cap length by 2 inches and eased in the other 2". The shirt was too puffy around the armscythe, but did have a better fit and less wrinkle in the arm.
Second Try: Increased the cap ht. to 6.25". The armscythe was 24.75" to begin and I reduced by an inch as it seemed that the sleeve was so low it caused some bicep wrinkling. It had a better fit with a higher armscythe (19" measured arm, 22.25"scythe not including seams). The original sleeve was straight from the armscythe to the wrist, I used a French curve to insert a gusset angle to make a better hinge and reduce bulk at bicep. My husband's upper arm is a bit hefty at the shoulder, but not the bicep and that is why i left the shoulder to drop a tad over the shoulder line. When this was done, it seemed to need a longer sleeve cap still, there was still too much ease in the armscythe. I cannot effectively get the cap high enough without narrowing the sleeve too much. Any suggestions?
Are you working this out on the flat pattern and then trying it on? My expertise is in fitting and I do it on the body- I have never spent a lot of time on the flat pattern first, but get the muslin to fit the body, then make a pattern from the muslin. You might want to take a piece of white muslin for the sleeve, cut it bigger than you think it should be. Use a pencil to mark the grain line vertically and also, horizontally at 1 and 1/2" down from the "seam line" and also at 3" down. Pin fit the sleeve on your husband, making sure to keep your marking lines straight. You can tell better when doing this on the body where you need to give more fabric and where you need to pin excess fabric out. I'm sorry I can't demonstrate this for you, hope it helps.. Janet
Hi, Cheri
Glad you’re enjoying my book. April at Threads forwarded your question to me, so I just checked in to see you photos. They look great!
You said:
I must admit it has helped me become obsessed with making a really well fitting shirt.
Well, I hope you’re enjoying being obsessed:) Improving the fit of clothes we make ourselves can certainly be equally satisfying and frustrating!
After a certain point, I got pretty tired of endlessly tweaking my own shirt patterns. A fix somewhere would always mean a new problem cropping up elsewhere! These days, in all my classes, I emphasize that, besides needing to lie smoothly across the shoulders, and to not be too tight anywhere, a shirt is NOT a fitted garment, in the sense that a snug dress bodice or a suit jacket is. It’s a simple, loose garment that’s more about allowing plenty of easy movement than about always looking wrinkle-free.
To be specific, the wrinkles at the underarm in your photos are, in my opinion, perfectly acceptable considering that the point of this sleeve is to not restrict arm movement. Think about a suit jacket: It’s got fitted sleeves with very high, eased, and long caps because it’s supposed to look great when the arms hang down at the sides, but the sleeves bunch up horribly when you raise your arms. Most people take their jackets off if they need to do a lot of arm-raising! Shirts are designed to be comfortable when your arms are in lots of different positions, at the cost of not looking completely smooth and tailored with the arms hanging straight down, or even being raised much beyond 45 degrees from straight down. There’s no way a sleeve can look smooth in all positions, unless it’s skin-tight and made of lycra, like a leotard.
Since you also said:
The comfort of the sleeve and the fit of the shirt front and back are fine.
...and since the shoulders and chest in your photos look excellent, I’d say you’re in danger of over-fitting the sleeves by continuing to worry about those basically unavoidable underarm wrinkles. Show us a picture of your husband with his hands on his hips, and therefore with his arm angle matching the pattern’s sleeve angle; should be perfectly smooth. And see if you can find a photo anywhere of somebody in a shirt that doesn’t have a few minor wrinkles in the sleeves when the arms are straight down.
I think you’re ready to make some shirts! Have fun!
David Coffin
[email protected]
I really appreciate you taking your time to look at my shirt questions and photos. Your book is excellent and very inspiring. I have enjoyed taking the time to learn the details as I enjoy making shirts very much and look forward to getting a good pattern fit that I can use regularly. As per your suggestion I will relax a bit on the fit issue for the sleeves and take a look at the shirt with arms angled at the hips to make a final judgement. Threads certainly does take a serious and personal responsibility for customer satisfaction. Hearing directly from you is wonderful. Thanks again. Cheri
A letter from David Coffin on your shirt! WOW! That did it for me. I'm going out to purchase my first subscription to "Threads"!
Good luck with you shirt sewing and please do send us a picture of your first project with this pattern!
I was very honored to hear directly from David Coffin,the author of a book I respect so much "shirtmaking". I have read Threads for years and always liked their dedication to the techniques of sewing and now in my new interest for more detail techinique I find them current and full of good resources. Now I also see their direct customer relations too, I also am impressed. Happy Sewing!
I am sending in photos to show the results of fitting my husband's shirt. I now have two shirts made that I am happy with.
I did do some more adjusting on the sleeve pattern (that I sent photos in for earlier in a gingham sloper). I lengthened the sleeve and widened the forearm area and the wrinkles I did not like went away. I determined the changes by using the arm measurements to compare a flat pattern from them to compare to the purchased pattern I was using. It made it easy to see that I had the sleeve scythe too narrow on top. I just used my French curve to make some minor changes and all was fixed.
I am submitting photos for all to see. My husband says the fit feels wonderful and I am happy with the results. Thanks to everyone for all the suggestions and encouragement to keep working. The final photo is of my husband and myself with him wearing his shirt. Cheri
Beautiful work, Cheri. Thanks for posting the pictures!
David
Thanks, and thanks for writing that book. I learned a lot.
Cheri
This post is archived.