
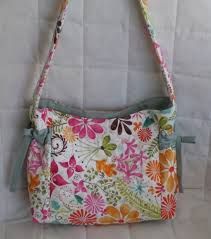
Quilting is such a lovely activity- it combines relaxation and productivity, helping you craft great little things for yourself or your loved ones. This tutorial will show you how to quickly make a stylish, spacious quilted purse that can improve all of your favorite outfits.
Tools and supplies:
-
Two quilting blocks (you can make them by sewing together 9 quilting squares of different patterns and colors)
-
Cotton thread
-
A large zipper
-
Pins
-
Lining fabric
-
Sewing machine for quilting and a walking foot
First, find a good working space. You will need a large table where you can put all of your tools. Then, cut two pieces of lining following the measurements of your two quilting blocks. If you want to add batting in order to make your bag thicker and sturdier, now is the time to do it. These will represent the basis from which you start making your new creation.
Next, it is time to add our zipper. To do this, you have to take the zipper and lay it on top of one piece of lining, right at the end of the seam, with the zipper side up. Then you take one of your quilting blocks and lay it on top of them, with the “good” side down. Pin everything in place.
Now we have to head down to our sewing machine for quilting and start sewing the block, lining and zipper together. It is important to make sure that the sewing foot is lined up with the teeth of the zipper. Gradually remove the pins as you progress, ensuring everything remains perfectly straight.
After you finish sewing the first side, it is time to repeat the process with the other side. Take the piece you’ve just sewn and lay the fabric down so that the quilting block faces you; then do the exact same thing you did the previous step. And there you have it: you have successfully sewn you zipper!
Everything that’s left to do now is sewing all the rest of the bag, which should be the easy part. Start off by sewing your two pieces of lining. You should only do this with your zipper open at least halfway! Another important thing to remember is that you shouldn’t sew the bottom of the lining all the way through. Leave a bit of space; you’ll need it later.
As a final step, sew the two quilting blocks together and pull them through the hole you’ve left in the lining in order to finally see your completed purse. Of course, you should stitch the lining all the way through after you’re done with this step; as for finishing touches, feel free to add pockets, handles, or different decorations. Be creative!
Now that you know how to make your quilted purse, feel free to experiment with different patterns and sizes. Have fun and enjoy wearing your trendy new accessories!
by seekwee.com


Log in or create an account to post a comment.
Sign up Log in