

With some simple tools and just a few minutes daily, weekly, or monthly— depending on how much you're sewing— you can help keep your machine running smoothly.
by Sally Hickerson
from Threads #91, pgs. 28, 30
Most sewing machine problems that I encounter can be traced to poor general maintenance or neglect. But with some simple tools (shown in the photo right) and just a few minutes daily, weekly, or monthly- depending on how much you’re sewing- you can help keep your machine running smoothly. Here are my guidelines for care that should keep you and your machine happy and out of the repair shop.
 Get more sewing machine-related articles:
• 17 Ways of Getting the Most Out of Your Sewing Machine
• Your Sewing Machine Buying Advice
• Sewing Machine Needles
• Video: How a Stitch is Made
• Understanding Thread Tension
Read more sewing machine tips like this one by purchasing a print subscription of Threads magazine. Print subscriptions come with FREE access to our tablet editions.
![]()
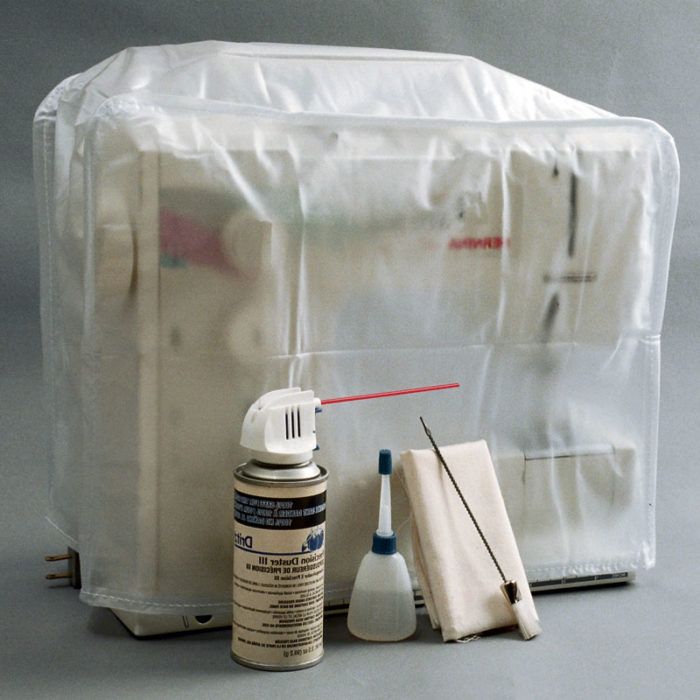
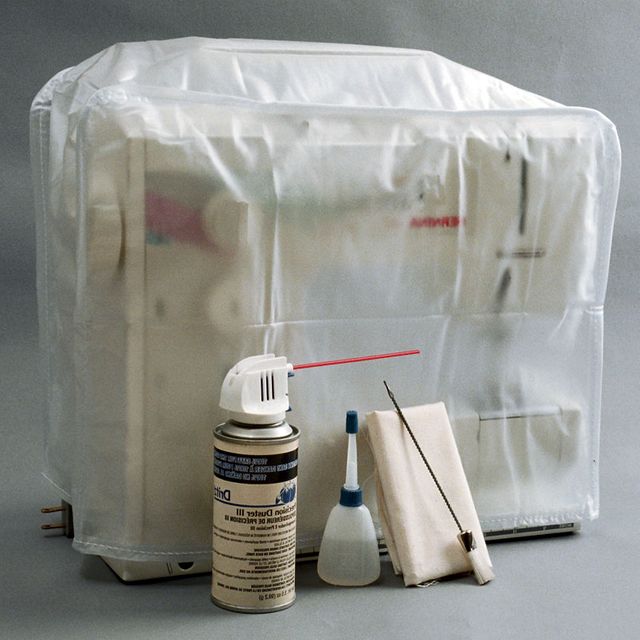
 Cleaning and caring for your sewing machine requires only a few simple tools available from your machine dealer or fabric store: a small lint brush, a can of ozone-friendly compressed air, a clean piece of muslin, sewing-machine oil, and a dust cover.
Keep it covered
Dust, lint, grit, and animal hair can find their way into your machine and cause all sorts of problems, especially for the printed circuit board of a computerized machine. So try not to place it near an open window, and always cover it when not in use. You can purchase a ready-made plastic cover from a notions or machine dealer, make one yourself, or even use an old pillow case- but keep your machine under wraps when you’re not sewing.
Change your needles often
I recommend replacing the needle after every four hours of sewing time. When you sew, the needle passes through the fabric thousands of times per minute, and each time it does two things: It makes a hole in the fabric for the thread to glide through, and it forms a loop with the thread to make the actual stitch. The bobbin hook picks up this loop by moving just .05 mm or less behind the needle- about the thickness of a piece of paper- so if the needle becomes bent or dull, you may get skipped stitches, broken or looped threads, runs and pulls in the fabric, or even damage to your machine.
When the needle is compatible with your fabric and thread, your machine sews more smoothly. An inappropriate needle will force the thread through the fabric instead of letting it glide cleanly through the needle hole and may cause broken or sheared threads. A common mistake is to use a needle that’s too small for the thread. For example, a size 70/10 needle is the right choice for fine fabrics like silk, but use only a size 60 or 65 with fine, lightweight thread, like lingerie thread.
A sharp needle, like a Microtex or Jeans needle, is the better choice when sewing natural-fiber woven fabrics than the Universal needle, which has a slight ballpoint and was developed to glide between synthetic polyester fibers without breaking them. Regular ballpoint needles, however, are still the best for sewing knits, fleece fabrics, and elastic. And now there are needles specially designed for sewing with rayon or metallic threads that have Teflon-coated eyes to reduce friction and thread breakage.
Wind bobbins correctly
Be sure there are no thread tails hanging from the bobbin when it’s inserted into the bobbin case. They can jam the machine and cause the upper thread to break. And note that there’s no such thing as a generic bobbin. Always use a bobbin designed for your machine in order to avoid skipped stitches, loose threads, and noise, as well as permanent damage to the bobbin case.
Regular cleaning is essential
Get in the habit of cleaning your machine after each project. Follow the instructions in your manual, or ask your machine mechanic to show you how. Basically, a routine cleaning can be accomplished quickly and easily if you follow these steps:
![]()
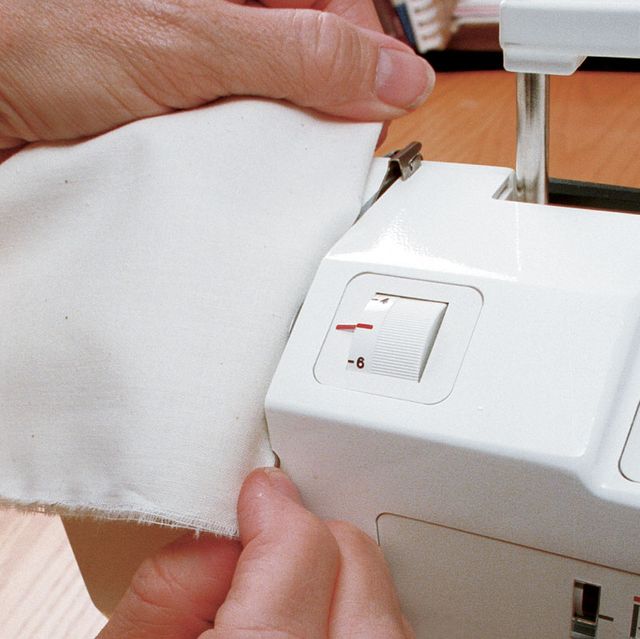
 Fold a piece of muslin in half, and use the folded edge to clean between tension disks.
Start at the top and clean the tension disks with a folded piece of fine muslin. Be sure the presser foot is up, so the tension springs are loose and the muslin can move easily between the disks, dislodging any lint or fuzz. Use a can of compressed air, blowing from back to front, to remove loose particles from around the tension disks and to clean other areas inside the machine. Don’t blow into your machine yourself because breath contains moisture and will eventually cause corrosion.
Get into the habit of removing the machine’s needle and throwing it away after completing a project. Then take out the throat plate, bobbin, bobbin case, and hook race if this applies to your machine (new computerized machines do not have removable hooks). Clean under the feed dogs and around the bobbin area with a small brush, and use the compressed air to blow out any lint from inside of the bobbin case. If the hook mechanism is removable, wipe it clean with a dot of oil on a piece of muslin, and give it an additional small drop of oil before returning it to the machine. Use a light oil recommended for sewing machines; do not use three-in-one oil. Check with your manual regarding any other areas on your machine that may require oiling, and use only a small drop for each spot. It is always better to oil too little more often than too much at one time, and avoid oiling any plastic parts.


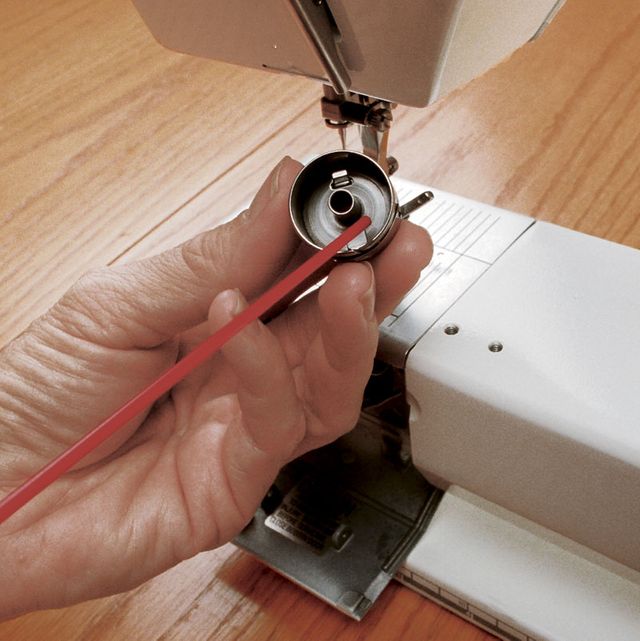
Don’t forget to clean inside the bobbin case. Using compressed air, which has a straw (shown in red above) to direct air to a desired spot, blow out lint and loose threads.
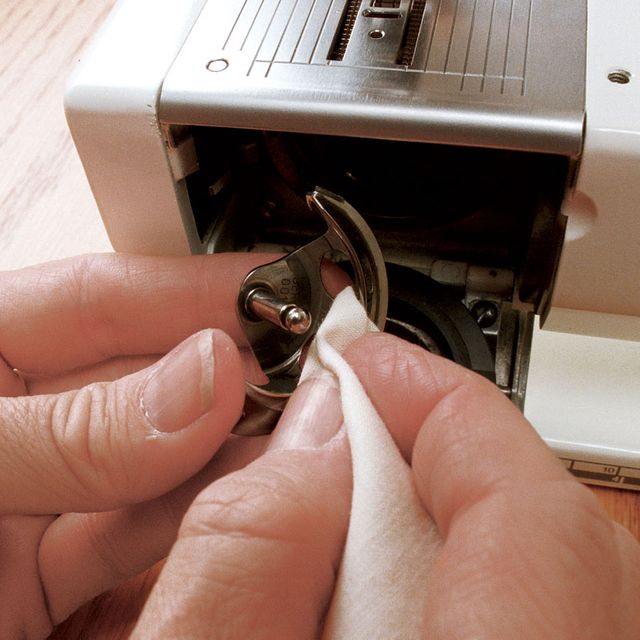
Use a soft piece of muslin with a dot of sewing machine oil to clean the race hook. If the hook is removable, place a drop of oil on it before returning it to the machine.
You can easily do this routine by yourself, but I also recommend a check-up by your dealer or an authorized mechanic every two years. Your machine will give you years of service if you take the time to care for it properly.
Sally Hickerson is the owner of Waechter’s Silk Shop in Asheville, N.C. (www.waechters.com), and is an authorized sewing-machine mechanic.
Photos: David Page Coffin


I have a singer quantum xl000 embroidery sewing machine
I am new to machine embroidery and without the manual- the machine was a gift- I have no idea how to connect sections-
can this machine use digitized patterns downloadable from the internet.
I have trouble with thread breakage with sewing and I was wondering if I should purchase a machine for embroidery only
I dont see tto many readers using singer machines. Are there any recommendations for ease to use and software upgrades?
I had same troubles with my singer.....first thing I did was look on google for the manual....put in the brand and model manual....singer quantum x1000 manual......or write the company for it.....,you'll need it for other things anyway....I did find it and made a copy... Next I took it to a Good sewing machine repair person....mine was cutting threads from the bobbin side and I could not figure it out....he cleaned it and gave it a good check up....rough edge on my bobbin was cutting the thread, I had broke a needle and it roughed up the bobbin casing... Hope that helps...my machine has never ran so good...
My mother insisted that I clean her machine after every project. Now, more that 45 years later I still have that habit and I'm passing this routine on to my daughter and granddaughters. I rarely ever have a problem with any of my machines.I have 4 and some of them are quite old! It doesn't take much time to do a through cleaning after each and EVERY project and it will really keep your machine humming :)
My husband is a certified sewing machine technician, and I am a dealer. Never, ever use a can of compressed air to blow out your machine! They also contain moisture which will cause rust, plus you're blowing the lint deeper into the mechanics of the machine. Use a vacuum with a small attachment.
My husband is a certified sewing machine technician, and I am a dealer. Never, ever use a can of compressed air to blow out your machine! They also contain moisture which will cause rust, plus you're blowing the lint deeper into the mechanics of the machine. Use a vacuum with a small attachment.
Great article.