

Fit the Seat of Your Pants
Measure your derrière, then revise the back pattern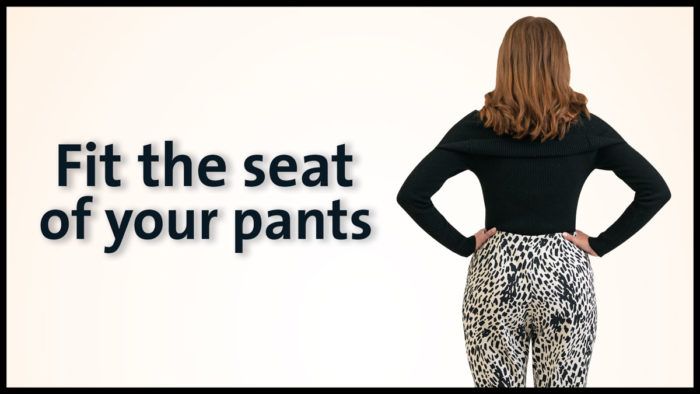
Many people experience problems with store-bought pants fitting correctly in the seat, waist, and hip areas. Bodies come in many shapes and types, and your waist-to-hip proportion may not match the garment’s cut. A common issue is finding pants that fit comfortably in the hips, only to have a gaping back waistband. Alternatively, if the pants fit your slim waist, they can hardly be pulled over your hips. The opposite situation exists, too, when your hips and seat are proportionally small compared to your waist. This results in excess fabric over the buttocks and back thighs.
For many sewers, the same fit challenges occur in commercial pants patterns, so making your own pants doesn’t immediately solve the problem. Fitting a pants muslin is tough to do on your own, especially if you’re focusing on the rearview. However, you can accurately adjust a pants back pattern based on your measurements. I’ll show my slash and spread (or close) technique. This simple adjustment alters length and width, both of which are involved in fitting a fuller or flatter derrière.
You’ll cut the pattern along a set of prescribed lines, then pivot the resulting sections to add or subtract fullness where you need to. Once you try this pattern-based approach, you can personalize the fit of any pants pattern you choose.
 |  |
Record essential measurements
Put on close-fitting garments, such as leggings or tights, but be sure they don’t compress your body. Measure the body, then measure the pattern. Begin with a pattern that fits you well at the waist. In the process of adjusting the pattern, you’ll enlarge or reduce only the back pattern to fit.
Body dimensions
Waist: narrowest part of the torso.
Hips: fullest part of the hips or thighs.
Hip depth: distance…
Start your 14-day FREE trial to access this story.
Start your FREE trial today and get instant access to this article plus access to all Threads Insider content.
Start Your Free TrialAlready an Insider? Log in


Happy to see a photo of what good seat pant fit looks like. However (always has to be a 'However'), the fabric print makes it difficult to see if there are wrinkles...am sure there are not.😎
This is a much better solution to most seat alterations that are just a slash and spread which results in all crotch length at waist and skewed grain line.
Do have a question about the location of line A where hip width is adjusted. The width adjustment is several inches above the hipline where the extra width is needed. Since the photo shows a nicely fitted seat, please explain why this works.
One other question concerning the Crotch Line...what if the Crotch Depth is more or less than the line across the pattern from the crotch point? Assuming Crotch Depth is altered with Hip Width?
Thanx for this in-depth article to add to my fitting knowledge.
Hi, NeuCarol,
Good questions! And yes, the pants fit the model well, though the print does make it a little hard to see.
Line A is located 1 1/2 inches below the dart point, and in this case it enabled the pants to be expanded to add length and width where the model needed it without unduly lengthening the dart. If you want to experiment with placing line A a bit lower, and make a longer vertical cut through the dart, you can try that. The resulting dart might be longer than you need, so I'd suggest pinning it to fit.
The crotch depth is adjusted when you spread at line A. It's worth making a muslin, or a wearable muslin, once you've adjusted the pattern. Each body is individual, and you may want to tweak the darts, waist level, etc.
Carol J. Fresia, Senior Technical Editor
I disagree that line A added width where needed. Hip width is needed at hip line, not below the dart point.
The principle of fitting is to adjust at the point of need.
Yes, I see what you are saying. Line A is positioned to release the pattern at line B, and line A's diagonal portion provides a place to hinge the upper section up and a bit toward center back (adding some width there). Once line A has been cut, then line B can be cut and spread to add further width across the seat. The reason line A is higher than where the greatest amount of fullness is often needed is so it doesn't interfere unduly with the dart length. But as I mentioned above, it's definitely possible to place any or all of the lines where you want to make your adjustment. If you move line A down too far, most of the added fullness is positioned somewhat low, which can work well for willowy or long-waisted figures. A muscular, round derriere often needs fullness a bit higher.
Carol Fresia, Threads Senior Technical Editor
Let me add my frustration with the photograph of the finished pants. While I'm sure they fit the model well, it's almost impossible to tell given the print of the fabric. It would have been much more helpful if you'd included another photo of the revised muslin, with the horizontal lines etc. so we could actually tell what it looks like after the adjustments were made.
I had the same thought when I saw the print fabric for the completed pants. I prefer to use a plain muslin when I'm working on fitting issues because a print won't let you see every single hiccup that won't give you the right fit everywhere. Thanks for this article though, it's just what I need right now for fitting a better "go to" pants pattern.
I agree about wanting to see the post-adjustment muslin. Could you do an update to this article?
Thank you for your interest, but the muslin was disassembled to pattern the final pants, and our model has changed sizes since the article (we work about 7 months in advance). The print was chosen because the young model, who posed for a courtesy, liked it for the final pants. We also like to show a mix of solids and prints in the magazine. Consider too, the adjustments made for the model may not be the exact adjustments you require. Examining that specific muslin might not answer all of your fitting questions. The best bet is to give the technique a try as explained and evaluate it for the fit you're looking for.
The Threads editors
Thank you for this article and for both of the photos. I can see the improvement and can't wait to try it out!