

Fitting the seated figure
I have a friend who uses a wheelchair I’d like to sew for, but I can’t figure out how to alter her pants so they look better and are more comfortable when she’s seated. Any suggestions?
—Carol LaBret, Bexley, Ohio
 Our body dimensions change substantially as we bend into a sitting position, says dressmaker Susan Schwartz. Ordinary pants are designed to look their best when the wearer is standing, so a considerable distortion of the garment is involved when the wearer sits. The main problems, of course, are a lap full of wrinkles from a suddenly too-long front-crotch length, a back-tilted waistline from the downward pull of a now too-short back-crotch length, and pant hems that lift above the ankles and angle up in front. But if you’re going to be seated all or most of the time, you can fairly easily adjust a basic pants pattern to compensate for all of these ills, understanding that the smoother the pants look when seated, the less they’ll fit when standing. You’ll probably have to live with knees that bag out in front and wrinkle in back, since building an angle into the legs at the knee would throw grainlines unattractively off course. But, even avoiding this correction, be prepared for your seated patterns to look quite strange compared with ordinary pants patterns.
Because of the logistical difficulties of accurately measuring a person in a wheelchair, and having them get in and out of muslins, I’ve evolved a simple, combined altering and draping approach to fitting seated pants, as opposed to the more familiar measure-everything-first/alter/test approach usually described in this column. The women I’ve worked with all seemed to prefer the simple lines of easy-to-get-on elastic-waist pants with no pockets, so that’s where I suggest you start. I’ll assume you have a pattern for this style that would fit your friend’s various circumferences if she were standing. You can always add details and dart shaping to, and redesign the waist of, this altered pattern later, as you gain more experience with your friend’s shape and needs.
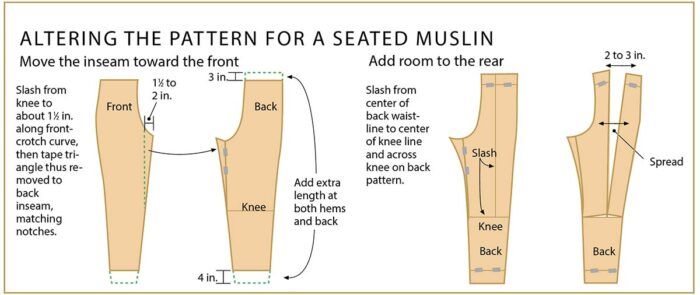
A seated person basically needs more room in back and less in front, both in length and width, so before cutting out a muslin test garment that you’ll tweak as your friend sits in it, first make the changes shown at lower left to the lengthwise dimensions of the front and back pieces. Shifting the inseam forward, as shown in the same drawing, moves the four-point seam joint usually hidden more or less at mid-crotch toward the front, which will be more comfortable. Adding what is essentially a big released dart or unstitched pleat in back, as shown below, accommodates the increased hip circumference we all experience when sitting redistributes our body fat. Of course, if your friend is very thin in back, as are many folks in wheelchairs, don’t bother adding this excess.
These changes should give her plenty of extra room, so when you cut out the muslin version, you typically won’t need more than ordinary side and inseam seam allow- ances around the legs. However, you may need to reposition the side seams above the hips, so allow at least 11⁄2-in. seam allowances here. Cut the hems, front and back, and the waist in the back longer than usual to allow for shaping these areas to the seated figure. Clip the crotch seam allowances (which shouldn’t be more than about 3⁄8 in.). As you construct the side seams, baste the top 8 in. or so since you may have to adjust this area later.
With your friend wearing the muslin, wrap a length of the elastic you’re going to use for the waistband around her waist and pin it at the tension and position she finds comfortable. This is a good time to experiment with different widths and types of elastic, if you have several around, to make sure you’re using the most comfortable and attractive option. Of course, you’ll need to check that the elastic will fit over her hips, or else plan to add a simple (perhaps hook-and-loop-based) closure at the side. Next, you simply need to slowly and carefully adjust the gathered muslin folds under the elastic, pulling up as much as is comfortable in front and making sure the fabric is as smooth as possible in back, including under the legs. This may take some maneuvering and “seeing” with your fingers.
Vertical folds at the front crotch probably mean you need to scoop the front curve out a little, and pulling at the center back means you need to release some of the tightness by lengthening the crotch seam at center back. Shifting the inseam to the front as described earlier usually makes the front curve pretty shallow, so don’t be afraid to cut it deeper if it seems necessary. Note that the center-front seam doesn’t need to be on grain. Also check to see if repositioning the side seams from the waist down to where the hip bends forward will make things smoother. Just pop the basting threads and repin, if this seems likely to help. It’s often useful to make the back side seam a little longer than the front, requiring that it be eased onto the front, in the same way that front-bodice side seams are sometimes eased to conform to the bust. Before marking the waistline and any other changes, check carefully to see that your adjustments have preserved as much symmetry and distorted the grain as little as possible, repositioning gathers if needed.
Before you take the muslin off your friend, fold up the hem at the angle and height that work for her seated posture. Typically, this will involve extending the front and shortening the back, so that the pattern hem will be a convex curve in front and a concave one in back, most easily finished with a narrow machine-stitched hem.
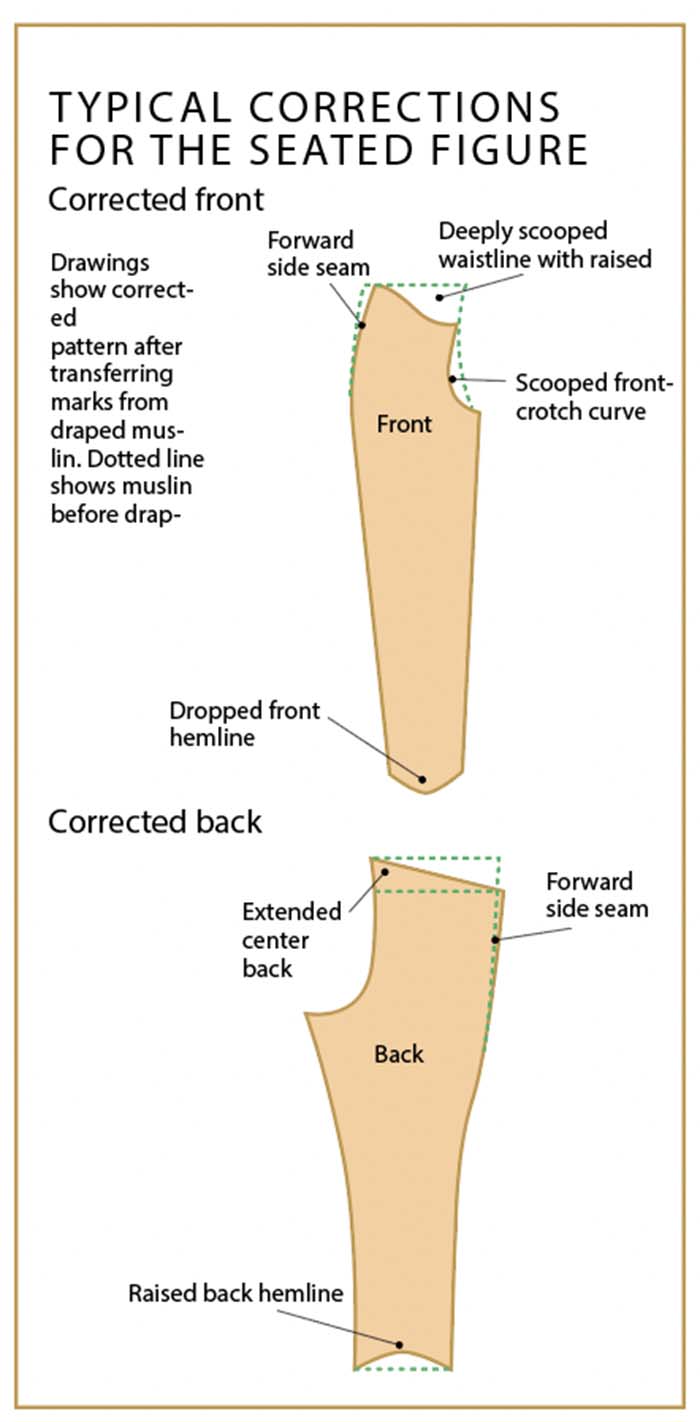
The drawings above show the typical results you’ll get at the top of the pattern when draping a seated figure: a deeply scooped waist in front, combined with a raised back. Surprising as it may seem, there’s often a slight rise at the center front, so the waistline looks more like two side-by-side scoops than one big one. If you adjusted the front and back side seams, you may also find that both now tilt forward, as if bending at the hips. This certainly makes sense for the seated figure, instead of these seams forming a balanced pair of opposing curves as they would for the standing figure.


Log in or create an account to post a comment.
Sign up Log in