This was originally featured in the Sewing Saves department of Threads #192 (August/September 2017).
When shortening tapered pants, it’s common to find that the new hem allowance has a shorter circumference than the pant leg it needs to be sewn to. With a slight taper, you can usually ease the two circumferences so the difference becomes negligible. However, if the pants are significantly tapered, you’ll need more than easing to prevent puckers along the stitching line.
Here are some simple ways to achieve a smooth hem when you shorten tapered pants. You can open the seams on the hem allowance or face the hem with 1-inch-wide bias tape.
Patricia Keay is a professional illustrator, Vogue Patterns designer, and creative garment sewer. SewingBetter.com
Release the hem allowance seams
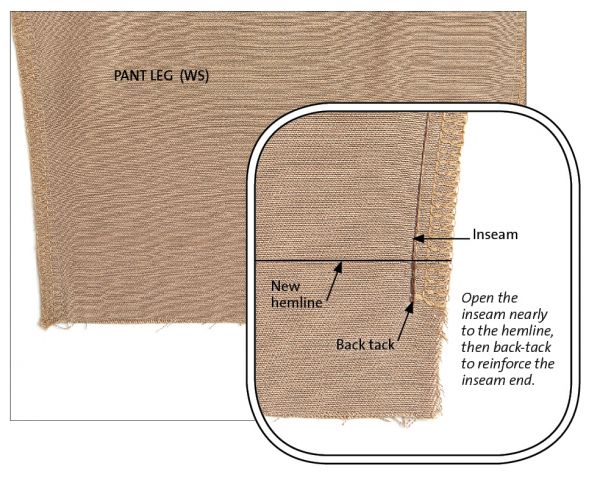
Increase the hem edge circumference by opening the inseam below the hemline. This eliminates some of the taper within the hem allowance.
1. Mark the new hemline. Then mark a 1-1⁄4-inch-wide hem allowance. Trim the excess.
2. Remove the inseam stitches within the hem allowance, up to 1⁄4 inch below the hemline. Reinforce the seam above the opening with machine stitches, back-tacking at the seam end point.
3. Finish the hem allowance and inseam allowance raw edges. Fold the fabric under 1⁄4 inch (as shown on the next page), serge it, or cover it with hem tape.

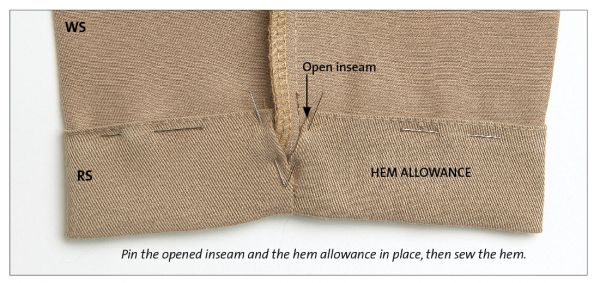
4. Press the hem allowance up along the hemline. Let the inseam open as needed, so the hem edge can fit around the pant leg. Pin in position.
5. Stitch the hem in place. Tack the open seam allowance edges at the seams if necessary.

Add a bias facing
Bias tape has enough give to stretch along the top edge and conform to the tapered pant leg. Use 1-inch-wide single-fold bias tape that is close in color to the pants. I used contrasting bias tape to demonstrate the technique.
1. Mark the new hemline. Trim the pant leg to a 1⁄4-inch-wide hem allowance.
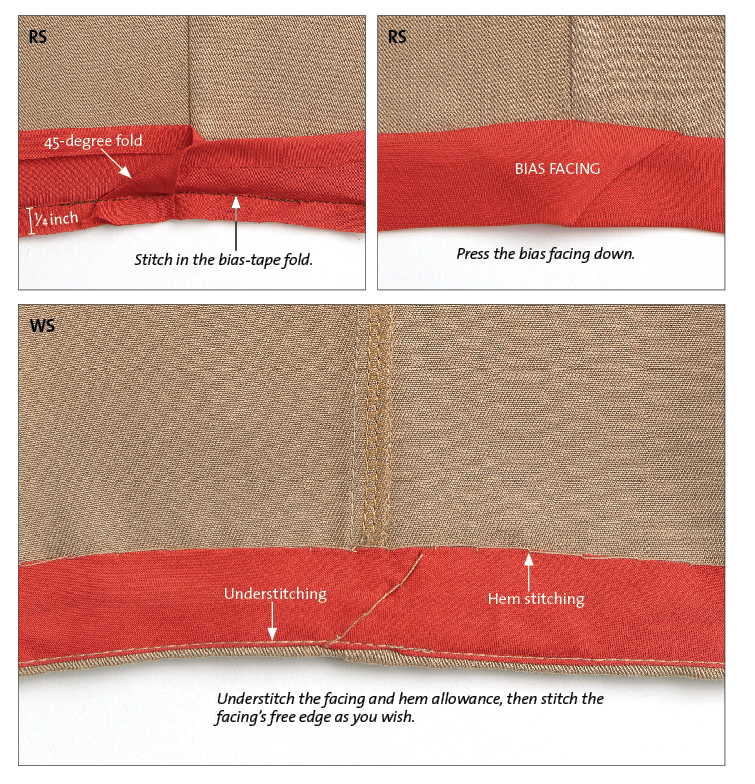
2. Attach the bias facing. With right sides together, open and stitch the 1-inch-wide bias tape to the hem edge, using a 1⁄4-inch-wide seam allowance. Turn each end back at a 45-degree angle to the seam. Press the bias facing toward the seam allowances.
3. Turn the pants wrong side out. Fold the bias facing to the wrong side. Fold along the hemline, rolling the seamline slightly to the pant leg’s wrong side.
4. Press the bias tape to help it conform to the shape of the pants and lie smooth. Understitch the bias tape and hem allowance seam. Use a few hand stitches to secure the 45-degree fold in the hem facing. Then, hand- or machine-stitch the bias-tape facing to complete the hem.


Log in or create an account to post a comment.
Sign up Log in