Create Lovely Lace Appliqué
Restyle a plain-Jane cardigan into a sweet and sassy number
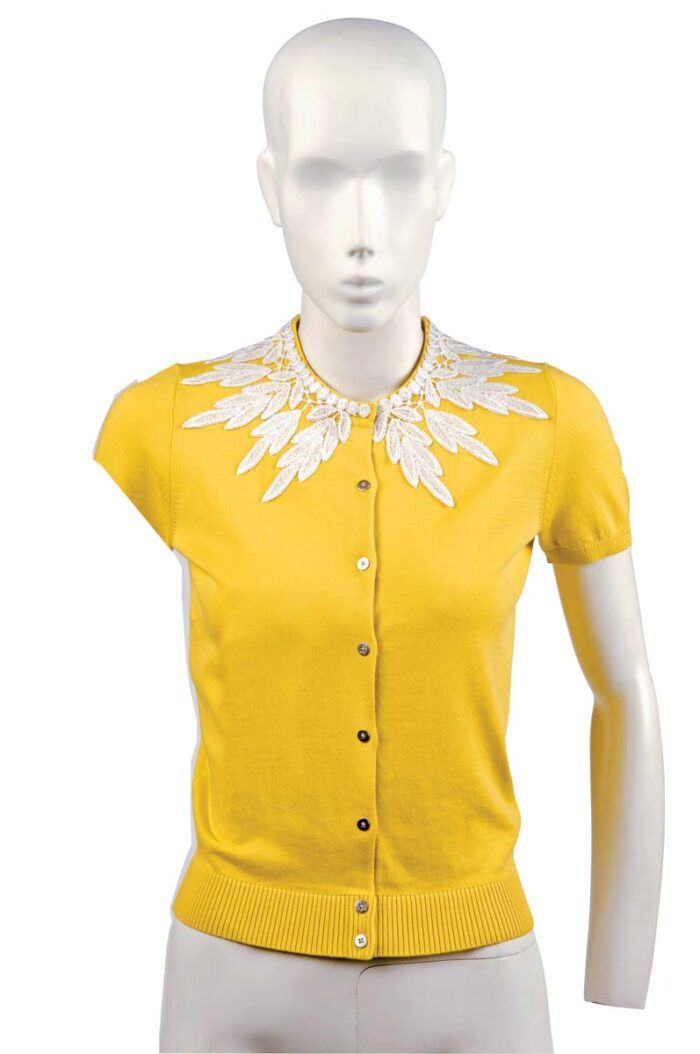
Classic cardigan sweaters can sometimes be too sedate. You can restyle a plain-Jane cardigan into a sweet and sassy number with wide lace trim around the neckline and sleeve hems. It’s a fresh look that’s easy to duplicate with a few feet of trim and any fine-gauge sweater in your dresser.
For a pretty update that’s neither fussy nor childish, select weighty lace trims with large motifs. Look for a wide trim that has one finished edge (the heading) and one decorative edge. The lace must be able to curve around a neckline, so examine the motifs to see if they can be clipped apart to separate and spread.
Venise lace—a heavy trim with lovely relief that comes in a wide variety of widths and designs—is the perfect choice because it frequently has deep, separate points along the decorative edge. Plus, Venise lace motifs are often connected to each other by fine threads that you can clip all the way to the heading edge, enabling the lace trim to spread around curves. You can find suitable lace at fabric and trim stores and online. Vintage tablecloths or curtains also may be a good source.
Purchase extra lace to experiment with stitch types (straight or zigzag) and with bending it around curves. Lace is forgiving; your stitches simply disappear. Temporary spray adhesive holds lace in place as you sew, making embellishment quick and easy.
Prepare the Lace
If the lace resists flexing enough to encircle the neckline, try snipping into the decorative edge. This enables the trim to spread and follow the sweater’s neckline curve. Use a pair of embroidery scissors with sharp points for precise cutting. If you have a dress form, place the sweater on it to support the lace as you work.
1. Customize the lace, if necessary. If you’ve chosen a lace trim that isn’t the exact style and length you’d like, you can adapt it. Portions of the motifs can be removed to reduce the trim’s length, and some can be added to fill in any blank spaces. For example, I cut one pair of leaves from each frond motif to reduce the trim’s length, then I filled in the spaces between fronds with extra leaves.
 2. Arrange the lace. Starting at center front on the overlap side of the cardigan, lay the lace around the neckline. You can align it with the outside edge of the neckline or with the seam that attaches the ribbing. Curve the lace around the neckline, pinning it in place as you go. When you arrive at the underlapped side of the center front, step back and check for symmetry.
3. Finesse the fit. If the lace motifs aren’t symmetrical on each side of the center front, you can adjust the lace’s arrangement slightly by inserting or removing a partial motif. To do so, cut the trim at an unobtrusive spot (the center back is a good choice), and add or subtract a section of lace there. If needed, apply a small bead of Fray Check to the cut ends.
|
You can apply lace trim to the hems of your sweater sleeves, too. If the sleeves are very narrow at the hem, try free-motion stitching. Drop or cover the feed dogs, and install a darning or embroidery presser foot. Move the sweater back and forth or side to side under the needle. For the best results, let the machine go fast, and move the fabric at a moderate, even speed. If the sleeves are extremely narrow at the hems, embellishing them with lace could make them difficult to get into and out of. You can shorten them to three-quarter-length sleeves before adding the lace. |
Position and Sew the Trim
Temporary spray adhesive makes basting lace in position quick and easy. A straight or zigzag stitch holds lace neatly and invisibly.
1. Unpin the lace from the neckline, and lay it wrong side up on a sheet of paper or protective plastic. Following the manufacturer’s instructions, apply the temporary spray adhesive to the wrong side of the lace. If you’ve cut the lace into two or more pieces, work with the pieces individually.
2. Lift the lace, and carefully arrange it around the neckline, adhesive side down. Finger-press it in place to secure. Add pins for extra reinforcement, if necessary.
3. Set your sewing machine for a straight or zigzag stitch. From the sweater’s right side, stitch the lace trim’s heading in place along the neckline edge. Then, stitch along the outer decorative edge. Depending on the motifs’ shapes, you can stitch with the feed dogs up, pivoting as needed to negotiate corners. Or you can lower the feed dogs, install an embroidery or darning presser foot, and free-motion stitch to secure the lace edges.


Log in or create an account to post a comment.
Sign up Log in