

Living on the Edge: Tahari-Inspired Edge Treatments
Tahari-inspired trim details make your creations the center of attention

Known for collections that feature subtle, intricate details, Elie Tahari manipulates fabrics in such an effortless way that it creates drama on any style. Here are four spectacular edge treatments inspired by Tahari’s creations and created entirely from garment fabric: beaded folds and tucks, a bias bow, five strands braided with beads, and floating arrowheads. Once you’ve mastered these techniques, you can sculpt your garment edges into masterpieces. Embellish necklines, collars, cuffs, pocket edges or any edge you like. Adding that extra little detail sets your style apart.
Secure soft tucks with beads
Not all folds and tucks require machine stitching to stay in place; you can secure tucks with beads for a decorative effect.
1. Fold the tucks into the finished position. Baste them along the folds.
2. Stabilize the tucks. Baste 1⁄8-inch-wide ribbon horizontally on the back of the tucks so they remain in place.
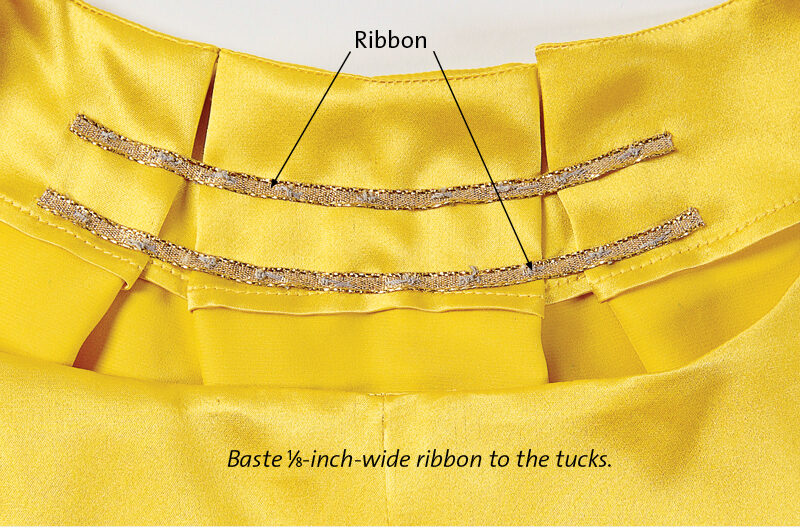
3. From the right side, use tiny backstitches to hand-sew beads along the seamline. First sew a bead along each tuck fold, catching the ribbon underneath. Pick up a bead every couple of stitches, and then add additional beads between them as desired. Add another row if desired.

Sculpt a row of faux bows

Manipulate a bias tube to create the illusion of bows.
1. Cut a 3-inch-wide bias strip. Cut the strip about 75 percent longer than the edge you plan to cover, e.g., if the edge is 6 inches long, cut a 101⁄2-inch strip. If the strip is not long enough for a continuous row of bows, you can piece it, and hide the seam later under one of the bow edges.

2. Sew a tube. Fold the strip lengthwise with right sides together, and sew the edges with a 1⁄4-inch seam allowance, as shown above at left. Press the seam allowances open over a card-stock template, as shown above at right. Turn the strip right-side out, center the back of the seam, and press again.

3. On the back, mark the tube every 2 inches. Then, mark the garment edge every 13⁄8 inch.
4. Create a bow center over each marking on the tube. Hand-stitch to create gathers across the strip, as shown below. Then, wrap a cord of fabric around the gathers to cover them, as shown at right. Tack a bow center to each marking, as shown at far right. Sew it in place.

5. Add pleats to form the bows. Between every other center, pinch a pleat of fabric with the fold away from the center, and tack it to form an upper bow. Pinch a second pleat on the other side, and tack it in the opposite direction to form an under bow. This forms the overlap that creates the illusion of bows.

6. Finish the strip. Make sure all of the bows are the same size. Then finish the end of the strip; turn under the raw edge to form the last bow.

Bead and braid five-strand trim
Five skinny, self-fabric tubes plus a few beads yield a complex, decorative braid that can trim an edge or act as straps on a dress. Here, tubes of different colors were used to make it easier to see how they are woven.
1. Make skinny tubes. Cut five bias strips 3⁄4 inch wide by at least twice the desired finished braid length. With right sides together, sew each strip lengthwise to create the tubes. Turn the tube right-side out.
2. Arrange the tubes side by side on self-fabric, and sew across the ends to secure them. For greater control of the braid tension, pin this end to an ironing board or foam core.

3. Cross the tube that’s furthest to the right, as shown in red below, over the two tubes to its left, shown in teal and white below. Then, cross the tube that’s furthest to the left, shown in blue below, over the two tubes to its right, shown in green and red below. Now, the teal tube is furthest to the right and the green tube is furthest to the left. Repeat the process, continuing to alternate the right and left crossovers.
4. Insert a bead. After every four cross-overs, insert a bead onto the left of the two under the strands just prior to the crossover.

Stitch floating arrowheads
Enhance any neckline with stitches strategically placed along a strip to form floating triangles. Use ribbons or bias-strip tubes of any width. The narrower the strip, the more texture there will be.
1. Sew and mark the tube. Use two temporary markers in different colors to differentiate the dots. Mark dots in black 3⁄8 inch apart along each long edge, and mark red dots between them, as shown at left.

2. Form 3-D triangles. With the back of the tube up, anchor a stitch through a black dot. Take the next stitch directly across at the opposite black dot. Then, take the third stitch through the closest red dot. Pull the threads to bring all three marks together and another stitch to secure them. Insert the thread at the next side mark, and repeat. Continue until the desired length is achieved. Then hand-stitch the sculpted tube to the edge of your choice.


Log in or create an account to post a comment.
Sign up Log in