

Basic Sewing Machines and How to Choose One
Whether you’re a novice or a confident sewer, these machines will work for you.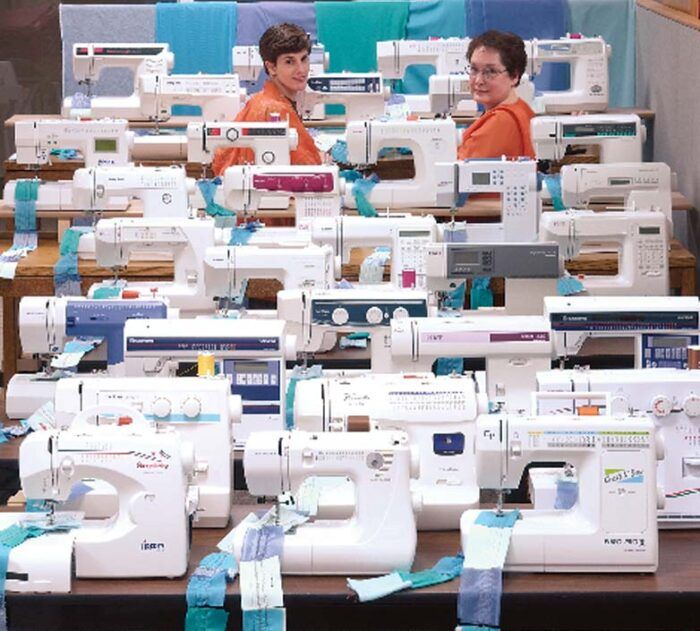
Maybe you’re looking to get into sewing as a hobby or are a beginner interested in garment construction, home-décor sewing, or quilting. Or perhaps you’d like to help someone else get hooked on sewing by giving them a new machine as a present. In either case, you’re likely to have lots of questions about which machine to buy. Making sense of the many brands and models on the market can be intimidating; even veteran sewers (and sewing editors) are challenged when making new machine decisions. To help you shop smartly, Threads explains how to evaluate sewing machines and pick the best one for your needs.
Putting machines through their paces
When we test a machine, we have a process that you can try, too. This will enable you to form your own opinions about different makes and models. Here’s how we tested machines when we were writing this article.
We cut uniform swatches of assorted fabrics for our stitching samplers: three wovens—polyester organza, shirt-weight cotton, and heavy denim (folded over to simulate a multi-layer jeans hem); three knits—stretchy mesh, T-shirt-weight, and polyester fleece; and a quilt sandwich of cotton broadcloth and cotton batting. We threaded each machine with all-purpose thread, set the thread tension within the recommended range, and retained the factory installed needles.
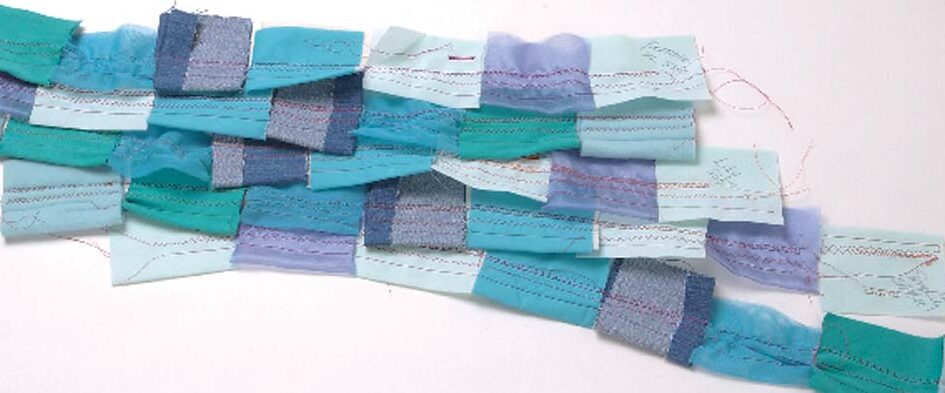
Then with each machine we made each swatch set into a swag by sewing a continuous line first of straight stitch, then zigzag stitch, and lastly, an overcasting stitch. You can see some of the results in the photo above. We also sewed a buttonhole on the shirt-weight cotton. On a larger piece of fabric, we stitched a sampler of the decorative and utility stitches.
As we sewed, we looked for smooth, regular stitches, even tension, and easy feed on a variety of fabrics—with minimal need for setting adjustments. We noted features such as: the position of the controls, how high the presser foot lifted, additional storage for presser feet and accessories, the placement and function of needle threaders and thread cutters, and the amount of lamplight. We observed that some of the machines balked when the foot control was first depressed, others continued to sew briefly after we lifted our foot off the pedal (albeit, often to complete a built-in stitch pattern). It’s not hard to get used to any machine’s idiosyncrasies, but it’s a good idea to be aware of them.
What drives your machine?
Today’s sewing machines can be divided into three categories: mechanical, electronic, and computerized. The main differences among them lie in the motor systems, functions, and features they offer.
Mechanical machines are driven by a single motor, which uses cams, gears, and levers to move the needle shaft and the feed dogs. Most mechanical sewing machines include only the basic features, such as a few utility and decorative stitches, stitch length and width adjustment, and a buttonhole feature. These machines are intended to be sold at very affordable prices, so manufacturers keep extras to a minimum.
Electronic machines work the same way mechanical models do, but they incorporate electronics that allow for additional labor saving features. For example, they might have a speed adjustment switch, a needle position option, and a low bobbin warning. They often feature a larger number of built-in stitches than do the purely mechanical machines, and they are generally more expensive.
Computerized machines use an entirely different drive system than mechanical or electronic ones. Rather than one large motor, they contain a series of step motors controlled by a microprocessor. These motors are almost maintenance-free. And the tiny chips enable these machines to offer dozens of programmed stitch patterns, including alphabets.
Considered top-of-the-line by manufacturers and dealers, computerized machines (even the simplest models) usually offer more features than electronic machines, such as automatic tension adjustment and memory to store and retrieve stitch patterns you create.
What are utility and decorative stitches?
The majority of home-sewing machines feature a variety of built-in utility and decorative stitches in addition to the standard straight stitch (which makes nonstretch seams) and the zigzag stitch (which allows seams to stretch).
Utility stitches are used for hemming, finishing seams, sewing elastic and trims, and sewing novelty fabrics to prevent raveling, stretching, or “popping” seams. Often utility stitches make sewing easier, faster, and more professional-looking. And sometimes they’re only visible on the inside of a project.
Decorative stitches, which are sometimes intricate, can be very appealing. However, if you don’t plan to embellish your sewing projects with stitched designs, they may not be important to you.
You may come across literature that refers to “stitch functions.” This term refers to the variety of uses for a specific stitch, not to a variety of different stitches. A straight stitch, for example, has many stitch functions: sewing a seam, top-stitching, inserting a zipper, shirttail hemming, edgestitching, and basting. If you are tallying the features of a particular machine, be sure you understand the difference between what the machine can do and what you can do with it.
Not all buttonholes are equal
While most contemporary machines feature an automatic buttonhole setting, you may encounter one that does not. Any machine that zigzags can produce a decent buttonhole: all it takes is two parallel rows of satin stitches and a bar tack at each end. Nonetheless, for convenience, most sewers consider an automatic buttonhole function a must-have feature.
Some machines have a four-step buttonhole, for which you select and sew each of the four sides individually. A one-step buttonhole stitches all four sides with just one command. Most of the machines we tested feature a special foot that automatically sizes the buttonhole to fit your button. Without this foot you have to mark the buttonhole on the project and control the size manually.
Since buttonholes often front and center on a garment, it’s important to be happy with the one your machine makes. The photo below shows various buttonholes produced by different machines. Each was made using automatic settings, without adjustments. When testing, bear in mind that most sewers choose to fine-tune automatic buttonhole settings to complement fabrics. Find out if it’s possible to adjust stitch width and length to refine the results.

Problems: Is it you, or is it the machine?
When we sat down to sew on different sewing machines, we ran into occasional glitches during start-up and test-stitching. You may think you know what you’re doing, but it’s a good idea to read the instructions before you begin. Most of our problems were solved when we checked for threading errors.
If possible, test-drive machines before purchasing one. This prepares you for what to expect after you get your selection home; you’ll have a more realistic idea of how it should sound and perform. It doesn’t happen often, but machines can get damaged by shipping or otherwise be defective. You may not recognize a flaw in an unfamiliar machine.
When purchasing a machine, be sure to read the warranty carefully and have the dealer explain its terms to you. Most warranties range from one to two years for electric and electronic parts, and 10 to 25 years for mechanical systems.
What do machines cost?
There’s a basic machine to suit any pocketbook, from $100 to well over $1,000. The higher-priced machines tend to be electronic or computerized, and have a larger number of features and stitches. At the lower end, you can find a perfectly serviceable sewing machine that will allow you to complete any project.
Many dealers offer a discount of 10 to 15 percent below the suggested retail price. They’ll also often give lessons and classes on your machine, free routine tune-ups, and general technical and how-to support. Many seasoned sewers say the most important feature when purchasing a machine is a good relationship with the dealer who will stand behind his or her product. Also, check the manufacturers’ websites for any current promotions.
You can find sewing machines (sometimes up to 50 percent off retail price) on the Internet and TV shopping channels, at chain stores (particularly for lower-priced machines with very basic features), and wholesale membership warehouses. You won’t get much (if any) service when you buy from these vendors, though. If dealer support is not that important to you and you know exactly what you’re looking for, this is a way to save money.
Consider your skills and needs first
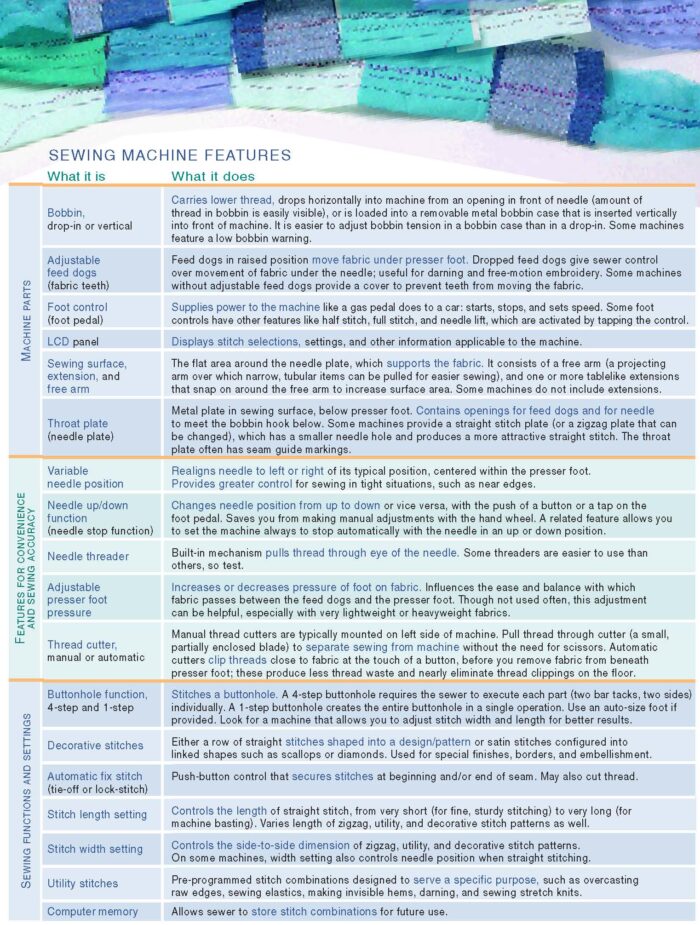
Before heading out to shop for a sewing machine, consider how you see yourself using it. Think not only about the specific tasks you want to accomplish now, but also about your long-term sewing goals. Are you more comfortable starting with a less expensive machine with fewer features, and then upgrading as your skills develop, or do you prefer to spend more on a machine you can grow into? The chart above explains some of the features available on today’s basic machines. Bear in mind there are myriad more sophisticated machines as well.
It’s really personal preference
There’s a machine for everyone, but not everyone is looking for the same thing. Accept guidance from the dealer, but don’t hesitate to stick to your budget and your wishes. Your preference will be influenced not only by features and price. You’ll also want to consider the kind of machine you’re used to and your sewing needs. Finally, don’t ignore how good each machine feels to you.
When you start shopping for a new sewing machine, spend some time making a “need and wish” list. Then, research the options in your price range, test several machines, and evaluate the results of your test. Your sewing machine is your partner, so make sure you pick one you’ll enjoy working with.


Log in or create an account to post a comment.
Sign up Log in