


Accurate cutting is important for a well-sewn garment, but this step doesn’t have to be difficult if you keep in mind a few simple things. After checking and adjusting your pattern for proper fit, follow the pattern’s cutting layout; then you’re ready to cut. You’ll need a good cutting tool, whether it’s scissors or a rotary cutter, and a table large enough to hold the project.
Tools and tables
Invest in good tools and find a sizable space for cutting—your results will be more accurate and you’ll save your back, too.
Scissors
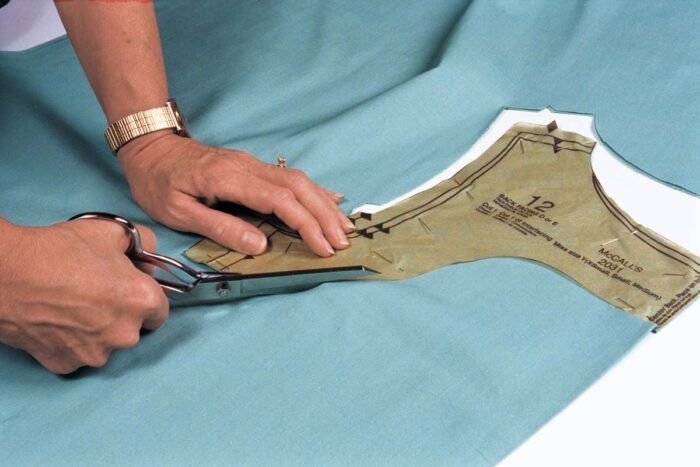
Don’t compromise when it comes to scissors. A good-quality pair of sharp, bent-handled shears that allow the fabric to lie flat on the table is necessary for accurate cutting. There are many types and styles of scissors to choose from, and you may want to have more than one pair. I like the Softouch spring-action scissors by Fiskars because they’re lightweight and have a comfortable handle, which is suitable for left- or right-handed sewers. They work best on light- to medium-weight fabrics.

Use bent-handled shears, and cut with pattern and fabric to the left of the scissors (vice versa for lefties). Cut with long, steady strokes along the cutting line using the entire blade of the scissors. And keep the fabric flat on the table. |

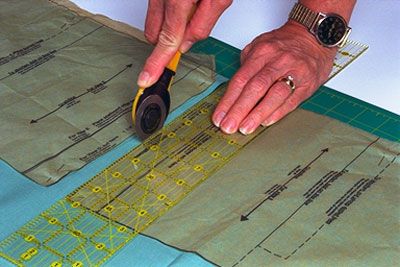
A rotary cutter is a fast, accurate way to cut out patterns. Use a ruler as a guide on straight edges, and always use a special rotary-cutting mat. |
![]()
Rotary cutters
Some sewers prefer to use a rotary cutter rather than scissors. It takes a little practice to get the hang of using a rotary cutter, but once you do, it’s fast and accurate. Rotary cutters are available with blades in various sizes beginning with 1-1/8 in. (28mm) and should be replaced or sharpened with a rotary-blade sharpener when they get dull. Use a hard plastic ruler to hold down the pattern and fabric and to guide the cutting blade when cutting long, straight edges. And switch to sharp scissors when cutting tight corners or small curves. Always use a mat that’s especially designed for rotary cutting on a table surface.
Table height is also an important consideration. A table that’s about 34 in. high, or 4 in. higher than a standard dining table or desk, makes cutting much easier and is better for your back. Of course, this depends on your height (I’m almost 6 ft. tall, and my cutting surface is 37 in. from the floor). Portable cutting tables are available at many fabric stores or by mail order. If possible, position your table so you can approach it from both sides for easier cutting.
Cutting reminders
Keep the entire length of fabric folded on the table (not draped over the edge) while you cut, so the fabric’s grain won’t be distorted. Most of the time, it’s more efficient to fold the fabric and cut two layers at once, but occasionally, it’s easier and more accurate to cut a single layer at a time: for example, when the fabric is heavy or especially delicate and hard to control or when cutting plaids and other designs that need matching. When cutting single layers, always be sure to turn the pattern tissue to the wrong side to cut the second piece; otherwise, you’ll end up with two right or two left sections. And to save time, get in the habit of cutting everything at once–interfacings, linings, and so on.
Direction makes a difference
I’m right-handed, so I cut with the pattern and fabric to the left of my scissors (reverse this if you’re left-handed). This allows me to clearly see the cutting lines while I support the pattern and fabric with my left hand. If you can’t reach around each pattern piece to cut in this way, roughly cut around the sections to separate them. Turn the roughly cut pieces to find the best cutting position.
On straight cutting lines and large curves, cut with long, steady strokes using the entire blade of the scissors. On small curves, use shorter strokes. Cut exactly along the cutting lines, and don’t lift the fabric as you cut.
Whenever possible, cut in the direction of the fabric’s grain. An easy way to remember this is to cut from the widest part of the pattern piece to the narrowest. For example, cut the side seams of an A-line skirt from hem to waist; cut the seams of a fitted sleeve from underarm to hem.
Pay attention to the pattern notches while cutting. They’re important for matching one cut garment section to another. If you’re a beginning sewer, I suggest cutting all notches outward, as indicated on the pattern, cutting double and triple notches in one unit. More experienced sewers often cut straight through notches, then mark them on the fabric with a snip or a chalk mark. Don’t cut notches toward the seam because this cuts away too much of the seam allowance and weakens it.
Pay careful attention to your cutting, and your reward will be easier, more accurate sewing. It’s a simple, worthwhile equation.
Jan Bones cuts and sews in Winnipeg, Manitoba, Canada, and teaches at sewing festivals across North America.
Photos: David Page Coffin


thanks great work..
thanks and nice share.........
nice cutting dress.
I really struggle with cutting neatly. Cutting notches is especially hard for me – manouvreing in and out! I might switch to a different marking method for notches. I am going to print this article out and refer to it.