Splicing Knits: How to Color-Block
Create bold designs by splicing contrasting knit fabrics.
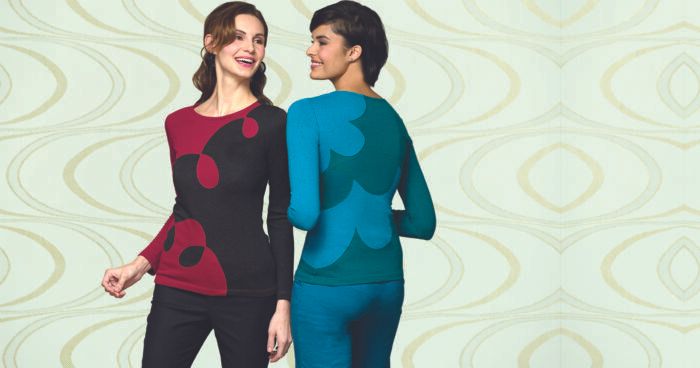
Designing original, color-blocked motifs in knits doesn’t require fancy pattern-work or tricky sewing. To unleash your inner artist and create bold designs, splice contrasting knits together with lapped seams. The technique applied is similar to large-scale appliqué: You simply layer two fabrics, stitch a motif, and trim around the edges of the upper layer to reveal a unique, graphic design. This opens up an entirely new world of opportunities and eliminates the frustration you may feel sewing complicated seams in stretchy fabrics. With this method, making curves and angles in knits has never been easier.
This technique works best with stable knits such as wool or cotton jersey, sweatshirt material, and polar fleece. Avoid knits with Lycra/spandex or ribbed knits, as they have too much stretch to produce smooth seams. When you’re starting out, it’s easiest to work with just two colors and to use the same type of knit fabric for both. After you’ve gained a little experience, try combining different knits or more colors for additional interest.
Simple color-block garment, complex design
Because knit fabric is stretchy, it’s essential that you select a simple garment pattern. A good style to start with is a basic T-shirt. Other garments that work well are boxy tops, pull-on skirts, simple dresses, and basic cardigan and jacket shapes. It’s important to begin with a silhouette that flatters and fits well; that way, you can focus on the design process.
There are countless design options when working with this technique. I like wavy or jagged seams, which are tricky to sew using standard methods but easy with this technique. I simplified a Marimekko print for the designs shown here, but you can use any motif you like, so experiment and have fun.
Design and transfer the motif
Determine the motif, and draw it on the pattern. Then transfer it to the fabric pieces.
Draw the motif
| 1) Create your motif. When drawing the motifs, work with full front and back pattern pieces so you can see the entire design at once. To make modifications when planning, start with a separate paper overlay, as shown at right. Once you’ve finalized the design, mark the full pattern with a permanent-ink marker or colored pencils. Outline the area of the pattern to be cut from the top layer of fabric, leaving a 1-inch margin outside the motifs.
2) Make registration marks. Either snip a notch into the pattern sections, or mark with a marker so you can maintain the original pattern shape. This makes it easy to align the sections during assembly. |
 |

Transfer the motif
1) Prepare the garment sections. Cut each garment section with the pattern and fabric right-side up. If the motif is scattered over most of the garment section (such as the front and/or back), cut a complete front or back from each color so you can use it without restriction.
2) Transfer the motif to the top layer of fabric. Use temporary dressmaker carbon to mark the motif lines on the right side of the fabric sections that make up the top layer.
Join the layers
Choose a stitch that works with your fabric and design. Then, sew the overlapping layers, and trim the excess fabric.
Test the stitch
| First, try a simple straight stitch or a zigzag stitch. The stitch you use varies according to the amount of stretch in the fabric as well as its thickness and texture. For example, if the fabric is smooth and has minimal stretch, e.g., wool or cotton jersey, and the style is not close fitting, a straight stitch works fine. On fabrics with more texture, a zigzag stitch covers the lapped edge better. It’s also more elastic for extra stretchy fabrics or very close-fitting garments. You might also prefer one stitch to the other aesthetically. |
|
| Always test the stitches on the garment fabrics and on a sample section of the actual design, so you can feel confident with the choice, and there aren’t any surprises. Test the stitch for smoothness, stretch, and overall appearance. |
|
| After stitching the test seam, trim away the excess next to the sewing line to see whether the stitching holds well. If there isn’t enough coverage near the edge with the zigzag stitch, you can widen and slightly shorten the stitch settings. Once you’ve found the right setting, make a note of it. |
|
Sew the garment sections
 |
 |
| 1) Layer the fabric. Use the registration marks to align the layers right-side up. The top layer should extend past the motif lines by at least 1 inch. Pin or baste the layers together. | 2) Stitch the design. Double-check to make sure the registration marks and raw edges on both layers are aligned. Sew the motif lines with the stitch you’ve chosen. |
 |
 |
| 3) Trim the right side. Cut away the top layer of fabric outside the stitched-motif line. Use appliqué scissors to trim close to the stitches. | 4) Trim the wrong side. Cut away the wrong-side edges, leaving a 1⁄4-inch seam allowance. Then sew the garment together as desired. |
“Splicing Knits” by Connie Long, which first appeared in Threads #142, April/May 2009.
View PDF


Log in or create an account to post a comment.
Sign up Log in