

Sewing Jackets from Knit Fabrics
A fitted jacket made in a knit fabric offers both style and comfort

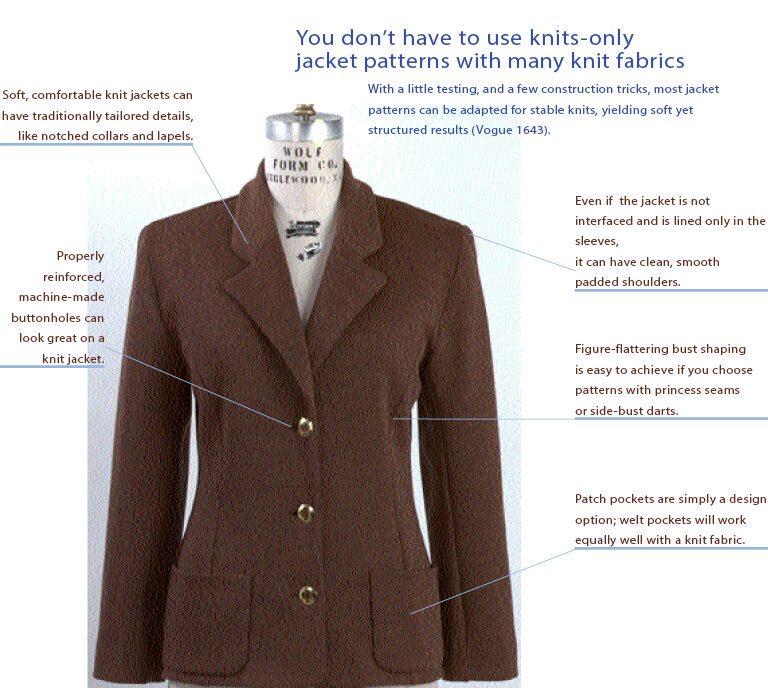
I used to think of using knit fabrics only for unstructured, pull-on garments such as T-shirts, elastic-waist shorts, summer shifts, and other soft, sporty clothing. But with some experimentation, I’ve found that you can also get great-looking, supremely comfortable results using knits for more tailored or structured garments, especially jackets. In this article, I’ll share my experiences with blending tailoring and sewing with knits techniques, as outlined in the photos below. I’ll offer tips on choosing suitable patterns, fabrics, and interfacings, when to use a serger or a regular sewing machine, and walk you through the choices I made for the garment above.
Test the fabric’s stretch and drape before cutting
All knits have a little give, which is what makes them so comfortable to wear and so easy to fit, but many knits actually stretch, which is why patterns for knits usually need to be cut smaller than patterns for wovens. How much smaller depends on how stretchy your fabric is, so if you want to use a pattern that’s not designed for knits, it’s necessary to assess the amount of stretch in any given knit fabric before you choose or cut out the pattern.
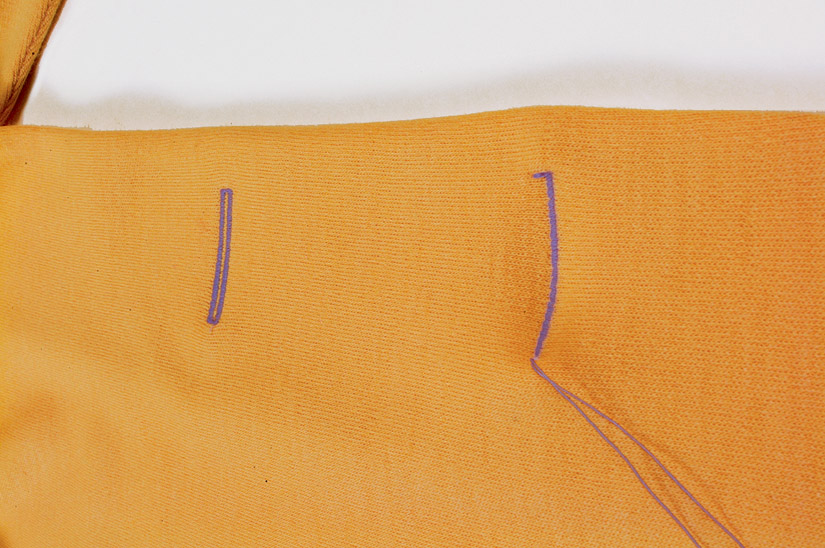
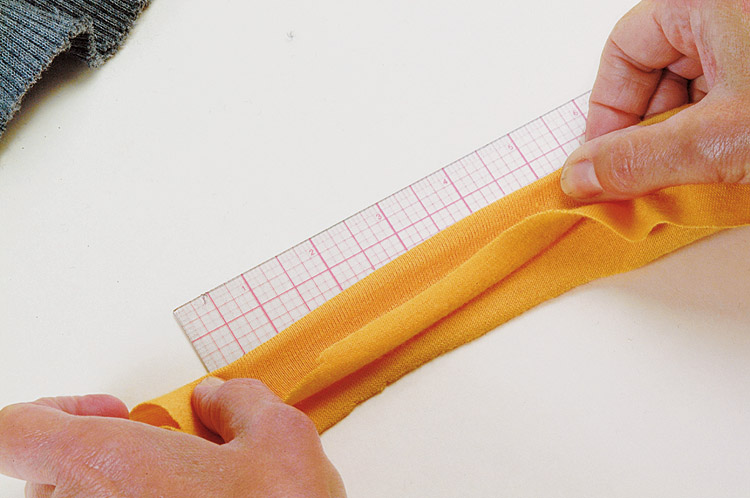 To test a knit fabric for its degree of stretch, grasp a 4-in. length of the knit, folded on the cross-grain (the direction of greatest stretch), and stretch it over a ruler, as shown in the photo below. A 4-in. length of a typical jersey will usually stretch from 1⁄2 in. to 1 in. A general rule for me is to go down one pattern size if the pattern is designed for wovens and you’ve selected a knit with this degree of stretch. Double-knits will usually stretch less than 1⁄2 in., requiring little or no change in the pattern, and sweater-knits, rib-knits, and most loosely knit fabrics will stretch more than 1 in. I usually avoid these very stretchy fabrics and any very bulky knits for jackets or other similarly structured or semi-structured projects. Ideally, you’ll want to position any knit fabric’s cross-grain going horizontally around the figure.
 |
 |
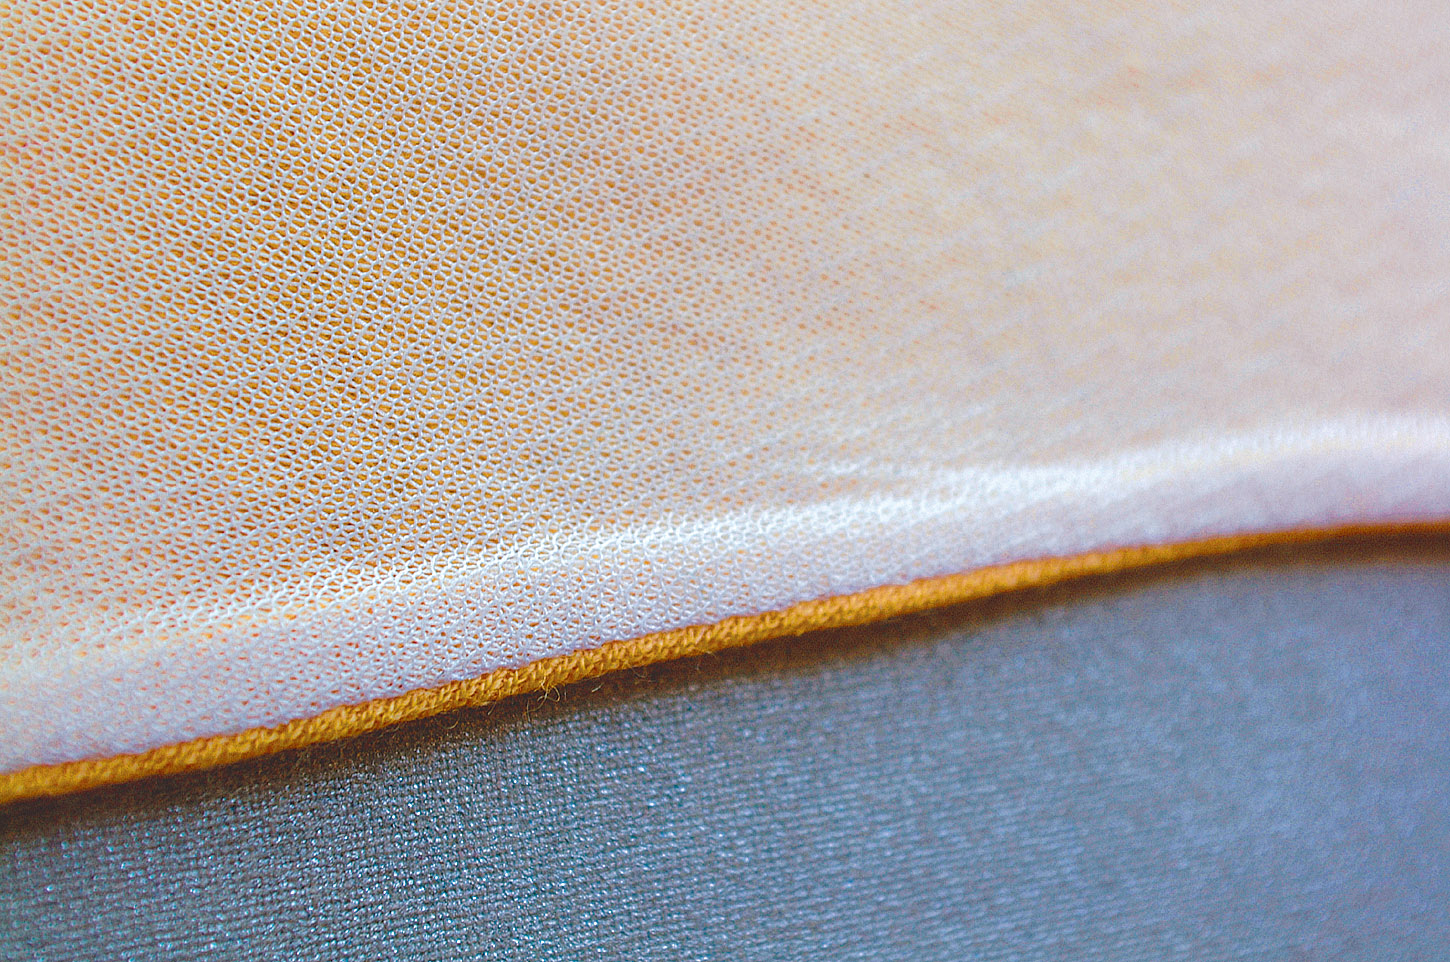
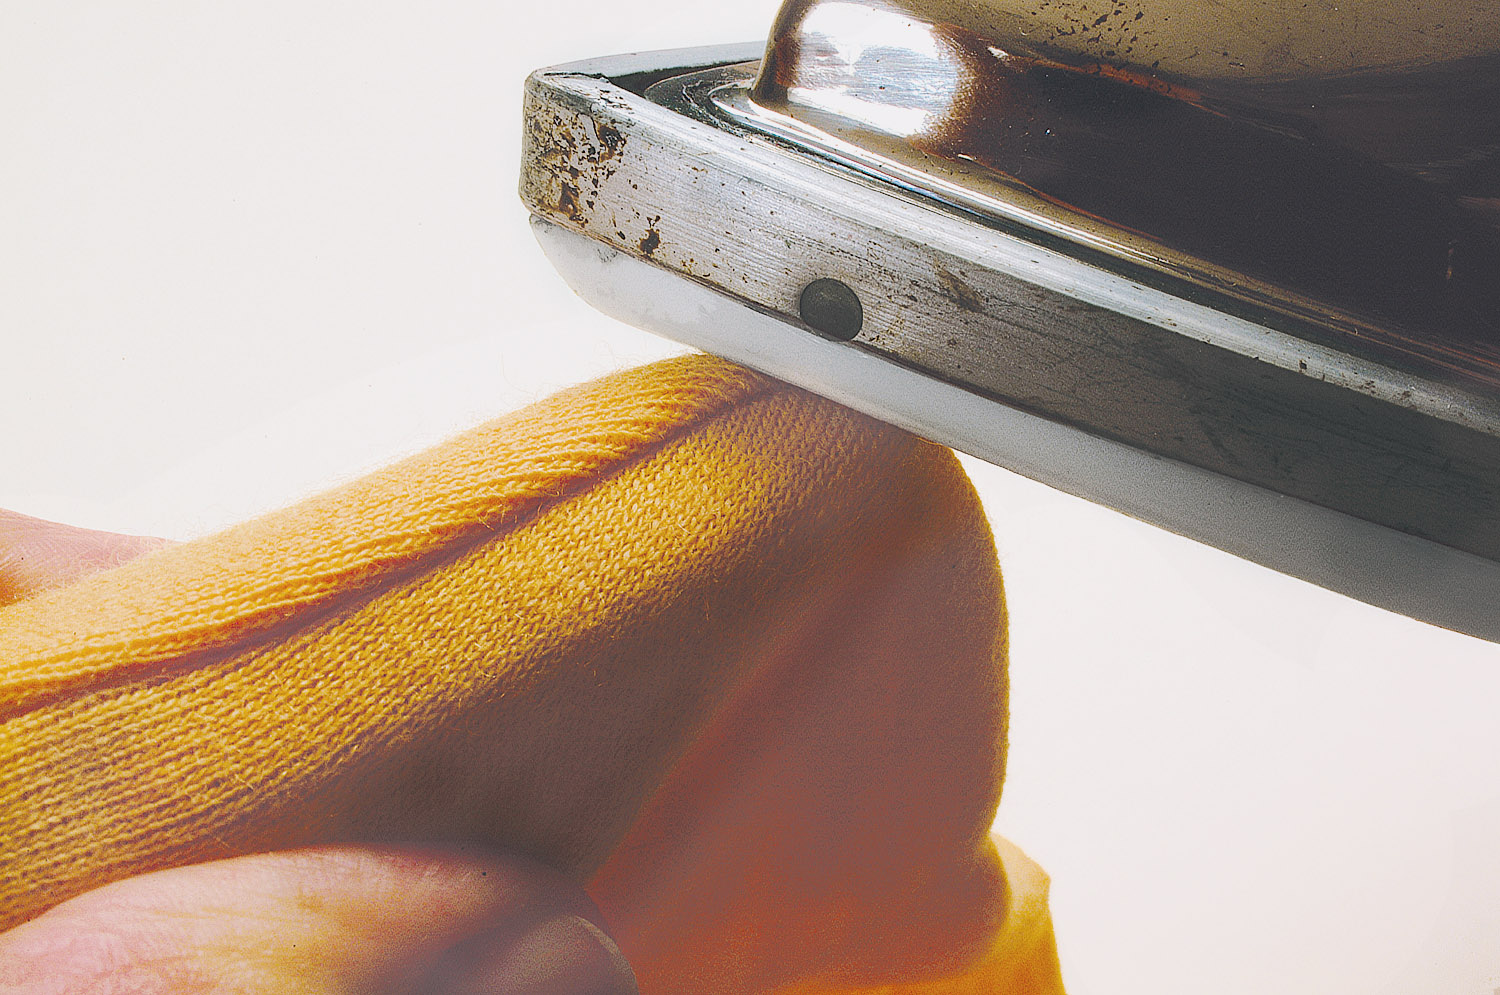
To test a piece of fabric for drape (or structure) appropriate for a jacket, I suspend a small piece of it over my closed fist (shown above) in which I’m comparing a double-knit with a very soft jersey. The distinct, stiff folds you can see forming on the tan double-knit reveal plenty of structure, while the blue jersey is too relaxed for jacket-making. Ideally, I try to use fabric as is, without changing its inherent structure with overall interfacing, but if I’m especially attracted to the soft fabric, I’ll definitely test a few interfacings to see whether I can get a happy blend of softness and structure, without sacrificing the crosswise stretch, as I was able to achieve with the samples. I’ll discuss interfacing choices in more detail in a moment.
These tests are good starting points, but often some pattern alterations will also be needed when adapting a woven pattern to a knit fabric. I always test any new pattern or pattern/fabric combination by making a mock-up out of an inexpensive fabric that has similar qualities to my fashion fabric. In the case of a knit, this means using a knit-fabric “muslin,” making sure that it stretches similarly (in both the lengthwise and crosswise directions) to the knit fashion fabric.
Choose a style with bust shaping
Although we are accustomed to seeing knit garments with little or no shaping in ready-to-wear clothing, I’ve found that using jacket patterns with some bust shaping gives the best-looking results. Bust shaping is included (and can be easily adjusted) if your pattern has a princess seamline or a side-bust dart, not just a waist dart. These details will help you keep the underarm and side of the garment looking trim and clean, by creating a more flattering fit through the bustline.
I avoid patterns with many complicated style lines or details because the stretch factor in knits will make joining seams with different grain orientations difficult. But this doesn’t mean you must choose a style with a plain neckline; as you can see in the jacket, a notch-collar jacket can be made successfully in a knit.
Don’t line soft jackets
Whether or not to line a knit garment is an important decision to make early in your planning, because it will affect the construction techniques you’ll use, as well as how the finished garment will look and feel. As with most knit-tailoring options, there’s no right or wrong choice; it’s simply a creative decision. Here’s how I considered the question for the project shown:
Because I’d chosen a wool double-knit, stable (nonstretchy) knit fabric, I could use classic tailoring techniques, including stabilizing and supporting the fabric with underlining or interfacing and using a firm shoulder pad and sleeve head to get a crisp-looking shoulder area. If I chose this approach, I’d need to fully line the garment, both for wearing comfort and to cover the interior construction. These choices would produce a structured garment that would look and feel like any well-made blazer or classic tailored jacket.
But I didn’t want a structured-looking blazer. I wanted this project to look like a jacket but feel more like a sweater. Since I didn’t have to stabilize my fabric with underlining or interfacing, I could leave the body of the jacket unlined, to help keep it feeling sweater-like. This meant that I’d need to keep the construction of the body of the jacket clean since the inside of the garment would show. But I could choose to line only the sleeves, which would provide wearing comfort, possibly cover a sleeve head (which always improves the fall of a sleeve, in my experience), and allow my arms to slip in and out easily. Also, a small, covered shoulder pad would be no problem to include in an unlined jacket.
In short, I prefer to leave the body of a soft knit jacket unlined, so I don’t have to struggle with a nonstretch shell inside a stretchy garment, but I can go either way with a more stable fabric. Whenever I line a knit garment, either fully or partially, I use silk crepe de chine or charmeuse. It seems almost impossible to find a lightweight knit that works as a lining.
Choose interfacings with careful testing
Whether I want a soft or a structured garment, I’ll need to interface parts of it for the same reasons and in the same areas that I would interface a woven jacket: to preserve the shape, protect critical seams, and support the details in selected areas. I can also use interfacing to alter the stretch, feel, and drape of the entire fashion fabric. I’ll need to be sensitive to how much structure I put into the garment, and how much softness I try to preserve, and if I’ve decided not to line it, I’ll have to keep in mind that the inside of the jacket body will show. Therefore, I’ll want to use construction techniques that look finished and are wear-resistant, since nothing will cover or protect them.
HTC sells a number of fusible interfacings that work well with knits, both partially and overall; I often use SofKnit, Textured Weft, or Satin Weave, which each have distinct properties, as described in the chart above. Test fuse several interfacings to make sure you get the type of structure you want. (Call HTC at 888-618-2555, or 604-873-4641 in Canada, for sources.)
I often use two or three different interfacings in the same garment to achieve the structure and effect I want. Make sure in the test samples that none of the interfacings you’re using change the look of the fabric. Also, don’t overlook the possibility of adding an extra layer of interfacing in any section of a garment that isn’t sufficiently supported by a single layer. Sometimes two layers of the same interfacing work well, and sometimes a lighter extra layer is enough.
Serge for a clean finish, straight-stitch for control
In the photos, I’ve noted when I use my regular machine vs. when I use my serger, either in a four-thread construction configuration or a three-thread finishing configuration. The advantage of constructing on the serger is that the beautiful seam it produces is elastic, but it doesn’t stretch the knit fabric much, and there are no unfinished seam allowances. The disadvantage is that, depending on the knit, the serged layers may yield a fairly bulky seam allowance.
Generally, I construct the sleeve sections and the princess and side seams on the serger. I first serge-construct (using a four-thread set-up) the shoulder seams, and then go back and straight-stitch in place the carefully measured stay-tape, after steaming the seam to shrink it to match the tape. In any area where a great deal of precision and control is needed at the seamline—such as when constructing the collar and set in the sleeves—I much prefer my straight-stitch machine and use good-quality ball-point needles (I like Schmetz). If you can reduce the pressure on the presser foot of your regular machine, you’ll usually get better results. But don’t worry if this isn’t an option on your machine or if you don’t have a serger, just take it slow, make lots of tests, and trust your instincts. This is uncharted territory, so have fun.
Shoulder pads and sleeve heads
To look tailored, all patterns need shoulder pads and sleeve heads. Use soft, small pads covered in lining fabric. Make soft sleeve heads from 5-in.-wide bias lining strips interfaced with knit fusible, such as SofKnit.
Fold in half, serge-finish raw edge, then hand-sew to sleeve/armhole seam allowance along the sleeve stitching line, pressing all seam allowances and head layers toward the sleeve.
Armholes and sleeve lining
If lining sleeve, slip lining into the sleeve, baste caps together, then set the sleeve into the jacket, treating sleeve and lining as one. Or add lining after the sleeve has been set in, and use an armscye of lining to finish the armhole.
Serge-finish all armhole seam allowances together (jacket, sleeve, and lining) without cutting off seam allowances, then press toward sleeve to fill cap.
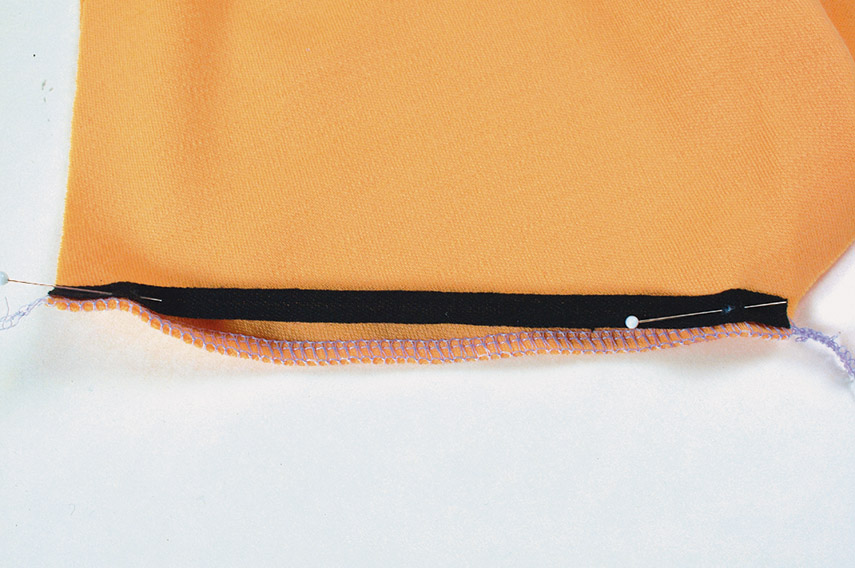
Tape underarm to reduce stretching, applying tape with hand stitches for a soft effect.
Front facings
Interface to provide structure and support. Machine-sew nonsticky side of fusible interfacing to right side of facing with 1⁄4-in. seam allowance, press seam allowance toward interfacing (protect ironing board from fusible glue with aluminum foil), then turn interfacing and fuse to the wrong side of facing, slightly rolling edge to the wrong side as shown above; catchstitch to facing garment if needed.
Pockets
Line garments with welt pockets to protect the wrong side of the welt from wear and to clean-finish. Interface patch pockets with lightweight fusible; then line completely using silk lining. Apply patch by hand, using an invisible slip stitch.
Shoulder seams
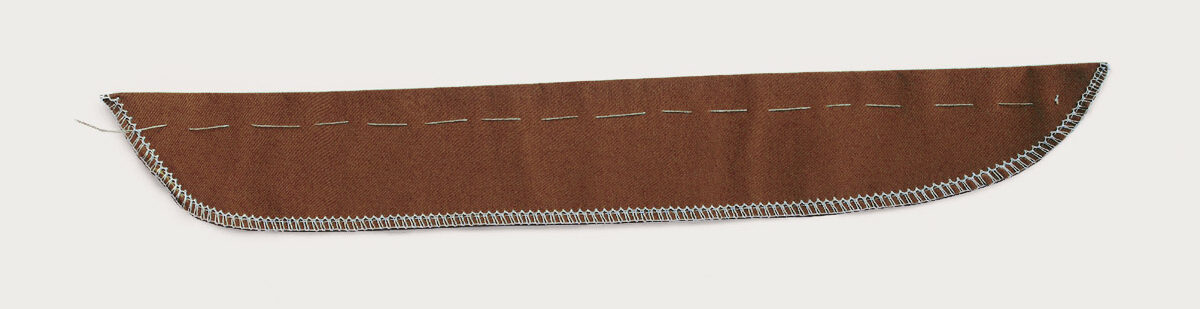
To reduce stretching, tape shoulder seam with 1⁄4-in. cotton twill tape applied along with the seam allowance of back garment piece; steam-shrink seam to match tape.
Collar
The back of the neck may need more interfacing than the rest of the collar to stand up. On the unlined jacket, bind raw collar edges in the back, or turn them into the collar, slip-stitching opening by hand to reduce stretching.
Corners
Press seam allowances to right side over wooden point presser, and then shape carefully to position seam out of sight.
Buttonholes
Test buttonhole on mock facing. To eliminate stretching, slip a single layer of silk organza between the garment and interfaced facing.
Bottom and sleeve hems
Interface to keep from rolling or collapsing. Interface the entire hem or just the fold and hem allowance, depending on the degree of structure you’re trying to achieve. Serge-finish raw edge of hem (unless the sleeve is lined) for a clean appearance. Use catchstitch to secure the hem.


Log in or create an account to post a comment.
Sign up Log in