


Editor’s note: Pants-fitting instructor Ruth Collins offers an introduction to her innovative method in Threads #218, Summer 2022, in “Practical Pants Fitting” The approach she teaches helps most sewers fit most pants patterns successfully.
However, we’re all unique in shape and size, and there are inevitably some patterns whose grading or design present more challenges. If you’ve followed the steps outlined in Ruth’s article but haven’t achieved the exact fit you’re looking for, you may need to alter the crotch seam and inseams slightly. Read on to find out how to do that, working with the pants toile (test garment) you created for the initial fitting.
Go smaller or bigger
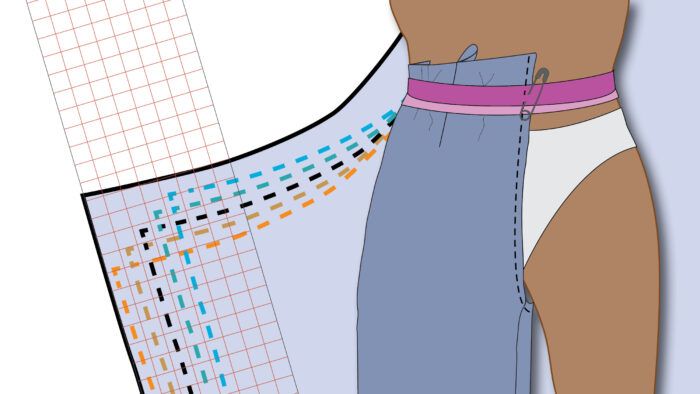
For this alteration, you’ll be using the overall pattern size you determined through the basic Top Down, Center Out process, but blending to a different crotch seam size. The easiest way to understand this is to look at a multisized pattern. The illustrations show the pattern’s cutting lines, not the seamlines, but the seamlines have the same relative size and shape.

The back pattern shows how the crotch seam changes through the range of sizes. It is higher and shorter for the smallest size, and lower and longer for the largest size. If your initial fitting suggests you need slightly more or less body space to comfortably shape the pants through the crotch seam, you may want to try making the seam smaller or larger.
You will be working with your toile, which obviously doesn’t have the multisized lines on it. However, you can achieve the effect of making the crotch seam smaller or larger by sewing with a wider or narrower seam allowance. Go bigger by taking a larger seam allowance in the crotch seam and a smaller seam allowance in the inseam. Go smaller by taking a smaller seam allowance in the crotch seam and a bigger seam allowance in the inseam.

This altered seam allowance starts at the crotch point and blends up to the straight portion of the crotch line. For the inseam, start at the crotch point and blend the adjust seam allowance to just above the hem. For either option, do not exceed 5/8 inch.
If you need any changes to the back or front inseam at the crotch, blend the change to around the inseam’s thigh notch. Don’t extend this alteration more than halfway down the leg.
Refit the waist level
Keep in mind that any changes to the crotch inseams affect the crotch position. You need to start over matching up the waistband with the pants from the Top Down, Center Out, including any changes you may have made to the darts. When we created the toile, we provided sufficient allowance in the adjustment zone for this purpose. However, if you need a little more room for adjustment at the top, add a strip of fabric. In this process you are distributing the ease in a collaborative process between the pattern and your body.
Fitting yourself, by yourself, is an iterative process. You might not get perfect results on the very first go, but you can make additional refinements until you achieve the look and feel you prefer.
Illustrations: Ruth Collins and Steven Fleck.


Thank you for the article. However, I am finding the wording in one paragraph to be confusing. It says "However, you can achieve the effect of making the crotch seam smaller or larger by sewing with a wider or narrower seam allowance. Go bigger by taking a larger seam allowance in the crotch seam and a smaller seam allowance in the inseam. Go smaller by taking a smaller seam allowance in the crotch seam and a bigger seam allowance in the inseam." In the illustration, it shows stitching lines for "one size smaller", "one size bigger", etc. However, the uses of the words smaller and larger do not line up here. I *think* in the paragraph "smaller" means "making the seam smaller", whereas in the illustration, "smaller" means "making the pants size smaller", and those seem to go in opposite directions. Is that correct? If so, I would recommend rewording the paragraph, because right now it seems confusing to me. Thanks.
Thank you for asking this question. Even after 20+ years of working at this job, I still find there are some parts of sewing and fitting that are always hard to describe in writing. (Bagging a jacket lining is another one!)
"Go bigger" or "go smaller" means to make the space defined by the crotch curve respectively bigger or smaller. Not to add further confusion, but this will change only the "body space" within the pants. The pants' circumference will be changed during the #topdowncenterout fitting process itself.
The directions for larger or smaller seam allowances in the crotch seam and the inseam are intended to result in a crotch curve that mimics a larger or smaller pattern size. What may seem confusing is that you are asked to handle the crotch seam and inseam differently in terms of the seam allowance you choose to sew with: For a bigger crotch curve, you'll use a larger seam allowance on the crotch seam and a smaller one on the inseam. For a smaller crotch curve, use a smaller allowance on the crotch seam and larger one on the inseam. In either case, this equates to shifting up or down a pattern size through the crotch seam and continuing down along the inseam.
I find it easier to understand this concept by looking at the pattern diagrams. But of course when you're tweaking the fit of a toile, those size lines are not present. That's why the description of how to change the seam allowances in the two parts of the crotch area--the crotch seam and the inseam--is helpful.
I hope this helps.
Carol Fresia
Editor, Threads magazine
Thank you so much! Your comments helped me switch the way my brain was seeing this...I get it now. (Felt like looking at one of those optical illusions and suddenly having it switch perspective!)
Is there a video of this method?
We do not have a video of this. I recommend Googling "ithacamaven" to see if the author, Ruth Collins, is offering classes by Zoom or other video platform. I also suggest giving the process a try even without the benefit of a video. Once you step into the half-pant toile, it is surprisingly easy to tell when the fit is working or not working. You'll feel and see the difference, and be able to make major or minor adjustments until you are satisfied with how the pants are draping.
Carol Fresia, Editor, Threads magazine
There is a great series of videos on this by The Crooked Hem in YouTube: https://youtu.be/0Cgo5s8yC1I