

Create Beautiful, Evenly Distributed Gathering
Tips for marking, pinning, pulling, and stitching fullness into fabric
Gathering adds fullness to a garment or other project in an area like a sleeve, skirt, or ruffle. Choosing the best method of gathering from among the available options will depend on the type of project you’re sewing, whether a casual garment, home decorating project, or fine-quality garment. The options include sewing a zigzag stitch over a cord (for example, for curtains), stitching over transparent elastic (for casual garments), and sewing several rows of straight stitching (for better garments). I’ll focus on the third method, which is the most challenging and gives the best gathering results.
Tips for fine gathering
The goal in gathering is to create small, even folds in the fabric that are evenly distributed along the gathered area. Check your pattern guide sheet for all the areas to be gathered—sewing all of them at the same time will speed up your work.
Gather across seams or not
If your fabric is lightweight, sew the gathering after the cross seams are stitched, the edges finished, and the seams pressed open. But, if the fabric is medium- to heavyweight, gather each section separately from stitching line to stitching line and then assemble the seams.
How full should gathers be?
The ratio of flat area to gathers is often determined by your pattern, but there are general guidelines you can follow. A 2:1 or 2-1/2:1 ratio gives an attractive amount of fullness in most fabrics. This means that 40 inches to 50 inches of fabric would be gathered into a 20-inch length. The fabric density (thickness), the hand (soft or crisp), and the length of the gathered area affect how full the gathering can be, or how much fabric can be coaxed into a given area. My most extreme gathering was done on Fortuny-pleated skirts of fine polyester georgette, where I used a 6-1/2:1 ratio with great results. In these skirts, 180 inches of fabric was first pleated, then gathered onto a 28-inch waistband.
The gathering rows are key
For fine gathering, machine-stitch two, three, or four parallel rows of stitching 1/8 inch apart, then pull the bobbin threads to gather the fabric to length. I’ve found that four rows of stitching give me the most control and the best results.
Stitch length
The ideal stitch length for gathering depends on the fabric and the ratio of gathers to flat fabric, but it can vary from four to ten stitches per inch. For a light- to medium-weight fabric, I suggest starting with eight stitches per inch.
Each machine stitch forms a knot in the fabric, which takes up space when the bobbin thread is pulled and the knots move close together. The stitches must be short enough to make small, even folds, yet long enough for the gathers to fit into the required area. The shorter the stitch, the more control you have over the gathers; the longer the stitch, the more fabric you can fit into a small area.
Adjust bobbin thread and tension
Since the bobbin thread is the one you’ll pull to draw up the gathers, a different color, stronger thread (topstitching thread, for instance) used in the bobbin will be easier to see and less likely to break. A slightly looser upper tension, or tighter bobbin tension, makes it easier to slide the fabric to be gathered along the thread. The tension must be tight enough so the fabric rides snugly on the thread, but loose enough that you can pull the thread without breaking. When you use a heavier thread in the bobbin, you automatically cause the bobbin tension to tighten, so you don’t need to adjust it.
Mark divisions for matching
To make it easier to gather evenly, divide into an equal number of sections (whether fourths, eighths, or sixteenths) the flat area or edge to which the gathered edge will be joined and the edge to be gathered. Mark the divisions on each side with thread tracing, marking pencil, or pins. The smaller the sections, the more control you have when adjusting the gathers; 10-inch sections on the flat side work well.
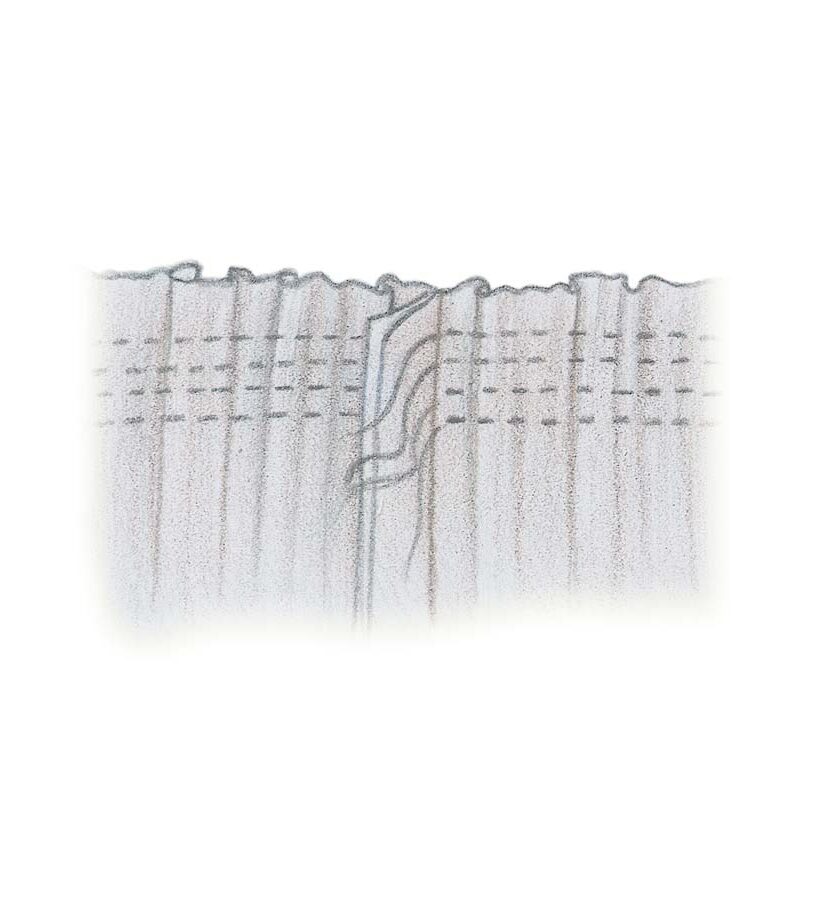
Sew the lines for gathering
Stitch the first gathering row slightly inside the seamline, on the garment side, and the remaining rows in the seam allowance. Don’t backstitch (so the gathers can be drawn up), and remember to leave long tails for pulling. If your machine has an adjustable needle position, sew the first row by moving the needle slightly to the left of center, then follow the mark for the required seam allowance. For the next row, adjust the needle position so you’re stitching 1/8 inch to the right of the first row; repeat for the desired number of rows.
Pulling up the gathers
Match up the marks and pin the two sides together, taking care not to pierce the gathering stitches. Starting at one end, pull all four bobbin threads together, pulling up half the area to be gathered until it’s slightly smaller than half the flat area. Avoid pulling both the upper and bobbin threads—the stitching will lock and require removal. Pull the bobbin threads on the other end in the same way, and wrap the threads in a figure eight around a pin on each end to temporarily secure the gathered length.
Working on a padded surface like an ironing board, pin the fabric taut and adjust the gathers evenly between pins. A seam ripper or an awl helps distribute the gathers. Tighten the threads, if needed, then pin the layers at even intervals, or hand-baste if the fabric is slippery.
Stitch the gathered seam
To join the gathered and flat edges, change the bobbin thread and stitch the seam with the gathered area on top. You’ll stitch between two rows of gathering. Hold the fabric on each side of the presser foot so the gathers lie at right angles to the seam, adjusting any unevenness and removing pins as you come to them.
After sewing the seam, remove the row of gathering thread that shows on the right side of the garment, and tie the ends of the other rows of stitching separately. Press the gathers in the seam allowance with the tip of an iron, being careful not to flatten the gathers below the seamline. Finish the seam as desired, and press in the direction it should lie in the garment.

Staying a gathered seam
If you plan to join a gathered area to a bias edge of fabric, you’ll need to add a stay to the flat side first, to stabilize the length. A lightweight stay made of rayon seam tape or the selvage from China silk or rayon lining works well. Baste the stay to the wrong side of the flat area so it will be included in the seam, then attach the gathered side.
I think you’ll be happy with your gathering results when you follow these simple guidelines.
This article by Shirley Smith was originally published as “Basics: Great gathering—a sure thing,” in Threads #63 (Feb./March 1996).


Log in or create an account to post a comment.
Sign up Log in