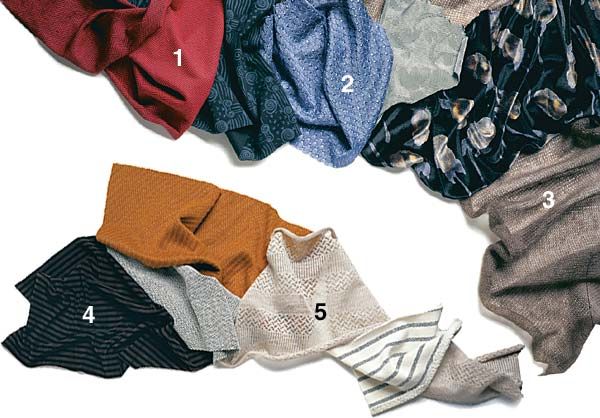
Let me quickly dispel the apparent mystery about sewing with knits: There isn’t any mystery. Nonetheless, after 30 years of writing and teaching on the subject, I’m always surprised to find out that these supple fabrics still alarm many sewers. Nowadays there are so many new knit fabrics available, it’s hard to know how to handle them all. So I’d like to present basic information every sewer needs to create knit garments that look like ready-to-wear. Believe me, sewing knits is easy. You don’t have to be an expert.
The great fun of sewing with knits is the leeway they give you when fitting. A garment made from a stretchy fabric doesn’t have to fit as perfectly as one made from a woven, so knits eliminate the pressure of exact measuring and altering of patterns. They’re also so comfortable to wear.
When constructing knit garments, the first rule is that if the fabric stretches, the seams must stretch, too, so that the stitching won’t pop as you bend and move in the garment. I’ll show you that whatever machine you have, you can achieve flat, stretchy seams.
Select patterns designed for knits when you sew these forgiving fabrics, available in an amazing variety. See “Sources of knits” below.
Check out the fabrics
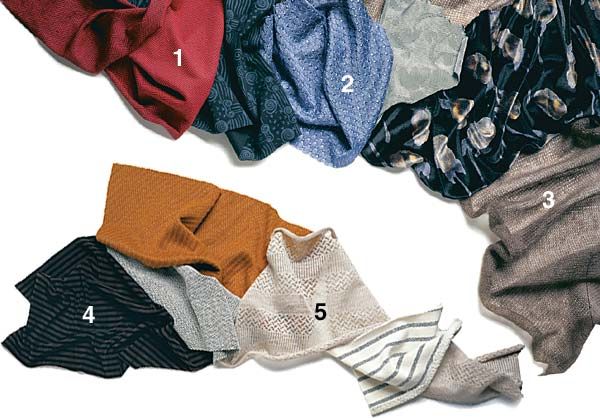
Whether made of cotton, wool, linen, one of the new synthetics, or a blend, each knit falls into one of several construction categories: single knits (created on a commercial knitting machine with a single bed of needles); double knits (created on a double-bed machine with two back-to-back beds of needles); and rib knits (made by alternating stitches between two needle beds). Single-knit fabrics like jersey, velour, terry, and fleece look different on the reverse side, have cut edges that curl, and usually have about 25 percent stretch. Double knits like interlock (made with fine yarns) tend to be more stable than single knits, often look the same on both sides, have cut edges that don’t curl, and stretch from 25 percent to 75 percent, depending on the fiber and construction. Rib knits, constructed from alternating knit and purl stitches in various combinations, may look the same or different on opposite sides, tend not to curl, and have up to 100 percent stretch.
My philosophy for fabric preparation is to always pretreat a fabric before you sew it exactly as you plan to care for the finished garment. This means that cotton, linen, and synthetic knits should be washed and dried (in the dryer if you plan to dry them this way later), and wool knits should be thoroughly steamed before cutting.
Smart pattern choices
When planning a knit garment, I recommend selecting a pattern designed specifically for knits, rather than for woven fabrics, because the pattern will have the correct amount of ease built into it. The amount of stretch in the fabric will determine the style and size pattern you choose. Check the pattern envelope for suggested fabrics and the amount of stretch required for the style. If you choose a fabric with less stretch, you’ll need to add more ease.
Since knit fabric has built-in ease, you don’t need as much in the pattern as you would for a woven fabric. A couple of inches of bust ease, for example, is plenty for a fairly fitted knit style, compared with the 5 inches of bust ease needed for many woven garments. And a double-knit skirt hangs nicely with 2 inches of ease, while a woven skirt would require at least 3 inches to 4 inches.
Construction options
You can get successful results on knits, whether you own a basic sewing machine or the latest high-tech serger. I began sewing on knits long before I owned a serger, and I still recommend my original technique of sewing with a long straight stitch of 9 stitches per inch (3 mm), stretching the seam as I sew it (as much as the fabric stretches easily) to add elasticity. When the seam returns to its normal length, the stitches are closer together and the upper and lower thread tensions have loosened. As for using zigzag or stretch stitches to construct seams, I’ve simply never liked them.
For double knits that will stay pressed open, use a 5/8-inch-wide seam allowance. For single knits that tend to curl, I recommend a 1/4-inch-wide seam, which you can finish two ways: either press it to one side and topstitch for a professional look, or sew a second line of stitching 1/8 inch from the first and then press to one side. The double-sewn seam adds strength and helps keep the seam flat.
If you have a serger, you’ll find serging a quick way to assemble knits with a finished, factory look, and the seams will have built-in elasticity, so you don’t need to stretch them as you sew. Make sure your stitch is balanced, adjusting the thread tension so that the stitch doesn’t bind or ruffle the seam. If your serger has differential feed, raise the setting if your test seam looks wavy. For hemming soft knits, I find that serging the edge, turning up a 1/4-inch hem, and topstitching twice gives a stable, nonslippery finish.
Edge finishes
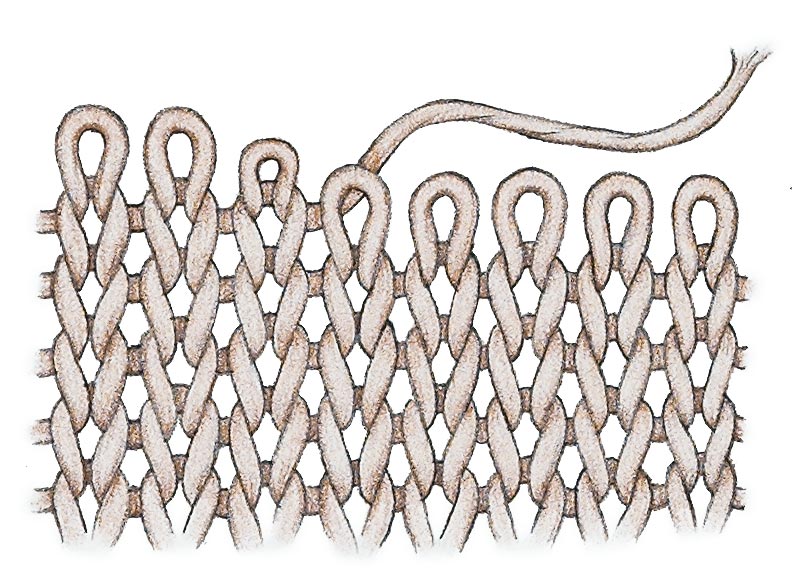
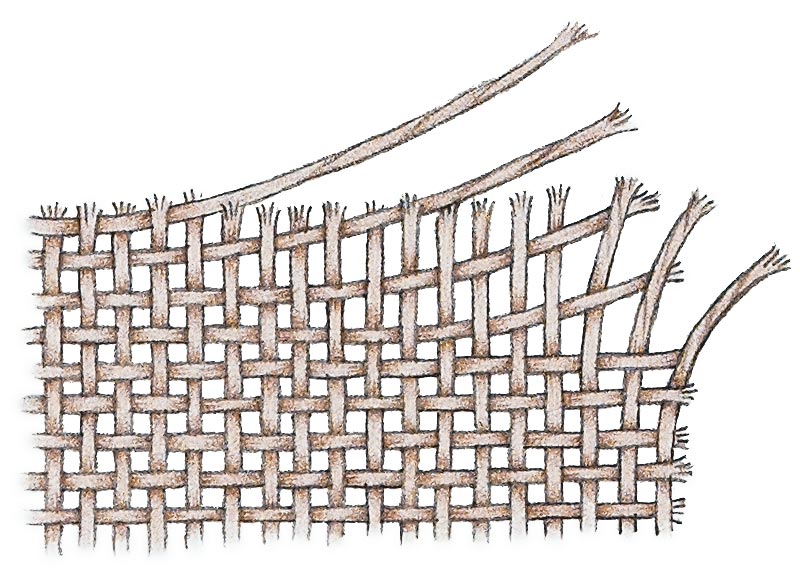
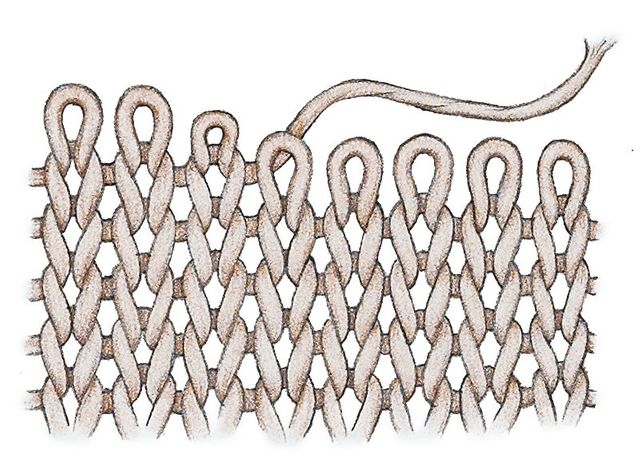
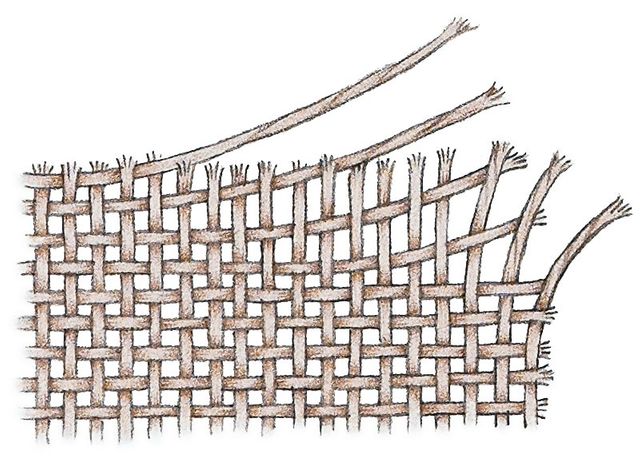
Most knits don’t ravel, unlike some woven fabrics, especially loosely woven ones, which can ravel until the seam allowance has vanished. So serging or otherwise finishing seam allowances isn’t necessary with knits. Nonetheless, test whether your fabric ravels on a swatch. Some silky knits ravel on horizontal cuts, but most cottons and wool knits don’t.
You can sew an attractive hem on many knits with double-needle topstitching, the finish that’s used most often in ready-to-wear. I prefer a 4-mm-wide double needle and 9 stitches per inch for a stretchy, professional-looking hem. For soft, lightweight knits that are difficult to hem, see “Fine details for knits.”
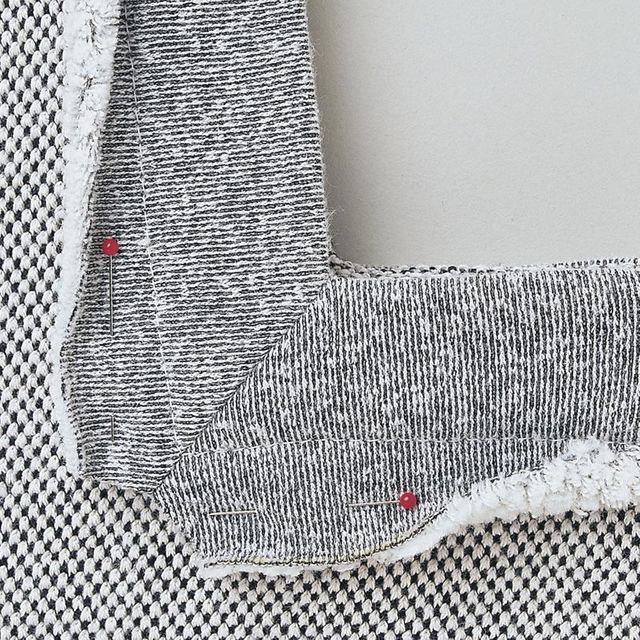
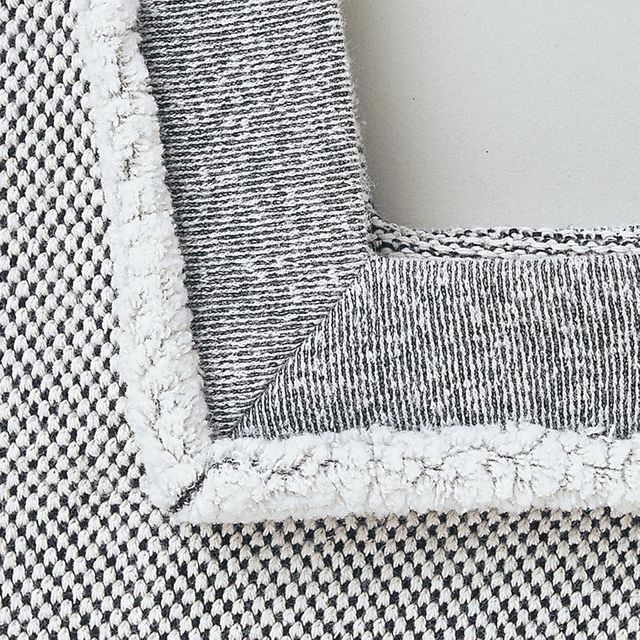
To learn how to miter corners on thick knits, such as fleece, see “Miter corner for a smooth finish on knits.”
Tips for a cowl-neck tunic
A cowl-neck tunic is one of the easiest garments you can make from knitted fabric. If you have a jewel-neck knit top pattern you love, it’s easy to convert this style to a tunic with a cowl neckline. To shape the pattern as a tunic, make the body as long as you want and wide enough to flatter your figure at that length, and decide on the length of the vent. To convert the pattern for a cowl neck, lower the neckline, as described below, and reshape the side seams to create a hem for the side vents. Cut the cowl the length of the neck seamline plus 1/2 inch for seam allowances, and as wide as you want. For thin fabrics, make it a double layer.
So take my advice and don’t be afraid to sew with knits. If anything, knits are the easiest of all fabrics to sew.
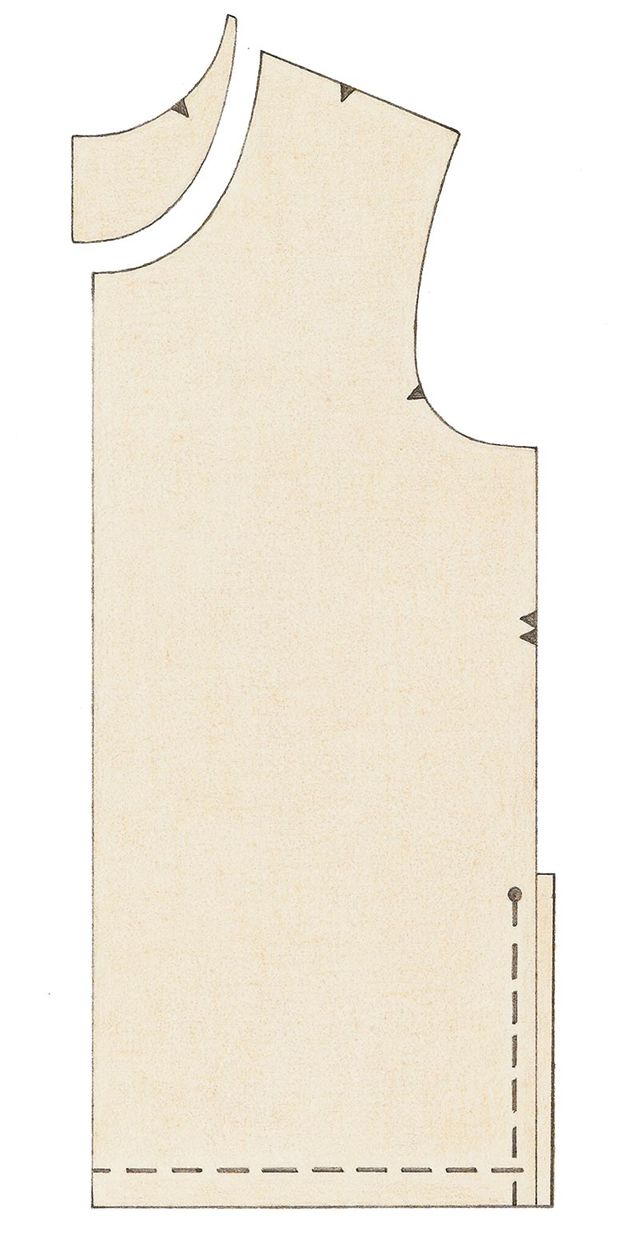
Adapt for a cowl neckline and side vents
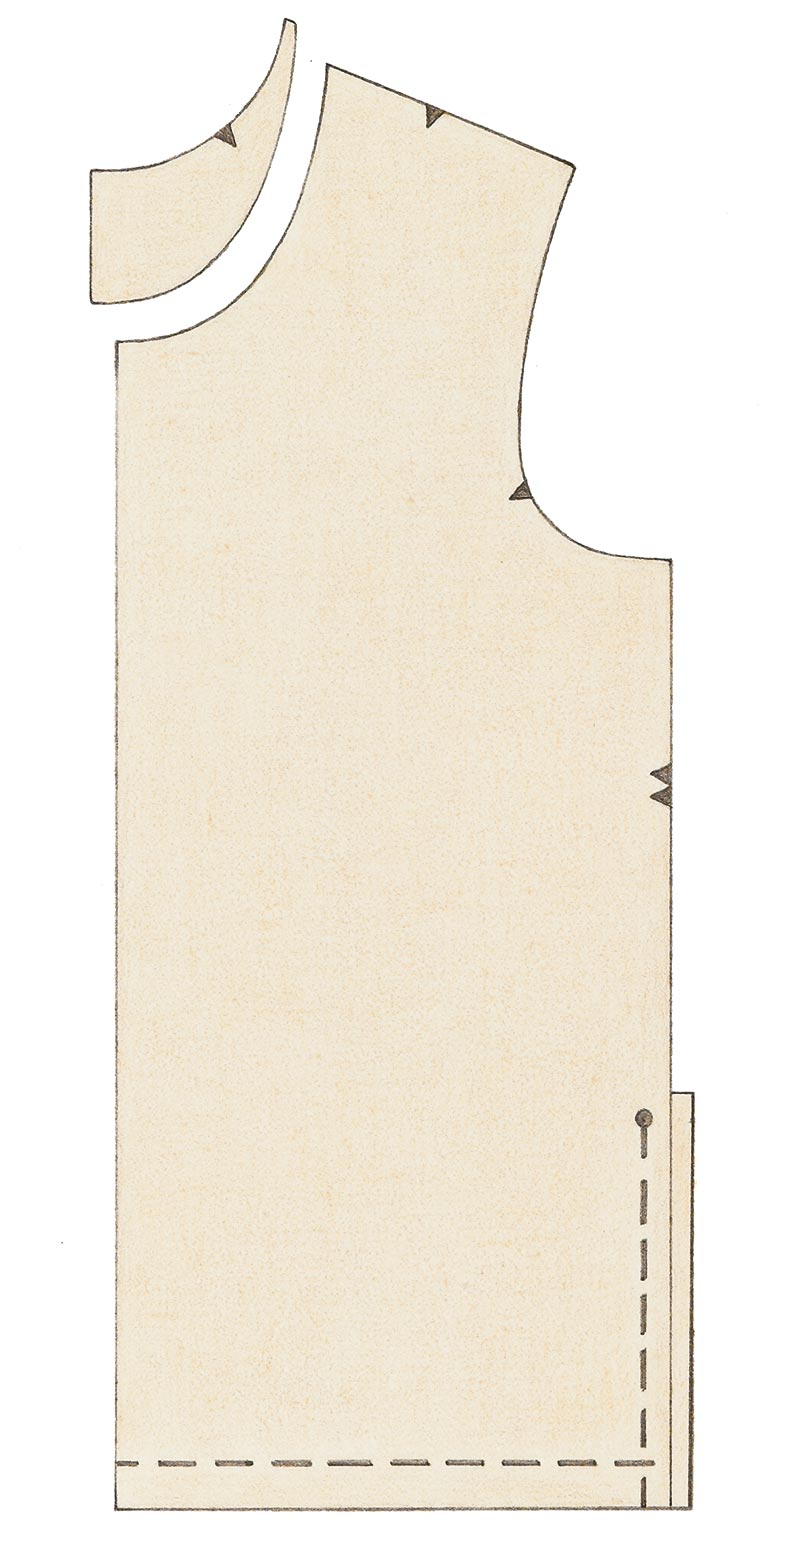
It’s easy to change a simple jewel-neck knit top pattern to a cowl-neck tunic with vents.
Lower neck for cowl
Trim the neck seam allowance to 1/4 inch. Mark 3 inches down from the center-front neck edge along the fold. At the shoulder, mark 1/4 inch in from the neck edge. Draw a smooth curve from the mark at center front to the shoulder line. Trim along the line. On the back, trim 1/4 inch from the neck edge. The cowl collar is a simple rectangle.
Add for vents
On the front and back pattern pieces, mark a dot along the side seamline 9 inches (or desired depth of vent) from the finished hemline. Draw an extension 1 inch (or desired hem width) past the side seamline from 1/2 inch above the dot to the lower edge.
Sources for knits
Banksville Designer Fabrics
115 New Canaan Ave. (Rte. 123)
Norwalk, CT 06850
203-846-1333
G Street Fabrics
12220 Wilkins Ave
Rockville, MD 20852
240-283-8300
GStreetFabrics.com
The Rain Shed
250 Broadalbin St. SW, Unit 110
Albany, OR 97321
541-791-8900
TheRainShed.com
The Sewing Workshop
301 South Kansas Avenue, Suite A
Topeka, KS 66603
800-466-1599
SewingWorkshop.com
This article, by Ann Person, was first published in Threads #73, Oct./Nov. 1997. The author was the founder of the Stretch & Sew company of patterns and books.
Fabric photos: Sloan Howard; shoulder pad photo: Scott Phillips; illustration: Christine Erickson.



I need to alter some knit tops. I am noticing that the shoulder seams have a transparent plastic strip sewn in with the seam. It is not fusible but works excellent as a stablizer to keep the seams from stretching too much.But it can stretch a little.
There are no places to buy sewing supplies here. They went out of business years ago. I can't find an internet supplier of a roll of these strips.
Can buy plenty of patterns and knit material online; but no one mentions these plactic strips even though ready-to-wear seems to have them is almost all their sewn knit tops.
Would love some info. Tks.
You can use narrow twill tape to stabilize the shoulders.
I believe the "stabilizer" you're talking about can be interchanged with clear elastic that you can use on shoulder seam lines. It's what I use - try it. You can get it at JoAnne Fabrics.
If this isn't suitable, I'm sure someone else will chime in!
Thanks for this, I think I might finally overcome my fear of sewing knits. I especially like your trick of using a straight stitch and pulling the fabric, my old Brother Pacesetter has a built-in stretch stitch but it is extremely slow and tedious.
Also --- help! I just bought a kimono dress pattern not realizing that it is for stretch knits only. Can I just add extra ease to the pattern to make it out of woven fabric? If so, how much should I add?
I would recommend looking for a similar pattern intended for wovens. Patterns for knits are designed to work with a specific amount of stretch and ease in different areas of the body, so just adding ease throughout may not work.
Carol Fresia, Threads Senior Technical Editor
Hi Dembie,
Not sure if this is what you are looking for but I think it is called plastic elastic. It is inexpensive, commonly used in knit garments at shoulder seams to stabilize them. I've seen it at 'Beverly's' and it's probably at other fabric stores... below is a link to it at Beverly's. Below that is a link describing how to sew it into knits.All the best.
http://www.beverlys.com/catalogsearch/result/?q=clear+elastic
http://sewing.patternreview.com/cgi-bin/review/readreview.pl?readreview=1&ID=486
What do you do to correct the material from bunching up when you start and do a back stitch? I just returned to sewing after years from it and I still haven't figured that out.
Usually what the garment industry uses is the clear elastic. However, whenever I sew the shoulder of a knit garment I simply cut a strip of the same fabric on the lengthwise grain and apply it to the shoulder at the same time as I sew the seam together. I use the serger so the fabric is trimmed at the same time as the shoulder seam. This stabilizes the seam just fine. and is not too bulky.
To keep your seam from bunching up as you start to sew, do not back stitch. Instead put the feed dog down and sew a couple of stitches in place, then put the feed dog back up and continue to sew the seam. No bunching, you can end the seam the same way.
Don't forget one of the premier sources for quality knit fabrics in the country: Christine Jonson (cjpatterns.com). She's a respected designer and author, who's appeared in Threads and many international publications. Her patterns are stellar and her knowledge of knits formidable. She's our favorite source for fabric and patterns here in Michigan.
Ball-point needles successfully have created my seams on jerseys and velours. I found that sharpies may cause problems as I've always tested a sample before proceeding with actual construction. Instructions on needle packages and in machine manuals are specific and reliable about this. Only on woven cloth do I rely on sharpies! The sample fabric is also important to wash-dry testing, as we know. Also, referring to the owner's manual is important to the maintenance of upper- and lower-thread tension. My machine does overcast without fail, and my Brother was much more affordable than others, and I've been maintaining it for about 30 years. I do clean, lube, and adjust it as necessary. I always create the first seam, then turn the garment or linen/curtain around to overcast it. Then, I stitch again .25" away from the seam line to create an easy but reliable French seam, even on all velours and jerseys. For some applications, I do continue to recommend Herringbone stitches, etc. by hand although the process is so consuming that I rely on machine whenever possible. Velours and jerseys are so comfortable.
I've had a lot of success sewing knit fabric seams by putting tissue paper under and on top of the fabric as I'm seaming it. Doing this allows me to use a regular sewing machine instead of my serger and it definitely minimizes any tendency to ripple.
I STILL haven't figured out how to successfully sew clear elastic to stabilize a seam though. If anyone has specific instructions for that, I would love to read them!!
I have some 54" wide, fine wool that I would like to make two scarves with, i.e., cut lengthwise. While I plan to create a fringe along the crosswise grain, how should I finish the long, cut edges? Would a tiny, rolled hem work?
You can use a rolled hem, but there's a limit to how narrow it can be. Trying to roll a narrow hem in thicker textiles may turn into an exercise in aggravation. In addition, hem width is often best when it is in proportion to the fabric weight or thickness. On a medium- to heavyweight fabric, a slightly wider hem, properly pressed, may lie flatter than one that has been forced into a roll.
I recommend testing various hem widths on fabric scraps, being sure to fold and stitch along the lengthwise grain, to accurately represent how these would work on the actual scarf. A 1/4-inch-wide, double-fold hem with topstitching would probably be manageable.
Carol J. Fresia, Threads Senior Technical Editor