


Updated May 2022
If you’ve had the unfortunate experience of having a malfunction in a fly-front zipper, you know it’s a finicky repair to make by machine. Here’s a method that combines machine and hand sewing for an expeditious fix.
This approach leaves all visible topstitching intact, and it doesn’t require you to unstitch the waistband. Therefore, the pants look exactly the same after the repair as before the zipper broke. And if you hesitate to install a zipper by hand, don’t worry: A properly sewn backstitch is quite sturdy. It’s the preferred stitch for many bespoke and couture construction techniques, including the crotch seam on trousers, where it’s considered strong enough to stand up to years of wear.
Remove the zipper without undoing any of the visible topstitching, and slide a new zipper into place. You’ll hand stitch one side to attach it invisibly.

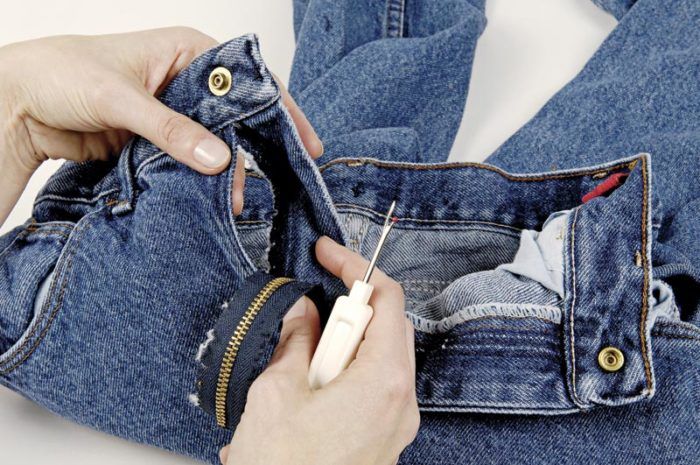
Working with a seam ripper, remove the stitches holding the original zipper in place. On the fly underlap, you’ll create a slot between the jeans front and the fly shield. On the overlap, simply pick out the stitches. At the waistband and bottom of the fly, cut the zipper tape to release the zipper. Don’t unstitch the waistband.
With the zipper right-side up, slide one side of the tape into the opening you created between the fly shield and the pants front. Fold the top of the tape under. Pin or baste the tape in position. Install a zipper foot on the sewing machine, and stitch the zipper close to the edge of the pants front, sewing from the top of the zipper as far down the tape as you can.

Close the zipper. Working from the…
Start your 14-day FREE trial to access this story.
Start your FREE trial today and get instant access to this article plus access to all Threads Insider content.
Start Your Free TrialAlready an Insider? Log in


Too bad that you don't show how to put the zipper in completely with the machine, which makes it stronger.
If I tried this method my clients would have a cow. They would prefer the work be finished professionally and in a way that will last. If I can't find matching thread in the correct weight, I double the thread in my needle of the matching lighter weight thread which usually matches tthe original thread. Furthermore, if somebody is looking that closely at the zipper area of your pants, they need to be slugged. This article is not up to your usual standards, I hope this is not a sign of things to come.
I totally agree with fasthorse on the zipper technique. When I replace zippers,(no matter the length, I have done 3") I do it exactly the way the zipper was put in the first place.
I'm agreeing, this is a terrible way to replace a zipper. I don't know of any of my customers who would want a hand stitched zipper in their jeans. I certainly would not.
Comments are a little harsh, perhaps they could tell us how they recommend how to sew that part on the machine, rather than by hand. I find it hard to do without seeing some kind of imperfection.:)
Whoa there, professional seamstresses! As someone who is BEGINNING to sew and make clothing repairs (mostly to save money) this was an awesome tutorial. It shows me how to replace a zipper myself without completely destroying the topstitching that I, as a beginner, could never duplicate. It's always important to remember that just because you're an expert does not mean everyone is.
A broken slider you can also replace with the new innovative click system. I just used one on my boot.
http://www.fix-a-zipper.com
Easy!! In seconds ready without sewing.
Threads, thank you so much. My expensive custom jeans had a defective zipper... and I was able to replace it myself with this tutorial. As somebody with less than no interest in ripping the waistband apart, I really appreciate this web page!
Was fortunate to work for a leather cleaners where we replaced sliders continually and one seamstress could even put the box ends back on some with superglue! IF a zipper has no teeth missing you can often replace the slider to make it work correctly. A separating zipper for a jacket requires that you remove the top stop and take off old slider and put new one on. Test before putting the top stop back on. A pant zipper will require taking apart at the bottom to put a new slider on so it is sometimes easier to replace entire zipper as indicated here.
I do alterations and NEVER toss a zipper as can often reuse parts, sometimes just one side of a jacket zipper or shorten it for use in a different garment. Keep on hand top stops and bottom stops (Wawak.com or other suppliers have them) or reuse them from zippers you have kept. Consequently, I order occasionally supply of zippers in longer lengths to just keep on hand, shortening as needed with new top stops. A needle nosed plier and, best of all, a tool called an end nipper should be part of your zipper repair tool stash. You may find some of the tool assortments at Harbor Freight or in the jewelry component section at a craft store.
Experiment with this with old zippers to get the feel for what works and what does not.
Thanks for the nice tutorial and very good tips.
Ok, I’m not a professional seamstress. I’ve been sewing for 10 years but have never made jeans. I’m just trying to replace the zipper in my husband’s jeans. There are teeth missing so it has to be replaced. I read and re-read this a number of times trying to figure out what they were talking about and it was only after reading these comments that I realised they want you to put the second side in BY HAND! What? That’s why I didn’t understand it! I thought they had missed a step after I basted in the second side of the zipper! That’s not replacing the jeans zipper properly! I expected to get a nicely finished zipper. This is shoddy. I won’t do it this way. My work has to look good inside and out. I expected more from Threads.
Perhaps you missed the beginning of the article, which explained the benefits of the technique and that it relied on hand stitching: "This approach leaves all visible topstitching intact, and it doesn’t require you to unstitch the waistband. Therefore, the pants look exactly the same after the repair as before the zipper broke. And if you hesitate to install a zipper by hand, don’t worry: A properly sewn backstitch is quite sturdy. It’s the preferred stitch for many bespoke and couture construction techniques, including the crotch seam on trousers, where it’s considered strong enough to stand up to years of wear."