


Who knew the subject of pinning involves more than just simply putting a pin in fabric, but it does, and I’d like to share a few tips.
 More on working with pins:
• A Pin for Every Purpose
• Create Intricate Fabric With Pin Weaving
• How to make a dust pan that attracts pins
• Why Pincushions Frequently Resemble Tomatoes
First of all, toss the bent pins. I can’t tell you how many pincushions and pin boxes I reach into in the course of teaching, and find them full of bent pins. They’re done! They’ve done their work! They can’t be straightened (well, I suppose they could be, but it isn’t worth the time), so do yourself a favor and throw them away. You’ll only waste time searching around for useable pins in a pin dish full of clunkers. And while you’re at it, you might take a couple of minutes and separate out all of the other things that seem to work their way into a pin dish or onto a pincushion: sewing machine needles, safety pins, hooks and eyes, paperclips, and a snarl of threaded needles. None of these belong with your pins.
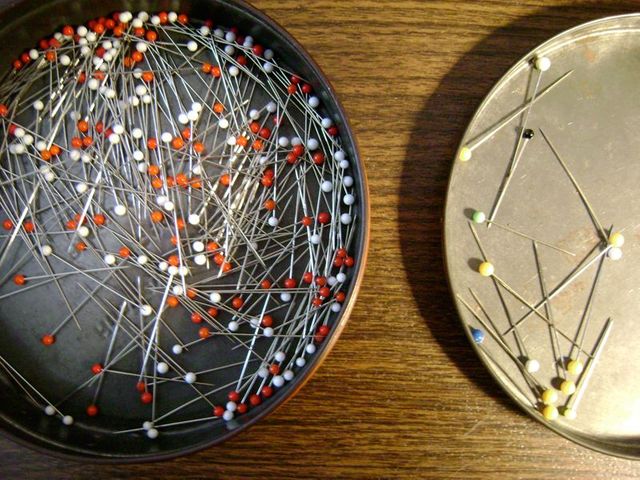
I have two metal tins for my pins. One contains a few heavy-duty pins that I reserve for heavy-duty jobs (jobs that I know would bend my finer pins)–and the other has very sharp, lightweight glass-headed pins that go easily into any fabric. And that’s what you want your pins to do–there should be no hesitation, no effort to get the pin into the fabric, no shifting around of the fabric as you pin.
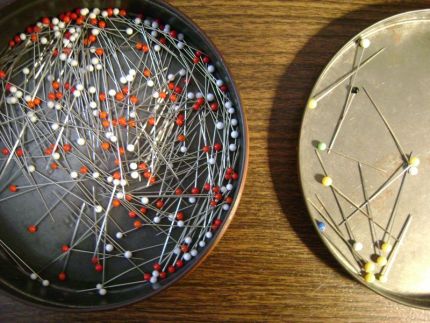
And beware of plastic-headed pins–they’re okay, but they can melt (and possibly stick to your fabric) when ironed. I like glass-headed pins because they’re easy on the fingers, and I think I got used to using them after so many years of working with lace. They tend not to sink into the lace and disappear the way metal pins often do.
When you’re pinning to a section of a garment (pinning on the pattern tissue, for instance, or pinning an underlining in place), keep the pins in the seam allowances. Most fabrics aren’t marred by pins, but some are, and if the pins are thick, then the damage will be worse.
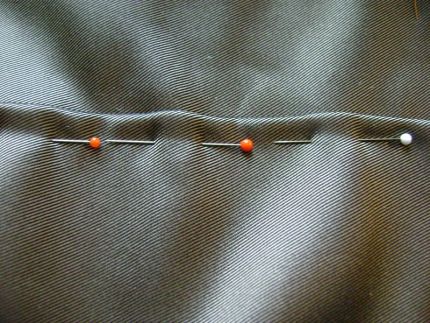
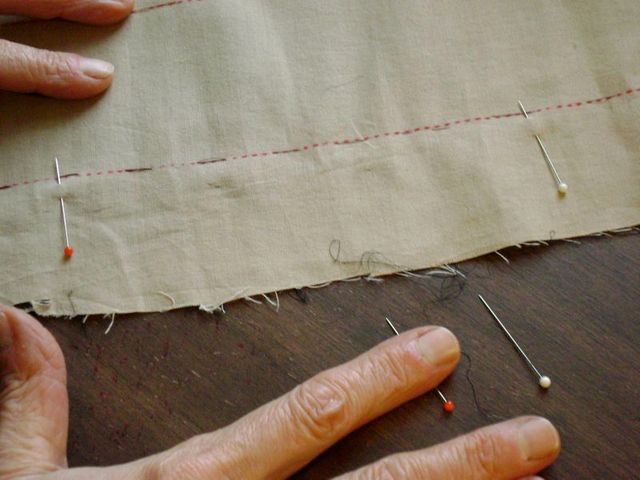
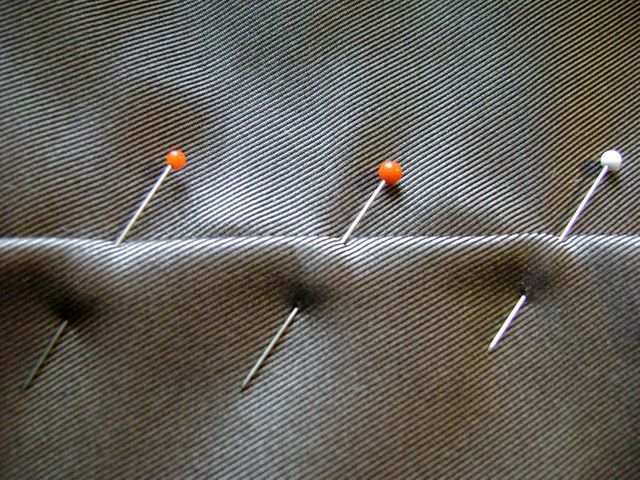
I’m often pinning an underlining to the fashion fabric, and I place the pens perpendicular to the seamline. That way when I gather the fabric onto the needle with basting stitches to join the layers together, the pins won’t stick me. The perpendicular pins nestle into the folds of fabric loaded onto my needle; and I don’t have to constantly stop to remove them as I baste. The whole process becomes much faster.
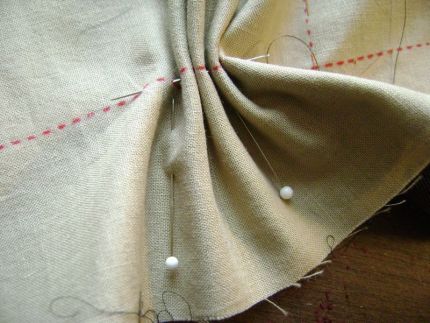
If the pins are placed parallel to the seam, I have to stop basting to remove them, and they are in the perfect position to stick me. As you can imagine, it’s a much slower process.

Another advantage to placing them perpendicularly: they’re easy to remove with your hand–you can just sweep them out of the fabric with your fingers held flat. It’s quicker (and more fun) than un-pinning each one. And while this isn’t an action shot, you can get the idea.
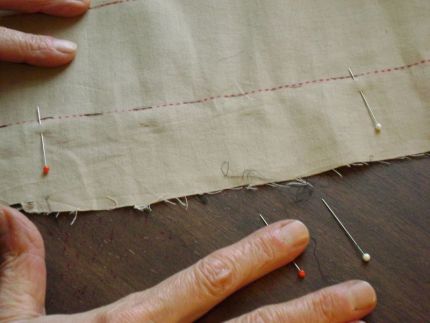
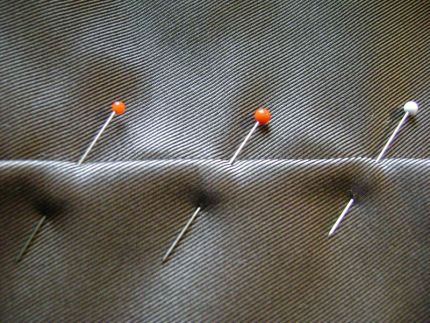
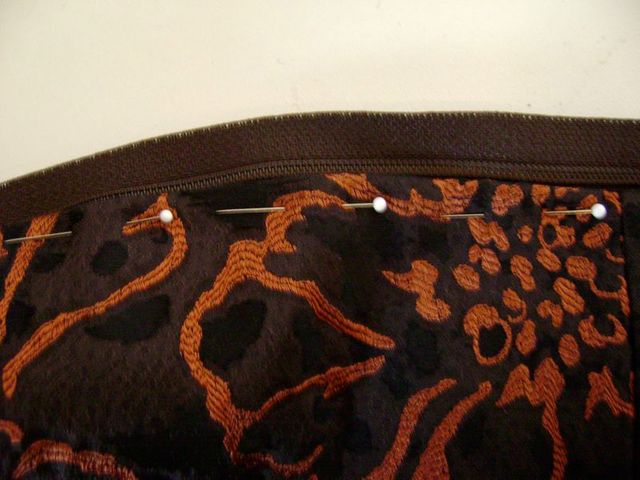
I also place the pins perpendicularly when I’m pinning a hem or lining in place because it leaves much more flexibility in the fabric. In this case, the fold of fabric is held right in place along the zipper coil (this is the first half of a lapped zipper application), just where I need it to be as I get ready to stitch.
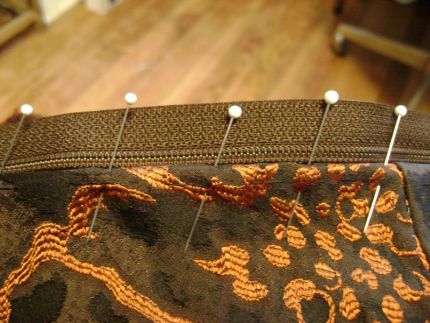
If the pins are placed parallel to the seam, the fabric has very little movement, it isn’t as flexible in my hand as I work, and in the case of the lining, parallel pins don’t do a very good job of holding the fabric close to the zipper coil. Your stitches, therefore, won’t be as accurately placed as they should be.

I often tell my students a phrase I hear my patternmaker colleague Julien Cristofoli use, “Use your pin as a stitch.” You can see his point. While a pin placed parallel to the seam does hold the layers together, you can see that the perpendicular placement is far more secure. It holds things in place precisely, beautifully defining the stitching line, and that’s critical to an accurate result.


I have been sewing for almost seventy years and never figured out this way to place pins. Thanks so much!
Funny how such a small thing really does make a big difference....my pleasure to add something new!
The other bonus to having pins placed (as I put it) east to west rather than south to north, is they are quickly removed, as the author pointed out, when on the sewing machine. I always place my pin dish to the right of my machine so its a fluid movement as I'm sewing. As well, if you happen to be sewing at 100 miles per hour, if you do happen to hit a pin the machine needle is less likely to break if it hits a pin. Now that I know zippers sewn in are more accurate with this method I will switch my pin placement for these applications.
This is how I use pins, except for when I'm trying a garment for fit; then I find that pinning down the seamline is more accurate. I'm pretty sure there's no bent ones in my pile, I keep mine in a magnetic keeper and if I find a bent one it gets biffed; the same with any with burrs on them. I'd rather buy more pins.
Pins can also be used as an indicator. When I have a little issue or problem with a seamline or cutting line, I use my red pins ONLY. The red pin indicates there was an issue and I am quick to take measures to remedy it.
Alison
It just seems natural to do it this way as well. After years of sewing a fluidity of movement helps with speed, accuracy and comfort for the seamstress.
There is a time to place pins parallel - when you are serging and you want to hold fabric together until the presser foot picks it up so it won't slip. (I learned this making swimsuits). Use extra long pins and baste with the pin. Then as the fabric goes under the serger presser foot, start pulling out as you stitch. The fabric will stay together (especially the annoying edges that sometimes fold under as you start) and the pin won't run afoul of the knife.
Also, for zippers and stiffer trims, you can use Scotch brand Magic Tape instead of a pin because it lays flat, you can stitch right over it and it won't gum up your needle and it is easy to remove. I mention the brand because it was originally developed by the aeronautics industry for a similar purpose. Regular cellophone tape doesn't work.
Go, Susan! Great article and info as usual! I took Susan's couture class and bought these fabulous top-of-the-line pins. She sells those and some way cool French pin cushions for the wrist on her site. Pinning correctly and using the right products really makes a difference.
I agree! I always say, "Life is too short to deal with bent pins," as I toss them away. :-)
You know, I almost always pin perpendicular to the seam, except for zippers, which I usually pin parallel. But you're right, this makes the zipper stiff and difficult to handle. I'm not sure why I did it that way, but I won't do it that way anymore.
I have two magnetic pin cushions for my fine sewing pins. One is to the right of the sewing machine, for taking pins out as I sew, and the other is kept wherever I'm pinning, usually at the ironing board. When one gets empty and the other gets full, I swap them. Simple, but efficient.
Thanks for the info. However, in that article I had hoped to find an answer to a more basic question: what metal makes the best pin? I recently bought some Dritz pins (the wrap said nickel plated steel). Was it the rayon fabric I was trying to use them in, or the pins themselves? I could feel them 'drag' when I pinned things together in the tunic I was making.
I pin as little as possible when setting a zipper. But you can see from the pictures in this article, a perpendicular pin does not distort the zipper tape like a parallel one will. And when the fabric from the garment takes the outside track around the zipper tape, you wind up with a warped zipper because there is more fabric in your seam than zipper tape.
Thanks Susan for a timely reminder - the right way always seems so obvious you wonder why you ever did any differently! I am interested in your beautifully marked seamlines too - how about a piece on transferring patterns to fabric?
I was surprised to see my friend sewing with the pins pointing to the right! That is the backwards way to get the pins out, unless you are left-handed and your pin cushion is hiding under your sewing.
I use the long pins like bkryatty said and have them hold my sewing together until the last second.
I like the idea of using red pins for trouble spots.
Thank you for sharing the simple things that help make sewing faster and more enjoyable!
Who would have ever thought we could say so much about pins?!! But they are so functional! I must have a zillion, of all sizes.
I have almost always pinned parallel, but now I will change. The only time prior to this that I pinned perpendicular was when I wanted to keep the fabrics or zippers from slipping ( thus offsetting the pieces )as I sewed.
I also noted that your beginning seam allowance looks to be at least two inches. This would make the perpendicular pinning easier.
As an added tip, when sewing a seam that requires me to let an opening ( such as for stuffing an item after turning ), I use two red-headed pins for the stop point and two green-headed pins for the starting point.
Good article, and consistent with what I learned. Some of the photos show pins inserted on a diagonal, not perpendicular to the sewing line.
Three sources for these wonderful silk pins are:
http://www.susankhalje.com/store.html
http://www.shiboridragon.com/Notions-Japanese.htm
Hisako Nakaya, owner of Professional Sewing Supplies of Seattle, WA. You can write for a catalog at PO Box 14272, Seattle, WA 98114-4272 or call 206-324-8823.
And yes, I do put the pins slightly on the diagonal - I think they're a little easier to put in that way than on an exact right angle - they do fall into the hand better. Also, I think I've convinced myself - and this verges on the unproven - that I'm getting two pin's worth (or maybe one-and-a-half) of pinning that way - where it first goes in, then a tiny bit further along, where it comes out. Who knows about that one....!!!
And thanks for the mention - I started carrying them in my classes a number of years ago to make life easier for my students (and I still do, and now they're in my store, as you've so kindly noted!). I was so frustrated seeing my students work with awful pins - things that were so hard to work with, that just destroyed the fabric. The fabulous Judy Barlup first told me about them (and the equally great hand-sewing needles) - she said I needed to make them available to my students. She was so right - anything else seems like a pitchfork compared to them!!! Would I use them to hem jeans? No - but anything else, absolutely - they're so nice to work with.
I also use and teach this perpendicular method of pinning to, but I don't angle them in and I call it "reversible" pinning, because you can sew from either side of the fabric. When the heads stick out,you can be sure to remove the heads with that "swipe and throw" at the magnetic pin cushion at your right.
Another Pin Tip is to get into the habit of inserting the very tip of the pin just under the top surface of the fabric, so you don't accidentally draw blood! I also always use pins like stitches when pin-fitting a garment for alterations, and the tuck-in-the-pin-tip is appreciated!
Pin Tip 3 when placing patterns and using pins (if the fabric allows it), is to point the pin tip at the corners, which are held down so much better for using scissor or blade. Often those are all that is necessary if you use your fingers like pins when cutting out.
Oh, may I mention the head-up insertion for doing a machine blind-hem, (with the tip pointing to the hem), also guarantees seeing them at the right for the sewing.
Great topic, thanks Susan!
You should be careful when you are discarding broken or bent pins and needles. Someone could accidentally get stuck! I keep a small empty mints tin clearly labelled "sharps" in my sewing room to put them in. When it gets full, I toss the whole thing. No dangerous points lurking in the trash!
Wow! This was so informative in a I-never-thought-about-it way. Thanks! And I love your quote, "use your pins as your stitch" - it sums everything up that pins are just as important as other other element in sewing.
I've been sewing for over 70 years and like Ardiemae I have always placed the pins in a horizontal way or straight north and south. To place them on an angle seems to be a much better way. To those sewers who commented about discarding their pins and needles in the trash in a container. The containers can open up when put into a landfill. A safer way would be to obtain a container from a pharmacy, they are free. The containers are used for diabetic needles, etc and are disposed of by the pharmacy and picked up for proper disposal.
Love this site and all the helpful information it contains. Thanks.
This is a good technique for pins and keeping them. I have misplaced so many pins in the last two months.
Great article. I learned with the in-line method and have mostly switched to perpendicular. The exception is inset sleeves and gathers. I think in-line is better for controlling the ease and fullness. I use an upholstered tuna can as a pin cushion. It's a fun teaching project. One spot on the edge is for hand sewing needles, one spot is for three sizes of safety pins for turning tubes and pulling elastic. The rest is pins. Used to use a dish but I have an evil cat who loves to knock it over and laugh while I pick them all up.
I learned perpendicular pin placement from my mother about 40 years ago. Then I stopped sewing for 25 years and when I started again recently all I heard about was parallel placement. Thanks for letting me know that I'm not just doing this because I'm stuck in the last century :)
I was taught to place the pins perpendicular to the seam when I'm sewing and parallel when I'm cutting. My grandmother taught me to baste, not pin, but I've never been confident with that, so I pin then baste then sew. It works best for me that way...even if it is a bit of overkill.
One thing I've learned through experience is, when pinning the pattern to the fabric, I pin through the notches perpendicularly. This allows me to lift the cut portion to get the second side of the notch.(I cut notches out, as points, not into the seam allowance.)
As for bent pins and needles, if they're still sharp and aren't broken, I keep using them. They're particularly useful when pinning curves. If necessary, needle-nosed pliers can straighten them out nicely. I guess I learned Depression-era frugality from Grandma, too.
Thank you. I appreciate the information on pinning for basting. No more stuck fingers and the layers of fabric will stay where placed.
When you shop for pins make sure they are made of steel. How do I know some are not? I use a magnet for picking them up on the floor and some just lie there not sticking to the magnet. They are made in China and probably from tin with not much steel in them and won't magnet. What a frustration to learn that, huh? I throw the ones away after straining my aged back picking the suckers up. The Chinese pretzel hold I call it.
Now you have me over-thinking this...I rarely pin, but when I do, I use the least amount of pins possible to get the job done. I can't stand any distortion in my fabrics; I like the fabrics to 'marry' each other, and sometimes too much pinning prevents this natural ease. Also, I adore fabric weights for the type of work I do. Thanks again!
Do you remember the pin sharpening little strawberry attached to the tomato pin cushions? Is there a way to make one at home? When I've tried to buy a new one, but they are stuffing the berry with fluff and cannot be used to sharpen pins. I read somewhere that you can use steel wool as a filler. Would this work? Thank you!
That little strawberry was filled (back in the day!) with emery (as in emery board....), and it was for keeping your needles sharp. I've no idea where to find it......
Readers???
SusanKhalje & SewingforKids: Here's a link to some information about emery strawberries, including where to find them and kits to make your own:
http://www.needlenthread.com/2011/02/following-up-needles-emery.html
I'm glad you asked about this, because it reminded me that I was intending to find this information for myself but hadn't gotten around to it.
It is so nice to find better ways of doing something we think of as basic! Many thanks for again sharing a special technique that makes us better sewers. I love learning fine sewing techniques that you use!
BTW I bought a giant strawberry at JoAnn Fabrics. I am pretty sure it is not just a different pin cushion because it feels like there is sand or emery inside it rather than the stuffing....
Thank you Susan, very helpful. I still use the glass headed pins I bought from you when you taught at PENWAG. I also keep heavy duty extra long quilting pins for things like pinning the sides of a sweater to take it in or working with Jean material.
I had to laugh at myself a few years ago when I started sewing quite a bit again and realized that the pins I had were frustratingly dull - and- I had purchased them in the early 80's. No wonder they were dull! I tossed them along with my vintage 80's thread (which kept breaking, duh).
When I was young and learning to sew, my mother always placed her pins perpendicular to the seams, even if she didn't know why. Then somewhere along the line someone told me that pins should be placed paralell to the seam and directly on the seamline, which I've been doing ever since. I can now see WHY my mother's method was the far better one and I will be returning to my former ways. Thanks so much for all your very informative articles. your advice.
I agree with KarenazW and would enjoy an article on transferring patterns to fabric.
Thanks also to all the other accomplished seamstresses' tidbits of information--many good ideas among them.
Paula
oprah, i've had an ah ha moment! thanks susan!
Here is a link for emery sand for pincushion strawberries:
http://www.joggles.com/store/catalog/product_info.php?products_id=15142
http://www.etsy.com/shop/dottyral?section_id=5432686
How do you sew for 50 some yrs and miss something so fundamental!! No wonder I've always hated zippers. Now I can Stop buttoning everything up. My granddaughters think it's my trademark when really it's been a problem with precision. Thank you and keep rattling this old dogs chain
Thanks for the informative article. My mother taught me your way and my home ec teacher taught me to place them parallel to the seem line. Seems mom knew best.
Where can I find good quality steel, glass head pins? I bought some "silk" pins from an online sewing company. But they don't seem to carry them any more. These are 1 3/8" long and .50 mm. Is there a better size for fine fabric? I must have 5 different types that I use for different purposes. Quilting, heavy fabrics such as denim, and even very short ones for curves and sleeves and in baby clothes. Then there's the ones that come on the magnetic holder which I use when I'm holding multi-size patterns down to my cardboard mat to trace my size and all the adjustments I need. I don't worry about bending or dulling my good pins for just tacking paper.
I also keep a medicine bottle for my bent and or broken pins. and needles.
I go to a local sewing school that teaches us not to use pins so I secretly use them at home when no one is looking :) Thank you SO MUCH for sharing this information. This really does make a huge difference!
Sorry to say this but you're wrong. Pins should be parallel. If you've ever worked in haute couture or seen any industrial sewing, they tell you to place parallel. Especially haute couture. I've seen it and lived it. Ready-to-wear clothing do not usually use pins when working in an industrial setting, but when they do they say place parallel. Placing perpendicular is a home sewing technique that has taken hold and become popular because the majority of home sewers do not know high fashion (hate couture) techniques. Also, placing parallel allows you to see the finished product before making any sort of stitches; an advantage perpendicular pins do not allow. The only time to use perpendicular pins is closures, such as zippers. At least you got that right.
Thank you very much for these precious explanations. It's really important to get the basics right!
I have learned that a piece of magnetic sheeting will corral the pins I remove as I sew the seams. Even a magnetic calendar from the fridge will work nicely - just be sure to put the magnetic side up.
Be sure to leave some space between the sheet and an electronic machine.
This is in response to Finely Fabricated's question about fine, sharp pins. I worked in the textiles and costumes department of a very fine art museum, and the conservator there used butterfly pins for fine work. So instead of looking in places that sell sewing necessities, try looking for pins for butterfly collectors. They are long, and very fine. I hope this helps.