
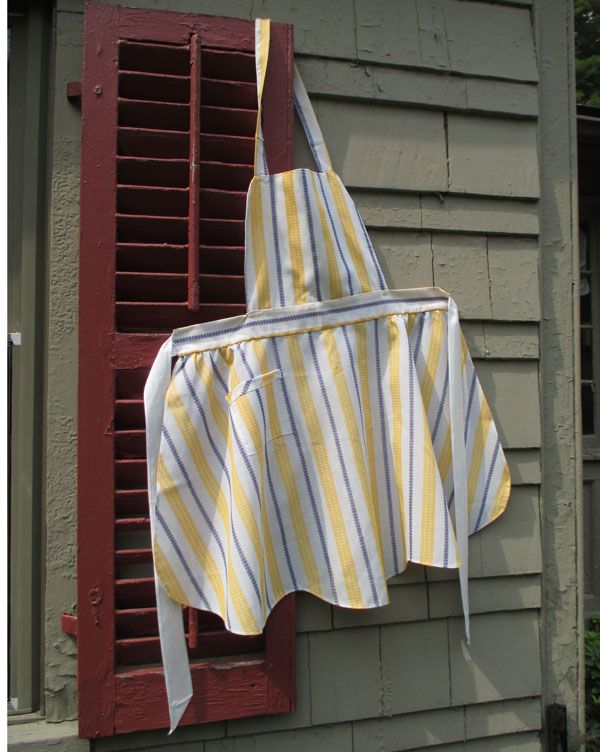
This handmade apron with curved skirt hem is the inspiration for sewing a new one.
Tying on an apron was part of my late grandmother’s daily routine, and my mother continues that ritual. Her aprons have been wearing thin, though, and it’s time for at least one new full apron. After looking through her collection of unused half aprons and the few full aprons not yet in tatters (see some of the collection here), I decided to replicate and then tweak one of my grandmother’s favorite designs. We’re not sure from where Grandma copied this design, but it is one she sewed and wore many times over the years.
Supplies:
1 3/4 yards woven fabric such as quilting cotton
1 1/8 yards rickrack
2 sets of snaps
Carbon and tracing paper
Hand-sewing needles
Matching thread
Pins
Scissors
Sewing machine
Create a pattern
I used tracing and carbon papers to create a pattern from the apron sewn by my grandmother, which features pretty curves at the hem. I folded the apron in half to make symmetrical skirt and bib patterns. I also added 5/8-inch seam allowances to all edges, even though I stitched 1/2-inch seams in some instances when assembling the apron. For the pocket pattern, I borrowed the general shape of another apron pocket (not shown) with a curved edge similar to that of the apron skirt. If you don’t have an apron to trace, use the photos below as a guide to draw your own pattern; you can adjust the pattern’s size and shape as desired.
Cut the fabric:
1 apron skirt on the fold
2 apron bibs on the fold
2 pockets on the fold
Two 26-inch by 5-inch waist ties
Two 13 1/2-inch by 2 1/2-inch neck straps
20 1/2-inch by 4 1/4-inch waistband
Note: This apron is a small size but can easily be enlarged by lengthening the straps, ties, waistband, and skirt, as well as widening the skirt at center front.
Mark the center front on the skirt, waistband, and apron bib pieces with pins or disappearing ink marker.
Sew the neck straps and waist ties
Fold the two neck straps and two waist ties in half lengthwise with right sides together, align the raw edges, and pin. Stitch 1/2 inch from the long edge and one short edge on each strap and tie.
Trim the seam allowances by half, and angle the cut at the sewn corners. Turn each strap right side out and press.
Set aside.
Prepare the apron bib
Baste rickrack around the right side curved edge of one apron bib piece (but not along the straight botton edge). Pin each neck strap to the bib piece’s top edge, where the curve begins on each side.
With right sides together and raw edges aligned, pin the second bib piece on top. Stitch 5/8 inch from the curved edge.
Turn right side out and press. Fold and press a 5/8-inch seam allowance to the wrong side along the apron bib’s bottom edge and stitch it closed. Set aside.
Finish the skirt hem
Press under 1/4 inch around the skirt piece’s outside edge. Turn under again and hand-baste, then topstitch.
Remove the basting stitches. On the skirt piece’s upper edge, run two rows of gathering stitches by machine basting at 3/8 inch and 1/2 inch from the raw edge.
Set aside.
Attach the skirt to the waistband
Press under a 5/8-inch seam allowance on the waistband’s short edges and one long edge. With right sides together, pin the skirt piece’s top edge to the waistband’s unpressed long edge at center front and just inside the 5/8-inch pressed seam allowance on the waistband’s short edges. Gather and pin the rest of the skirt to fit along the waistband. Note: Keep the gathers closer to the skirt sides, rather than the center front. Stitch the gathered skirt to the waistband 5/8 inch from the raw edge.
Press the waistband away from the skirt, and fold the waistband over the skirt’s raw edges.
Sew the ties to the waistband
Pin a pleat into each waistband tie’s raw edge so that it is the same width as, and fits neatly into, each of the waistband’s short ends. Pin the ties in place.
Fold the unsewn waistband edge over the tie edges and attached skirt section and stitch the waistband sides by machine.
Secure the waistband’s free inner edge with hand- or machine-stitching; this also encloses the waist seam allowances.
Attach the apron bib
Pin and stitch the apron bib to the waistband 1/4 inch from the top edge. Be sure to align center fronts.
Try on the apron to determine the correct length of the neck straps before hand-sewing two sets of snaps in place, 1-inch to 1 1/2 inches apart, and near the tip of each neck strap. Be sure to stitch both snap balls on one strap and the corresponding snap sockets on the opposite side of the other neck strap. When the snaps are closed, the straps will wrap around the neck like a halter and will lie flat.
Prepare and stitch the pockets
Press under 1/4 inch around the pocket edges. Turn and press again along each pocket top edge. Pin rickrack to the pocket top edge and stitch in place.
Determine where you’d like the pockets on the apron; pin them in place. Tip: Be sure the pockets are pinned symmetrically by folding the apron in half along the center front and checking that the pockets line up with each other before stitching. The pockets on the apron shown are stitched at a slight angle, with the pocket top inner edge 4 1/4 inches from center front and 5 1/4 inches from the waistband edge.
Stitch the pockets to the apron skirt close to the pocket edges, then sew a second row of stitching 1/4 inch from the pocket edge.
Give the apron a final press before wearing. For more free apron patterns, click here.
Get the latest including tips, techniques and special offers straight to your inbox.
good post !
bardzo fajny pomysł na fartuszek
ładnie zrobione
ładnie zrobione
super post
good post