

The Secret to Sewing Slinky Knits
Take a cue from the runway and get a look that’s super- slimming
Slinky knits, the acetate/spandex blend with a luxurious, fluid drape, have become a versatile staple fabric. Top designers are featuring slinky knit apparel in their 2007 collections, in everything from sportswear basics to sparkling evening wear.
There was a time when slinky knit synthetic blends made people cringe. So why are they all over the runways? Slinky knits are stretchy, they travel beautifully, and they’re slimming. The soft drape of this knit is not only comfortable but also makes you appear as though you’ve spent a month at Canyon Ranch Spa. Everyone looks slimmer in slinky, and a touch of spandex keeps it from looking baggy. Simply design your garment with enough ease (a minimum of 4 inches) to allow the knit to drape and flow.
Fusing makes slinky knits easy to sew
So why isn’t slinky the superstar of knits? The prevailing myth is that using it limits your design options to only the simplest of garments. Another is that the wonderful stretch of slinky makes it hard to sew. Don’t believe it. The truth is the application of a fusible can bring that super-stretch under control. Once that’s accomplished, you’re free to take advantage of slinky knit’s nonravel characteristics and design something spectacular.
With the right technique, you can use slinky as you never thought you would. In this article, you’ll learn to create custom bindings, faux piping, ribbon trim, and reverse appliqué designs. These techniques will transform the challenging aspects of slinky into sewing nirvana.
Top 10 tips for sewing slinky knits
1. Always cut slinky knits with a rotary cutter for accuracy. (Scissors can stretch the fabric out of place.)
2. Don’t allow the fabric to drape off your cutting or pressing table. The weight of slinky can distort the pieces.
3. Although using a serger is not necessary, an overlock stitch can support the weight of longer-length skirts,
pants, and dresses. Experiment with woolly nylon in the upper looper for added stretch.
4. For conventional seams, use a zigzag stitch, as well as for topstitching. Try a stitch length of 2 to 2.5 and a stitch width of 0.5 to 1.
5. Slinky has a right and wrong side. Pick the side you like best and use it throughout your project.
6. When sewing, hold the slinky back slightly and ease into the feed dogs. This creates better elasticity.
7. Trim excess material to eliminate bulk, especially when attaching facings.
8. Choose a stabilizer (fusible tricot) that won’t reduce softness or drape. Shoulder seams should be stabilized, as well as other areas that need extra strength, such as yokes and jacket fronts.
9. Choose a firm, nonroll elastic for waistbands to support the weight of the fabric.
10. Slinky will melt or get shiny with too much heat. Always use a press cloth when ironing, and experiment with scraps to get the heat setting right.
No-Sew Edges
Take advantage of slinky’s nonravel edge by creating a daring diagonal hem or adding a lovely ribbon trim. Decorative topstitching is optional.
Go for a Diagonal Hem
Showcase the beautiful drape and flow of slinky knit with a simple yet fashionable diagonal hemline.
1. Cut a sharp diagonal hemline using a rotary cutter and straightedge.

2. Iron a double-sided fusible tape to the raw edge. Remove the paper backing, fold the hem up at the tape edge, and press again to fuse.

Embellish with a Faux Grosgrain Ribbon Trim
Ribbons of slinky knit in complementary or contrasting colors are an adorable way to play up a raw edge. The natural ribbing of the slinky gives the appearance of grosgrain.
1. Cut a straight line on the cross-grain of the slinky. Press a double-sided fusible tape onto the edge you have just cut (as shown in the photo, above right). Don’t stretch the material; it should lie ripple-free on your ironing surface.
2. Cut carefully along the inside edge of the paper tape. This makes a 3⁄8– or 5⁄8-inch-wide ribbon. Remove the paper backing. To avoid future waves or puckers, give the slinky ribbon a slight stretch.

3. Lay the right side of the garment edge flat on the ironing surface. Proceeding in short increments, fuse the slinky ribbon onto the hem edge of the garment. To avoid making imprints, do not pin. Also, be sure not to stretch the material; otherwise, the edge won’t lie flat when finished. You can easily add a third color by fusing another piece of slinky ribbon next to the first.

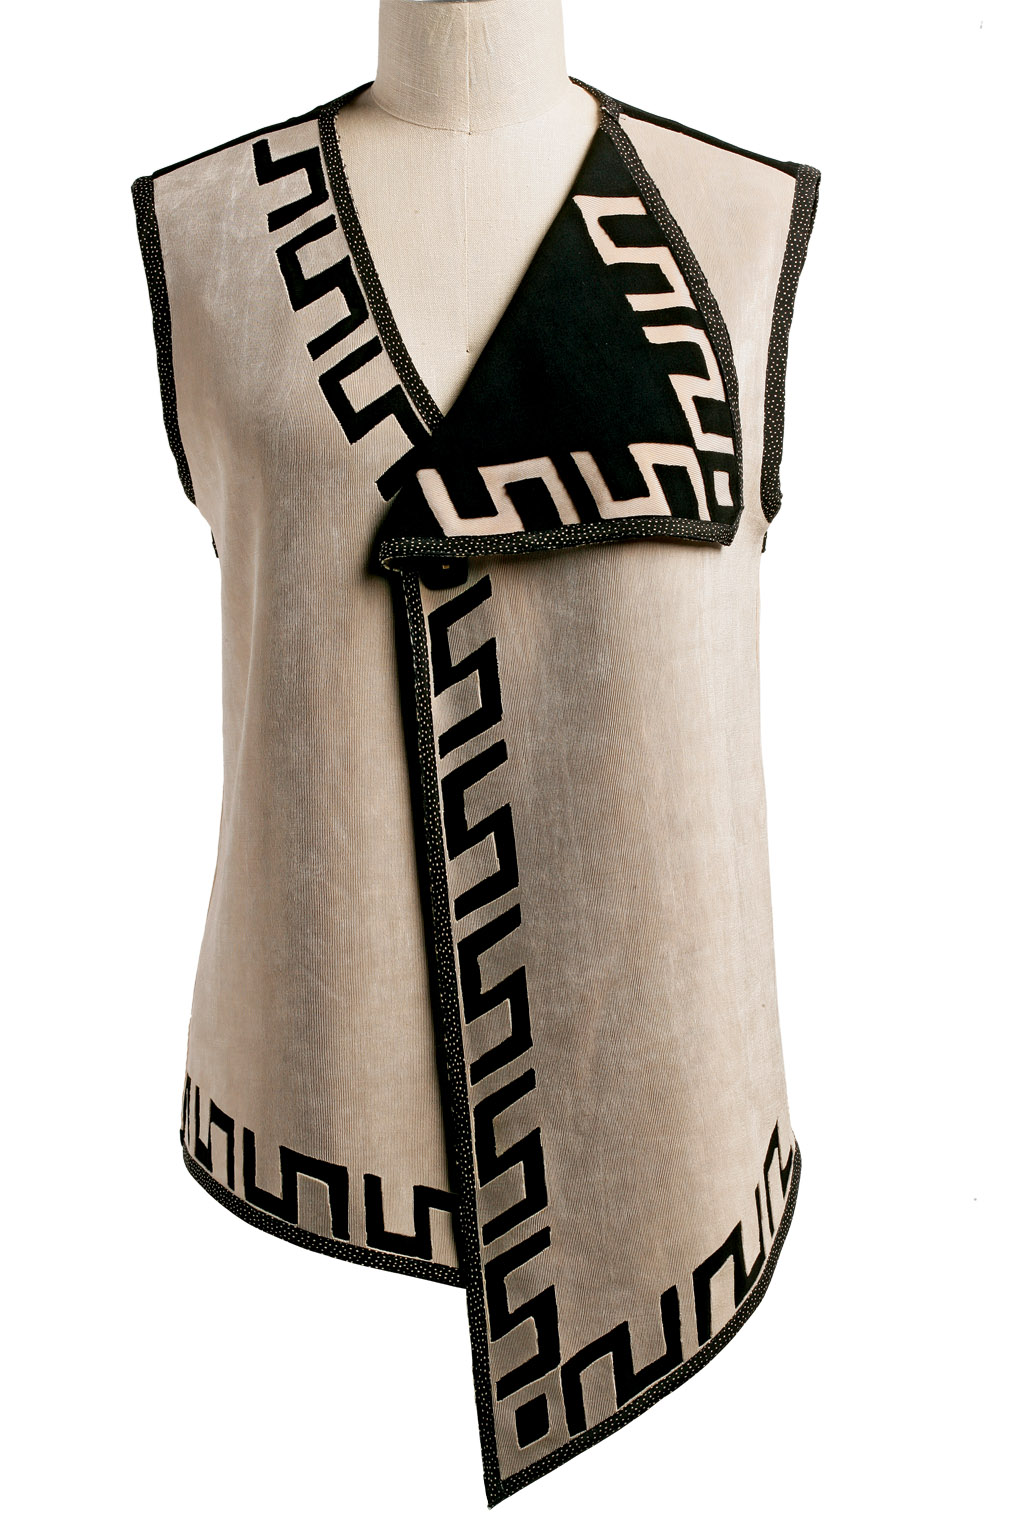
Add on Faux Grosgrain Binding

Go all the way around the edge with slinky knit for a clean, bound look. This technique works particularly well for the front edge of a jacket or vest.
1. Cut a straight line on the cross-grain of the slinky. Iron on a double-sided fusible tape along the edge you have just cut. When applying the tape, don’t stretch the slinky knit. Add a second piece of fusible tape next to the first, leaving a 1⁄16-inch space in between to allow the binding to wrap around the hem edge.

2. Cut carefully along the edge of the second piece of fusible tape. With the protective paper still intact, fold the slinky binding in half. Press the folded binding for a sharp edge. Remove the paper backing. To avoid waves and puckers, give the slinky knit binding a slight stretch and allow it to return to its neutral position.

3. Place the garment edge inside the fold of the binding. Press along the edge, fusing the hem into the pocket of the binding fold. Press the binding on right and wrong sides to bond. Do not allow the layers to stretch, and be sure to let the piece cool before moving.

Sewn Edges
To rev up a neckline, stabilize a jacket front, or add a splash of color to your project, consider an edge that is piped, bound, or lined.

Create Faux Piping Edges
A great alternative for necklines and armholes is a band of slinky knit piping in a contrasting color. This tailored, stylish detail helps control the stretch where it’s needed.
1. Cut an 11⁄2-inch-wide strip of slinky cross-grain to a length 25 to 30 percent shorter than the neckline or armhole circumference. Sew the ends together, then fold the wrong sides together lengthwise. Mark the strip and garment edge in quarters. Pin the strip to the right side of the garment with raw edges aligned. The distance you position your stitching from the fold determines the width of your piping.

2. Trim the garment fabric close to the stitching. Fold the piping strip to the inside of the garment.

3. On the right side of the garment, stitch approximately 1⁄8 inch from the seam. Trim the excess piping fabric and press lightly.

Fashion a Woven Bias Binding
Use a bias binding in a woven fabric to add color and contrast, while hiding the raw edge. This also gives stability to the armholes and neck holes of a slinky knit garment.
1. Fuse a 3⁄8-inch bias fusible stay tape to the wrong side of the slinky garment edge. The stay tape prevents stretching as you attach the binding.

2. For a 1⁄2-inch binding, use a 13⁄4-inch-wide strip of bias fabric. Line up the raw edges, then with right sides together, sew along the inside edge of the stay tape.

3. Wrap the bias binding around the slinky, and tuck the edge under 3⁄8 inch. Pin in place. Stitch in the ditch or hand-stitch the binding to the slinky.

Make a Woven Fusible Bias Tape
Bias tape is a woven fabric that offers a unique contrast to slinky knit. Can’t find a bias tape you like? Make your own with a fusible bias tape maker.
1. You can create your own bias tape using a Clover fusible bias tape maker, as shown above. Fuse bias fusible stay tape to the woven fabric. Remove the paper backing, and press the woven bias tape onto the edge of the slinky.

2. Edgestitch carefully alongside both sides of the bias tape. This topstitching ensures that the woven tape will stay in place on the slinky garment.

Reverse Appliqué
Create your own cutout patterned edges or allover designs using this no-sew technique.
1. Trace your pattern piece onto the paper backing of the fusible web. Include seam allowances with your reverse appliqué design. Following the directions for your fusible product, fuse the traced pattern to a piece of slinky. This knit piece will ultimately be the outside of your garment. Carefully press the entire piece and allow it to cool. It only takes 2 or 3 seconds of heat to bond. Next, cut out your appliqué design.

2. Carefully remove the paper from the fabric. Make sure the adhesive film is transferred to the slinky. If it didn’t transfer well, redo step 1. Place the inside garment piece onto a pressing surface. With the film side down, place the outside piece flatly on top. Make sure there are no wrinkles or creases.

3. Beginning at one corner, press in a continuous direction to fuse the pieces together. Check for wrinkles or creases. You may turn and press the other side. Trim the fused knit piece to the seamline around the edges. Be careful not to cut off the seam allowances you’ll need to assemble the garment.


Log in or create an account to post a comment.
Sign up Log in