Cashmere has always been considered a classic fabric, and today it also connotes high fashion. If you really want to wrap yourself in luxury, wearing cashmere is one way to do it. A cashmere garment is a blue chip investment well worth including in your wardrobe.
It’s been three years since I made my first cashmere garments; I wear them as often as possible and they still look and feel as great as the first day of wear. Cashmere knits are available in various weights, colors, and patterns. They are easy to sew and the techniques I’ll discuss are workable with other knit fabrics.
Cashmere is visually appealing and has a distinctive “hand” which is hard to duplicate. The feel of true cashmere is “downy” soft, sensuous, and seductive. It is very comfortable and, because it’s a natural fabric, it breathes. Though soft and lightweight, its fine fibers have more insulation power than any other.
The factors behind the cost
Cashmere is hard to obtain and its production is limited. The best cashmere comes from Himalayan goats living in the Kashmir province in the mountains of Mongolia. Usable fleece from goats in other regions, such as South Amelica and Australia, is not of the same quality but is available on the market. China, the main supplier of the fiber, sells it to other countries such as Scotland and Italy for processing.
The goat fleece is composed of the down (a fine fur undercoat) and the hair (a coarse outercoat); either type may be used to construct the fabric. The down is removed from the goat by hand combing. Depending upon the care taken in combing, 60 some coarse hair may be present in the fleece. The more down in the fleece, the better and more expensive the fabric. It takes 24 fleeces to make a coat and one to make a muffler.
100% cashmere knit, 54 in. to 60 in. wide, ranges in price from $98 to $170 per yard; cashmere jersey, a stretchy, fine knit, is the most expensive. Cashmere is also blended with other natural fibers; if you are at all hesitant to use pure cashmere, you can start with a blend and work your way up. A blend is usually less expensive and may range from $30 to $90 per yard. Alpaca, lambswool, merino, or silk are blended with cashmere to render a high-quality fabric. The exact fiber blend should be stated on the bolt label or hand tag.
When nylon is blended in large amounts with a wool-type fabric, it usually means the wool has been recycled, although the fabric may not be labeled as recycled. Nicole Balding, a fabric buyer at G Street Fabrics in Rockville, MD, notes, however, that since cashmere wool is not a strong fiber, nylon is often added in small amounts to strengthen it.
As a warning to purchasers, The Wall Street Journal recently reported that imported cashmere fabrics have been mislabeled (the percentage of cashmere may be misrepresented) to increase the fabric price. The labeling laws abroad are less stringent than those in the United States, so there’s not necessarily a guarantee that the imported fabric label will include the same fibers as the label states. In the U.S., however, cashmere is covered by the Wool Labeling Act which requires manufacturers to state the fiber content specifically and whether the fibers are recycled.
To help you through this jungle of information, I suggest the following guidelines: Expect to pay a high price for good quality cashmere, and shop at reputable stores. Learn the feel of pure cashmere; poor quality cashmere blends feel hard and harsh because finishes have been applied, they are sometimes limp, and will wear thin and pill. Look for wrinkling; lower quality cashmere blends do not drape well and will wrinkle when you crunch them in your hand. If you are going to sew with a blend, select a natural fiber blend, which will yield a better quality garment with a hand closer to that of pure cashmere.
Check for luster; pure cashmere does not shine. If there’s a shine, a synthetic may have been added. Also look for knit fabric with even, tight stitches; the stitches in top-quality cashmere knits are close together and tightly knitted.
Style talk
As with other knits, cashmere has degrees of stretch. When selecting knit cashmere fabrics look for two characteristics: the recovery and the amount of stretch. A quality knit should recover, or return to its original shape, after being stretched. Knits are defined by the amount of stretch on the crosswise direction: limited or stable, moderate, and stretchy. To determine the amount of stretch, hold 4 in. of knit fabric on the crosswise grain and stretch it until just before the cut edge starts to roll. Stable knits should stretch about % i n . , moderate knits 11/4 in. to I1f2 i n . , and stretchy knits 2 in. or more. Knits with a limited stretch can be used with patterns made for wovens. Stretchier knits should be used only with patterns recommended for knits. The descriptions given in the pattern catalogs and on the back of the pattern envelopes list the type of stretch that is needed for the pattern.
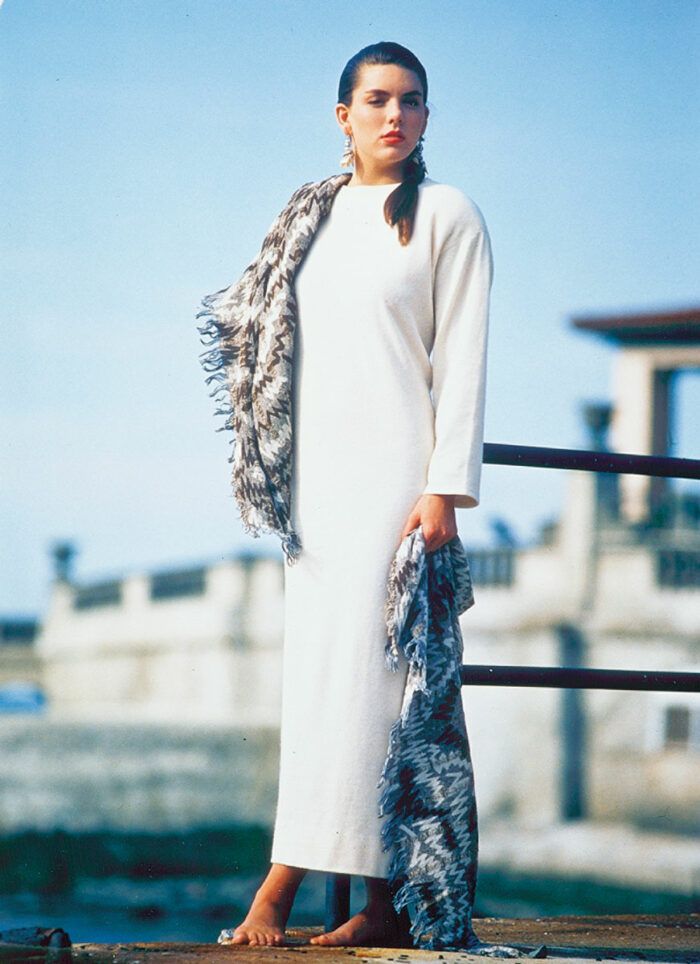
Most cashmere knits fall into the limited or moderate stretch category. These medium-weight, stable knits that don’t cling to the body are good for cardigans or buttonfront sweaters, sweater coats, flared skirts, and pants. Lighter weight, stretchy knits, such as jersey, sew nicely for shells, turtleneck sweaters, and clingy dresses such as the one shown on the previous page.
Select your pattern based on the design lines. Patterns with clean, simple lines and details tend to balance the fabric quality and allow the fabric to make the fashion statement. Patterns that have classic lines will stay in style longer because they are easily updated. Over the long run, they will give more wear for the money invested. Garments made from patterns that can be used with woven or knitted fabrics will also add more versatility. Here is a pattern selection tip: Check cashmere ready-to-wear for fashion styles; many are suitable as ideas for pattern selection.
|
|
Preparing to sew cashmere
Because cashmere knit fabric is expensive, you’ll want to check the yardage suggested on the pattern very carefully before purchasing. A cashmere knit is usually tubular, which means that it will come in double thickness on the bolt. To determine the exact amount needed, take your pattern to the store and lay it out on the fabric to find the most economical cut.
When laying the pattern on the fabric, always use a with-nap layout. The most subtle difference in fabric shading will show up in your finished garment whether you can see it in the store or not. If you have trouble determining the right and wrong side of the fabric, slightly stretch the crosswise edge. The fabric edge will roll toward the right side.
Pure cashmere knits require no preshrinking. Carefully check the content of blends to determine if shrinkage will occur and if sizing has been added. If in doubt, steam-press the fabric with a good surging steam iron and buy extra yardage to allow for shrinkage; steam will help remove the sizing. Press the fabric on a flat surface with a lifting and lowering motion of the iron while constantly shooting in steam. Use a press cloth on top of the fabric to prevent damage. Don’t slide the iron across the surface; that can pull the fabric out of shape and stretch it. An alternative to pressing the fabric yourself is to send the fabric to a reputable dry cleaner for steam pressing only.
As with all fabrics, the grain of a cashmere knit should be straightened before laying out the pattern. Smooth the fabric out evenly, making sure it is squared off. Use a Tsquare or other right angle measure and cut the crosswise edge following the straight edge and the weft of the knit. Press out lengthwise folds or re-fold the fabric to avoid placing the pattern on these areas. This eliminates having permanent fold lines at center areas. Use pattern weights to hold the pattern in place for cutting. If the fabric is difficult to cut in two layers, cut each layer separately for greater accuracy. An extra sharp pair of dressmakers’ shears is a must for cutting straight, clean edges. Transfer pattern markings to the fabric with a water-erasable marking pen or a small sliver of soap. If the fabric is thick, you’ll need to mark one layer at a time.
Construction
Select a machine needle according to the weight of the fabric. Lighter weight cashmeres will accept size 1 1 or 12 universal point needles. Stretch needles, which have a less sharp point than regular size needles, can also be used on knitted fabrics. Blunt or bent needles will snag the fabric or cause skipped stitches.
I recommend spun polyester threads for all cashmere sewing. Molynke, Gutterman, or Metrosene are good top-quality threads suitable for sewing cashmere and other knits. A nice addition is rayon, Sulky, or Stickgam for topstitching, buttonholes, and other decorative stitching. If these threads are not available, the top thread can be doubled by using two spools of thread.
There are several types of machine stitches that can be used to sew cashmere knits. The type of stitch, whether straight or stretch, depends on the stretchiness of the fabric. You can sew stable knits entirely with straight stitches, but stretch stitches work better for moderate or stretchy knits. Check your stitching on a scrap of fabric before beginning the garment. To find just the right stitch for your particular fabric will take some experimenting.
For stable knits, use a straight stitch combined with a short stitch length and put tension on the fabric from the front and from behind the presser foot as shown in the photos above. A short stitch length puts more thread into the seam, which allows it to stretch without brealting.
For stretchy knits like jersey, use a long and narrow zigzag stitch, a multiple zigzag stitch like a three-stitch zigzag, or whatever stretch stitch your machine offers.
When selecting a stretch stitch, consider the weight and the stretchiness of the fabric. Check the machine tension and pressure. The stitching should be flat and smooth and should not look pulled. The fabric should move through the machine at an even rate. If the presser foot and feed dog drag the fabric, tl}’ putting tissue paper between the feed dog and the fabric.
Test the machine stitching on a scrap piece of fabric. Adjust the stitch until you can sew the fabric without the seam puckering. The seam should be able to be pressed flat without bulk from the threads. For lightweight knits, try approximately 12-15 swin.; for medium weight knits, use 10-12 swin.
Wherever two seams meet, I trim the corner of one of the seams diagonally to reduce the bulk. A % in. seam allowance can be trimmed to % in. and pressed open flat. The edges of cashmere knit do not ravel, so no seam finish is necessary, but I often serge the edges for a neat finish. If the fabric is thin, both seam allowances can be serged together instead of separately. In this case I finger press, then steam press them open so the seam is flat, then I press them together to one side and serge. This method gives a beautiful flat seam.
Press the garment as you go. A light pressing will remove any slight puckering from the seam allowances. Since cashmere is a wool fabric, an iron that can provide bursts of steam is needed to give proper shaping and a good finished look. Don’t slide the iron across the fabric; use an up and down motion to press. Always use a press cloth so you won’t polish the cashmere suliace.
Sewing without ribbing
Sweaters, dresses, turtlenecks, and cardigans are popular in cashmere ready to wear, but the problem for home sewers is finding cashmere rib knit to finish the edges. A fine wool knit ribbing can be used if available. For a shell made of stretchy knit, you can use a self facing at the neckline. The hem edges can be turned under, pressed, and topstitched. If the knit is stretchy, woven hem tape (I prefer rayon) should be stitched into the shoulder seams to prevent stretching and to stabilize the seam. The seam can also be serged.
Cardigan sweaters and simple knit tops can be seamed using an overlock stitch on the sewing machine or the serger. A one inch grosgrain ribbon along the neckline, hem, and buttonhole areas make a stable finish. Whether you apply this technique to the right or wrong side of the garment depends on whether you can exactly match the grosgrain and fabric color. For a ribbon trim on the wrong side turn the raw edge 1/4 in. to the wrong side and press flat. Lay the ribbon even with the folded edge, shaping around curves. Pin the ribbon in place, being careful not to stretch the folded edge. Topstitch with the fashion fabric on the bottom so the feed dog eases in the fabric. The corners of the ribbon hem edge can be mitered for a neat finish. For sleeves, apply the grosgrain before sewing the sleeve seams.

A modification challenge
For the purple and black cocoon jacket, I substituted a stable knit for the woven fabric recommended by the pattern, and I lengthened it. There was no stretch guide on the pattern to tell me whether the libbing I chose (a black 100% wool rib) had the amount of stretch the pattern company had in mind. I needed to figure out how much additional ribbing would be required and to make sure that it would be distributed around the front curve of the jacket without bunching up or stretching out the knit fabric.

To check the ribbing stretch I laid it out against the lengthened pattern, grabbed the ends, and stretched it until just before the edge started to curl. Then I marked this stretched ribbing at the length of the addition, as shown in the photo at upper left. Knit ribbing usually comes in 20-in. to 24-in. tubular form. It had to be pieced to fit the edge of the entire jacket.
When applying ribbing to a circular area, such as a round neckline and cuffs, I divide the garment opening and the ribbing in quarters separately, then match the marks when I pin them together. For the jacket ribbing, I modified the quartering method, because the straighter section near the shoulder would need less ribbing than the curved front edges. To get an approximate distribution, I quartered both the jacket front and the pieced ribbing, between the shoulder seam and the side seam at the hem. After matching the marks at the shoulder and the side seam, I matched the uppermost quarter marks and pinned the jacket and ribbing together. Then I requartered the remaining lengths and pinned, matching the marks together. This distributed the ribbing better around the curve. To finish the jacket, I serged the ribbing to the fabric, keeping the ribbing on top.
Kerdene DePriest teaches a cashmere sewing workshop at G Street Fabrics in Rockville, MD, and is an educator in northern Virginia.


Log in or create an account to post a comment.
Sign up Log in