There’s Fabric in Your Sock Drawer
New or old, socks offer endless color and texture choices for easy knit cuffs and jacket collars
Shopping for knit ribbing by the yard can be a fairly discouraging experience. If you can find ribbing at all, you’ve typically got very few choices: ordinary colors, one weight and texture, and, often, lifeless elastic. I passed up many a project that called for ribbed cuffs or a knit collar before I realized that virtually unlimited choices were hiding in my own dresser drawer and in clothing stores of every description.
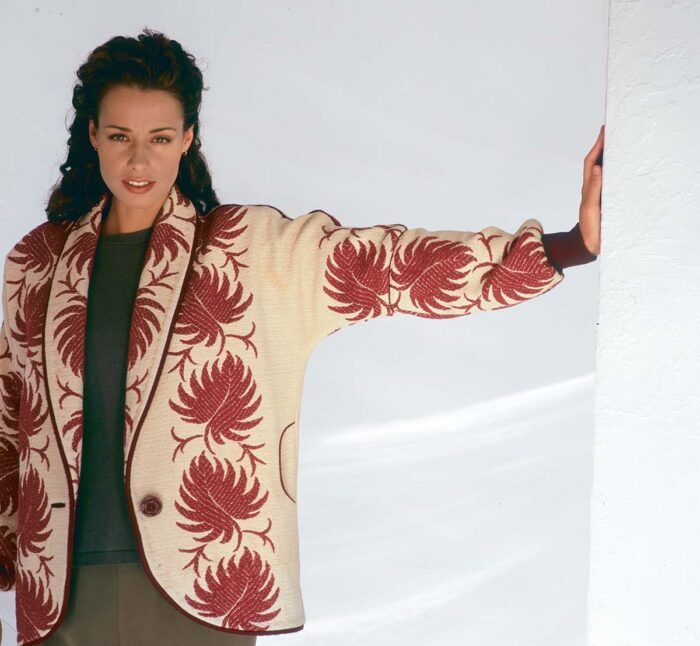
Whether you find just the right color in a shop or raid your own collection, the ankle-and-up portion of a pair of seamless tube socks is perfect for cuffs, like those I used on the jacket above. If the socks you want to use aren’t stretchy enough, it’s easy to add more elasticity. And the unribbed foot portion of socks has numerous uses as well, especially as the raw material for collar-making.
Any old sock?
For cuffs, socks with ribbing from hem to ankle are the most flexible choice, since you can attach them at various lengths, while socks with a narrow strip of ribbing at the top will make only short, single-layer cuffs. For the best stretch recovery, look for socks in wool, cotton, or acrylic blended with nylon. For collars and other flat projects, you’ll usually find that socks with a single smooth texture from the ankle down are the most versatile, but textured tops sometimes work beautifully.
When you’re plundering the sock drawers at home, keep in mind that any socks whose ribbing is still stretchy and pill-free are ripe for transforming, even if the toes or heels are wearing thin. Loose, sagging socks will, of course, produce loose, sagging cuffs, but on p.52 you’ll find directions for adding additional elastic to double-folded ribbing layers. You’ll probably want to add elastic even to new all-wool or all-cotton socks, which can be skimpy on stretch recovery.
Test your sock fabrics to see how they react to pressing. The main thing is not to distort or stretch the knit fabric, so be careful not to slide the iron as you press. I use steam and press with a clapper when necessary on flat-knit fabrics and in seam allowances, but I’m careful to avoid overpressing ribbings.
Double cuffs are more versatile
I put my first sock cuffs on as single layers, using the finished top edge of the sock as the hem edge of the cuff, which worked well. But after a few garments, I switched to attaching the sock cuffs folded in half toward the inside of the sleeve, creating a self-faced finish. This worked still better, even when I planned to wear the finished cuff folded back on itself, making a four-layer total.
When folded this way, socks will show right side out regardless of how you wear them. This allows you to use socks with wrong-Side floats, visible elastic, and unap pealing inner textures. Few socks are so thick that two layers seem excessive, and double-folding has become my method of choice on most garments.
Use stretch stitches
The drawings at left accompany step-by-step instructions on how to attach sock cuffs of any sort, once you’ve determined the appropriate sleeve length, as de scribed below. You’ll notice that I recommend gathering the sleeve first, before attaching the cuffs, rather than stretching the sock as it’s stitched and letting it gather the sleeve as it relaxes. If you’ve got a serger, you may want to try us ing it to attach the cuffs, but I prefer to use the stretch stitches on my regular machine because the seams lie flatter. I think you’ll find that pregathering provides very professional-looking final results. Before finishing the cuff, remove both rows of gathering stitches so that the sleeve can stretch to the extent the stretch stitches allow.
How to measure your sleeves
Regardless of the length of the cuffs, you want to make, be sure to figure in some extra sleeve length, or ease, to allow for movement and to create blOUSing where the gathered sleeve joins the snug cuff. Measure the actual length from the armhole to your wrist, add 1 1/2 to 2 in. of ease, plus seam allowances at cap and cuff, then subtract the length of the cuff you want, whether short and subtle or long and dramatic (argyle knee socks?). Measure one or two cuff lengths (plus one or two seam allowances), depending on whether or not you’re folding them double.
I typically use cuffs that are 2 to 2 1/2 in. long when finished (but un folded), so I just measure off the necessary sleeve length to my wrist and cut the sleeve pieces at that length. This provides 1/2-in. seam allowance, and 1 1/2 to 2 in. of ease after the cuffs are attached.
 Collars and beyond
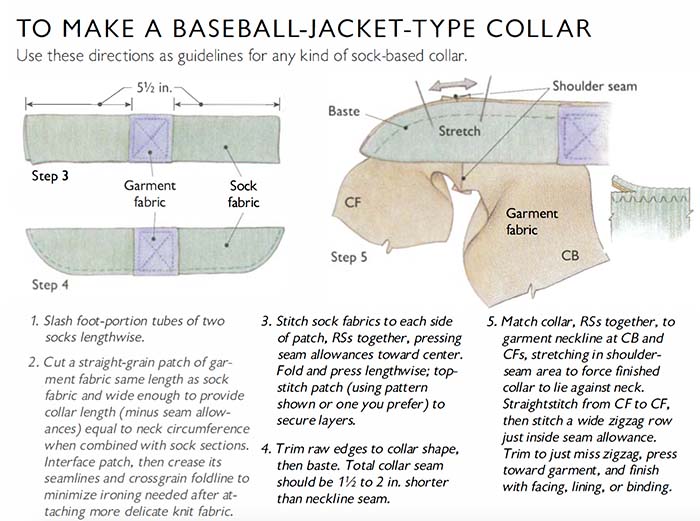
To match your marvelous new cuffs, you can use the foot portion of the socks as flat fabric, perfect for small trims (such as cuff-match ing pocket welts) and for easy-to make collars, particularly baseball-jacket-type collars as shown at right below and also described be low. You can interface or underline the sock fabric to give it more body (ribbed yardage works well as underlining), which brings slinky, soft rayon socks into the realm of possibility.
The problem, of course, is how to extend the fabric beyond the small rectangle you get from each sock. Plain seams are usually too obvi ous, but sections can be joined with patches of garment fabric, or even piped, so the joins look like features, not flaws. The photos at right should suggest some possibilities, but I’m sure I’ve merely scratched the surface. If you dis cover other wonderful ways to use the socks-as-fabric concept, be sure to let me know.


Log in or create an account to post a comment.
Sign up Log in