

Everyone Can Have Jeans that Fit
Here's how to alter the pattern.
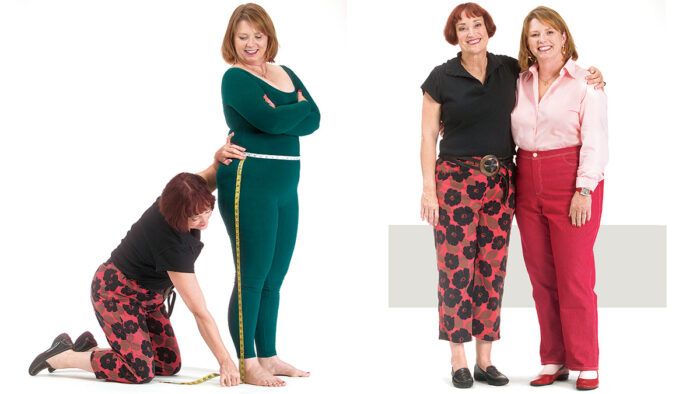
Women love to wear jeans; in fact, the average woman has seven pairs! If you can’t find a pair at the store that fits, it’s simple to make your own comfortable and attractive jeans, in any fabric you please, like the ones we’re wearing. I’ll show you how to customize every aspect of jeans fit, using only a few basic measurements and one of several current patterns. Let’s start off with what’s unique about the way jeans fit.

Jeans fit differently than trousers
The current jeans style is close-fitting, with a contoured front waistband and a shaped yoke in back. The top edge of jeans often comes right to your waistline, or about 1/2 inch below it. Jeans hug your body everywhere, including in the crotch curve, which on an average fitted trouser is about 1/2 inch from your body, and about 1 inch away on pull-on pants. There are three typical leg styles of modern jeans: straight-leg, tapered, and boot-cut. Straight-leg jeans fit to the hip but fall almost straight down from there. Tapered and boot- cut jeans fit snugly to the knee, but boot-cuts flare out below the knee (to allow room for boots underneath), while tapered legs continue to taper to the hem.
To get all these features, you need a good pattern. Try this list of patterns for ideas.
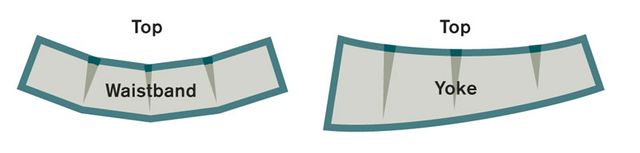
Since these patterns are multisized, check the sizing chart to see what size you should use for your waist and hip measurements. If you need to combine sizes, use a highlighter to outline the sizes you’ll be using, making smooth transitions between the waist and hip areas. If you have a small waist and full hips, choose the size that will give you the circumference you need over the hip, tapering in a size or two at the waist. If the waist is still too large, reduce the back yoke and front contoured waistband by folding out small wedges, as shown below, to bring in the waist. If you have short legs, taper to a smaller size from the knee to the hem for better proportions. Finally, check the pattern’s total crotch-length measurement by measuring the front and back curves, and include the height of the waistbands and back-yoke pieces of your total measurement.
Measurements you’ll need
The measurements you need are listed below. If you like your jeans tight, you should take a snug measurement of your full hips, pulling the tape measure so that it cinches your hips as described. If you prefer a more relaxed fit, take the same measurements, but be sure to maintain minimal ease around your hips.
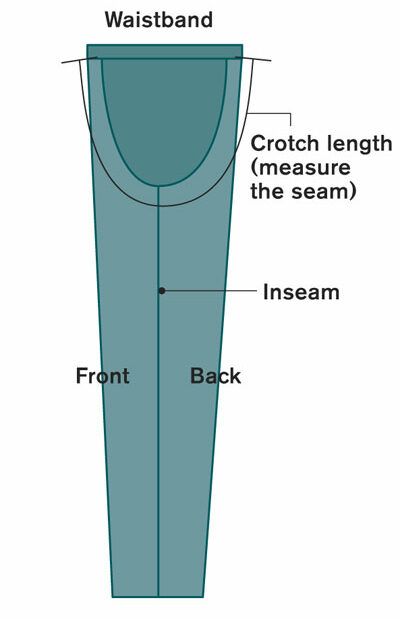
Another measurement that’s very handy to have, if possible, is the length of the crotch seam from a pair of pants that fits you comfortably in that area. If any of your trousers are the right length from crotch to waist, regardless of how they fit (or don’t fit) elsewhere, measure the front and back crotch curves as shown below, and use these as references for your new jeans. If you simply don’t have any pants that fit well, measure your figure from center-front waistline to center-back waistline between your legs. The drawings below will walk you through the process of altering your jeans based on these measurements. Just remember that if the total crotch measurement is different from the pattern, that doesn’t tell you whether you need to add or subtract in the front, back, or both, so refer to all the drawings for guidance or make a muslin to see where the problem is. Below, you’ll find advice for fitting specific body contours that are independent of measurements. Have fun wearing your new jeans!
Taking measurements for jeans
Take all the indicated measurements with minimal ease, unless you want tight-fitting jeans, in which case take a hip measurement that cinches in the body by about 1 inch. Take the full thigh sitting down with the tape measure near the crotch. To find the crotch length, measure either a comfortable pair of pants as shown below, or the figure, from waistline to waistline between the legs.
Standing measurements |
Pants measurements |
Seated measurements |
 |
|
 |
Accurate measurements get you off to a good start toward jeans that fit well—your experience with other pants may help too.
To begin, adjust the pattern to match your measurements and desired leg style
You can make the following adjustments on your pattern. To be sure the results fit as you wish, make a muslin sample and try it on.
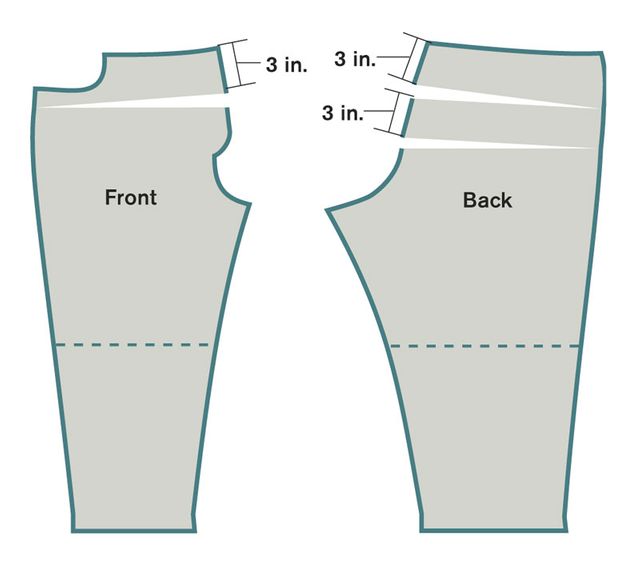
To make the waist bigger or smaller: Reshape the yoke and waistband
If blending to a different size at the waistline doesn’t help, slash the front waistband and the yoke pieces vertically several times, from the top edge to the opposite seamline, leaving a paper hinge, then overlap the slashes equally until the combined upper seamline is half the needed waistline length.

See a video of Sandra putting a fly zipper into a pair of pants.
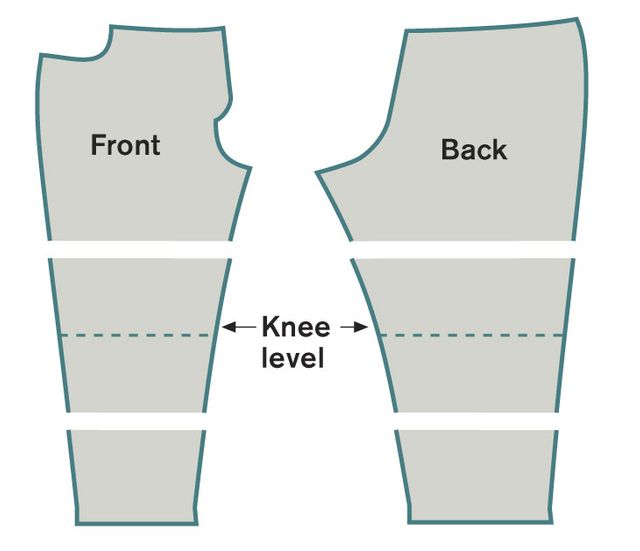
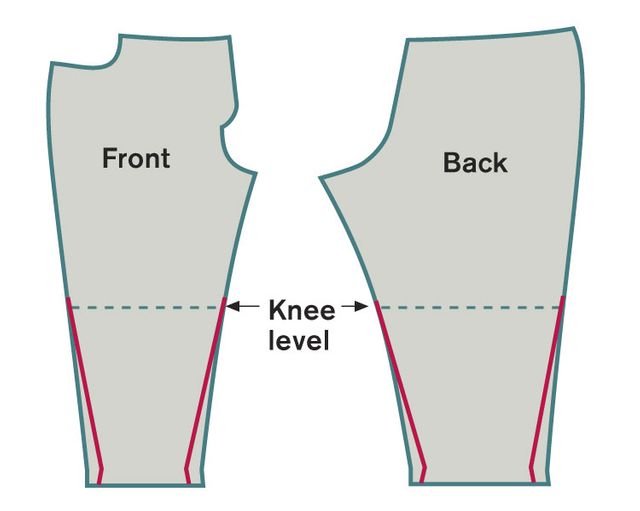
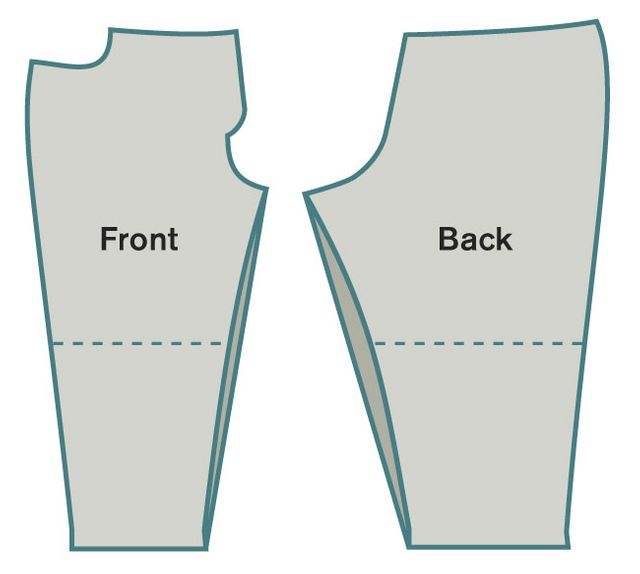
To lengthen or shorten the legs: Adjust above and below the knees
To find the length adjustment needed, compare your measured length to the pants length on the envelope back for the hip size you’re using.
Divide the length adjustment in half; spread or overlap the pattern by this amount both above and below the knee level.
Smooth the affected seamlines.
|
|
|


To change the style of the leg: Redraw the seamlines
You can customize the leg style and the hem circumference on any pattern by adding or reducing one-quarter the desired difference at the hemline at each vertical seamline and drawing new seams that taper from these points to wherever you want the width to be unchanged, typically somewhere between the knee and hip levels.
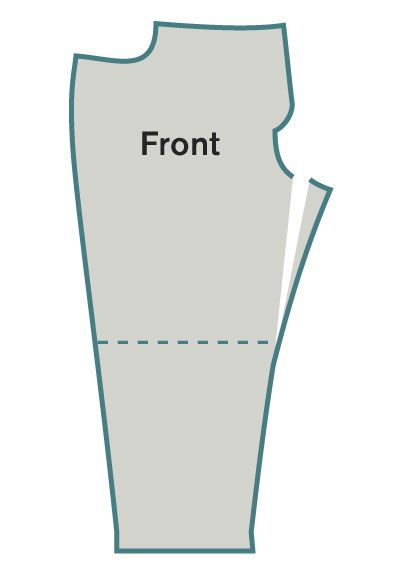
To shorten or lengthen the crotch: Reshape the front and back separately
Compare your crotch measurement (taken from your figure or from a favorite pair of pants) to the pattern measurement. If there’s a difference, alter the front and back individually, adding or subtracting at midcurve. You can also make small changes to the waist or inseam positions if those are typical problem areas for you.

To change the front length: Slash the pattern as shown, leaving a paper hinge at the side seamline. Spread or overlap the pattern pieces to get the length you need, then smooth out the center-front/fly seam. Use a longer or shorter zipper to adapt to the new fly length.
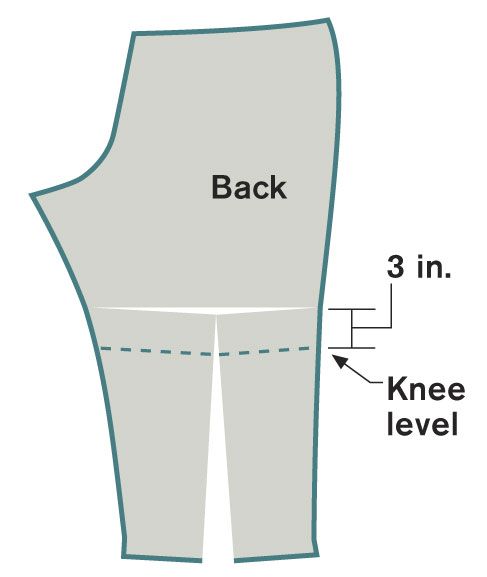
To change the back length: Slash the pattern as shown, leaving a paper hinge at the side seamline. Spread or overlap the pattern pieces to get the length you need, then smooth out the center-back seam.
Specific body shapes require individual pattern adjustments
The following alterations aren’t always indicated by measurement differences, but your experience with other pants, or with a jeans muslin made at this point, may tip you off to their necessity.
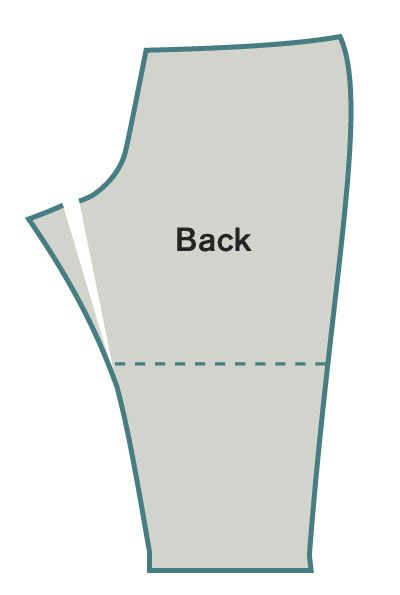
Protruding or flat seat: Move the back inseam out or in
For a protruding seat, slash the pattern and spread as much as 3/4 inch; more will create a baggy seat. For additional room, lengthen the crotch as described above.
For a flat seat, overlap the pattern in the same place instead.
For either case, taper to nothing below the knee.
|
|
|


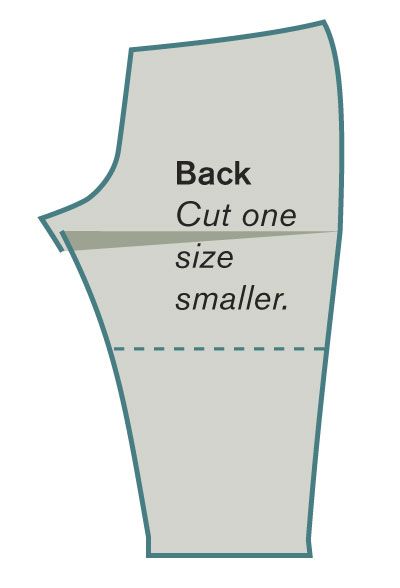
Very flat seat: Use a smaller back pattern
If your pants always have a baggy seat, cut the back leg pattern a size smaller, adding to the waist and high hip if needed.
You can also, or alternatively, horizontally slash and overlap the back by 1/2 inch below the crotch, tapering to nothing at the side seamline.
In either case, stretch the back inseam between knee and crotch when sewing it to the pants front.
Full thighs: Move the front inseam out
To see how much to add, compare your full thigh measurement plus 1 inch to the thigh measurement on the pattern.
If your pants are always tight across the front of the leg, slash the pattern vertically through the crotch and spread, tapering to nothing by the bottom of the leg.
To increase the leg circumference overall, add equally to the inseams and side seams on both front and back.
|
|
|


Knock knees: Straighten the inseam at the knee
If your knees rub together, straighten out the curve on the inseam of both the front and back legs to get the extra fabric you need.
Protruding back calves: Lengthen and widen the lower back leg
If your close-fitting pants always get hung up on the back calf, slash the pattern as shown, leaving a paper hinge at the vertical seamlines, then spread to create a 1/2- to 3/4-inch space in the midcalf area.

Sandra Betzina (PowerSewing.com) lives and writes in San Francisco.
Photo: Jack Deutsch; drawings: Karen Meyer


how do I shorten jeans using the old hem line
Jeans sewing expert Angela Wolf answered this question in the Q&A section of Threads #163 (Oct./Nov. 2012). In fact, she provided three methods for hemming jeans. Here's the method she explains for preserving the topstitching: Fold out (or cut away) the desired amount and sew the new seam directly above the sewn hem, using a zipper foot to get as close as possible. Finish this seam allowance with a zigzag stitch or a narrow serged edge, and press it up away from the hem.
You may also like to consult the forums section of our site for tips from our readers: https://www.threadsmagazine.com/?s=Jeans+hem
Thank you for your question.
How can I shorten the crotch length of my purchased slacks without taking the waistband off and ruining my pockets? Can I open the crotch and do it that way? Please help.
We recently addressed this issue in "Q&A: How to alter pants that are loose in the seat" Threads #206 (Dec. 2019/Jan. 2020): https://www.threadsmagazine.com/2019/10/23/qa-how-to-alter-pants-that-are-loose-in-the-seat
Digital Ambassador Pamela Howard also offers valuable how-to information in her post, "How to Get Your Pants to Fit Better at the Back Leg": https://www.threadsmagazine.com/2020/05/08/how-to-get-your-pants-to-fit-better-at-the-back-leg
Forgetting to buy the next size down in stretch denim. Be guaranteed that your stretch denim jeans will stretch by half a size and your great fitting jeans won't have that perfect fit anymore.Guess Jeans
To shorten the crotch length of your slacks, assuming no lining, turn the pants inside out, in-seams flat and together. Start between the knee and crotch, sew along the original seam but stitch beyond the existing crotch to the desired depth, maintaining the curve in the pattern and repeat on the other leg. Be careful as this method can sometimes create a 'pleat'. If you undid the seams, you should be OK. Hope this works for you. It does for me.
Thank you so much for the share