
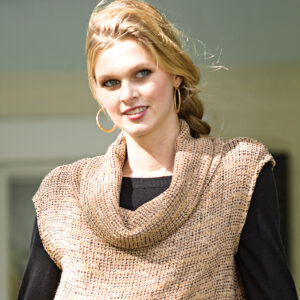
Design a Cut-On Cowl Neckline
Transform a basic shirt pattern to make a contemporary tunic
A white shirt belongs in every wardrobe, but it doesn’t have to be a basic button-front style. Consider making a modern, stylish cowl-neck tunic.
You can design this top based on a standard shirt pattern. Be sure it has some ease, so the finished tunic can be pulled on over your head. Opt for a smooth cotton fabric or a lightweight linen. White is versatile, but other solid colors, prints, and patterns can create different looks.
In Threads #201 (Feb./March 2019), Paddye Mann showed how to design a tunic with a separate cowl, attached at a neckline seam. In the version shown, the cowl is cut in one with the tunic front. This is good for fabrics that have an interesting wrong side, as the reverse shows at the neckline.
These instructions explain how to alter the pattern front for the cut-on cowl. To adjust the back pattern and add side-seam vents, see Paddye’s article, “Custom Tunic,” in Threads #201 (Feb./March 2019).
Adjust the front pattern
1. Trace the bodice front. Begin with a pattern without waist-shaping darts or princess seams. Side bust darts are OK. Remove all seam and hem allowances, and cut the pattern along the center-front line.
2. Adjust the neckline and shoulder seamline. Lower the shoulder seamline by 1 inch and widen the neckline by 1 inch at the new shoulder seamline.

3. Create the center-front pleat extension. Draw two lines, parallel to the original center front line, 2 inches and 4 inches beyond center front. Label the line at 2 inches “Pleat foldline.” Label the line at 4 inches “Place on fold.” Extend the neckline and hemline to intersect the lines at right angles.
4. Begin the cut-on cowl draft. Extend the “Place on fold” line up by 10 1/4 inches (or as desired). From the top, square a line toward the bodice side. Extend it beyond the shoulder seamline’s outer end.

5. Establish the back-neck seamline. Draw a line, perpendicular to the grainline, from the shoulder seam neckline end out over the shoulder seam. This is the back-neck cutting line. Draw a parallel line, 5/8 inch above this, for the back-neck seamline. Curve the neck end down gently to meet the the shoulder seam at the neckline end; label this point A. On the garment’s back pattern, measure the back-neck seamline length. From point A, measure out along the line half the back neckline length. Mark this point center back.
6. Draw the cowl’s center-back seam. From the center-back mark, draw a line up to the collar’s top edge line, perpendicular to the grainline.
7. Add seam and hem allowances and topstitching lines. Add 5/8-inch-wide seam allowances to the collar’s center-back seam, and the shoulder, armhole, and side seams. Make the hem allowance as wide as desired. Include topstitching lines, as shown below, to secure the front pleat.

Construct the top
1. Assemble the tunic back. Then, join the collar’s center-back seam (this is part of the front pattern), with a French seam.
2. Pin the tunic front to the back. Be sure to pin at the shoulder seams and across the back neck, matching the collar’s center-back seam to the tunic’s center back. Sew from one shoulder across the back neck and along the other shoulder.
3. Complete the cowl-neck tunic construction. Do this by attaching the sleeves flat, sewing the side seams, and finishing all edges and vents. Finally, fold the front pleat into position and topstitch.


Photos: Jack Deutsch. Illustrations: Rosann Berry.


You don’t explain why you lower the front shoulder seam 1” and I don’t see it added to the back shoulder so I think the sleeve wouldn’t fit? Also it sounds like you are saying to sew the front-to-back shoulder seam and the cowl-to-back seam all at once, I can’t picture how that would work. And is the top edge of the cowl unfinished?
The instructions for adapting the tunic's back pattern are in the article mentioned above. You do add the 1 inch to the back shoulder, as a style adaptation.
It's difficult to describe sewing the shoulder and back-neck seam, but if you have the fabric pieces in hand, you'll see that it works. Place the front and back with right sides together, and pin the shoulder seams. Then pin the cowl's back neck seam to the shirt's back neck. (It's a bit like sewing a shawl collar on a jacket, except the front has no opening.) You will need to stop and pivot the seamline at the shoulder/neck intersection on each side.
You can finish the cowl's edge as desired; a double-fold hem is suggested.
Carol Fresia
Threads Senior Technical Editor