

You Don’t Have to Clip Seams to Reduce Bulk in Edges
Use efficient ways to control bulk at the edges and corners
Pattern instructions routinely tell sewers to clip or notch seam allowances along curved edges and at corners. It’s wise to remove bulk in these areas, so garment edges can hug curved areas, such as around necklines and armholes, or remain flat in flat areas, as at collar points. You may want to skip clipping, though, because the typical method of clipping a 5/8-inch-wide seam allowance to the seamline can result in a misshapen edge.
I’ll show why copious clipping can be dangerous, and I’ll demonstrate a better way to handle seam allowances so your garment has smooth, flat edges that curve properly around the body.
Trim, don’t clip
Learn why traditional seam allowance treatments can undo your careful sewing by overhandling and distorting seamlines. Then discover a better technique.
The pitfalls of clipping and notching
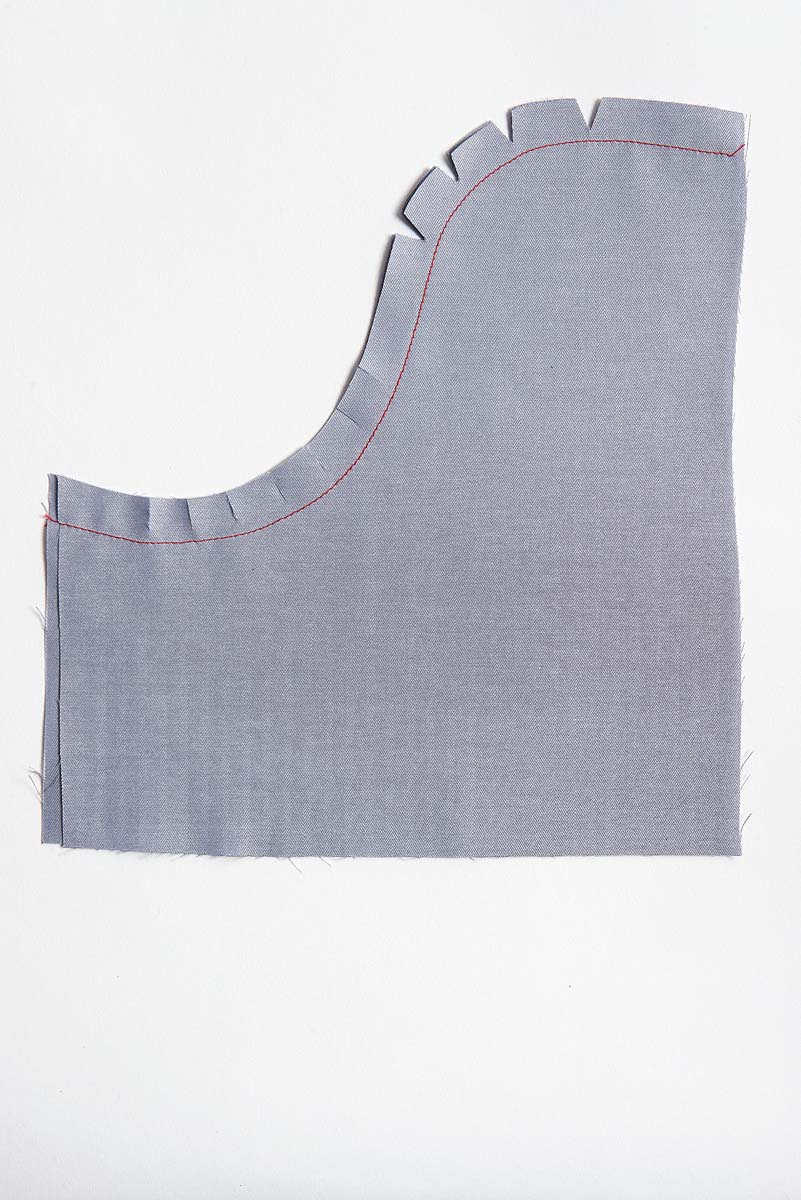
The typical method for ensuring that curved edges are smooth and pucker-free requires clipping or notching. A concave curve (a “valley”) is clipped and a convex curve (a “hill”) is notched before turning and pressing. Consider, however, what these methods may do to the garment’s edges.
When a concave curved seam is sewn, its cut edge is shorter than the stitching line. For this seam to sit flat once turned or opened, the cut edge and seam allowance must be released. Clipping to the stitching line releases the tension or tightness in the seam allowance, but it also allows the stitching line to grow and straighten during pressing. This can create undesirable stretching of curved areas, such as necklines and armholes. Gaping or fluting can occur, throwing off the garment’s fit.
A notched convex curve may be turned smoothly, but the seam allowances can still create undesirable bulk, or even visible lumps, along the edges.
The benefits of trimming
In the fashion industry, seam allowances are much narrower. A home sewer can duplicate this effect by trimming allowances to a fat 1⁄4 inch, or even closer around deep curves. The garment can be neatly turned, and the narrow seam allowance helps maintain the seam’s shape.
Tip: Save trimming time. Cut your pattern with narrow seam allowances. Be sure you’ve fitted the pattern ahead of time, and keep track of any seam allowance variations as you sew.

Understitch for smooth edges
Arrange and manipulate the fabric properly to maintain a seam’s curve when understitching.
After trimming, understitch the seam allowances to the facing or lining. This prevents the inner layers from rolling to the garment’s right side.
Understitch with the garment right side up. On a concave curve, gently pull the fabric out-ward, away from the needle, on both sides of the seam as you stitch close to the seamline. This compresses the fabric and shortens the seamline slightly.
A shorter seamline curves closer to the body, creating a better appearance in the finished garment. If the seamline is tightly curved, you may still need to clip the seam allowances at occasional intervals after understitching, so the edge can be pressed properly.


Roll to hide facings
Shaping and pressing the edges helps them behave beautifully.
On a convex seam, such as a rounded, faced hem edge, trim the seam allowances to 1/4 inch wide, turn the work right side out, heat the edge with steam, and roll the seamline slightly to the wrong side. Use your fingers as though you were rolling a pencil between them, to gently break down the bias grain and make the seam allowance more pliable. Finger-press the edge, then give it a final shot of heat and steam to set it into position.

Miter-trim the corners
Here’s a foolproof way to remove seam allowance bulk from an angle so it turns neatly and produces a flat, clean corner. It can be a challenge to know how close to clip a corner. A rule I find helpful is to clip as far away as the length of a stitch at the corner. However, with loosely woven fabrics, you may need to leave a wider margin.
The key to a corner than can be turned easily is to clip the allowances at an angle that enables the cut edges to be abutted when folded together. The allowances should neither overlap, nor have a gap between them, at the corner. They then serve as a support for the pressed corner.
To achieve this, pinch one corner seam allowance together and snip the edges where they touch the garment. This snip establishes the angle of the cut that removes the corner seam allowance. Trim both corner allowances along this angle and the edges should fold together neatly for a crisp corner.


Article author Martyn Smith is an expert in clothing manufacture and machine embroidery.
Photos: models, Jack Deutsch; all others, Mike Yamin


Log in or create an account to post a comment.
Sign up Log in