

Sew a customized t-shirt
Although the word T-shirt may conjure up images of men’s cotton/poly underwear, the customized version you can sew has its roots in the finest ready-to-wear, where a price tag of $100 and even $200 isn’t uncommon. And if a T-shirt is well made and beautifully shaped, it can be the glue that holds your wardrobe together, worn just as easily with a suit as with jeans.

![]()
When you sew your own versatile T-shirts, you can refine the fit, alter necklines and shaping to flatter your figure, use beautiful fabrics, and add fine details. Fitting and adjusting are easy when you follow a few simple guidelines.
A word about fabrics
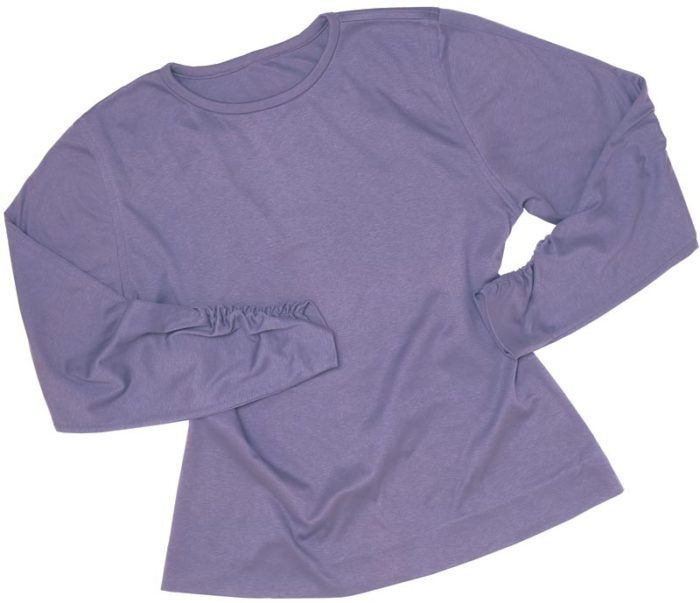
To sew a T-shirt that looks better ready-to-wear, you’ll need to seek out fine-quality knit fabrics. Since knits don’t have much bolt appeal, keep an eye out for especially nice ones; they’re among the few fabrics I stockpile. And take a look at ready-made garments that you like for shaping, details, and other ideas.
I’ve made T-shirts from many knit fabrics, including cotton, wool, velour, cashmere, panne velvet, Lycra blends, and fleece. Don’t worry if you don’t have access to the matching ribbings and trims that manufacturers have made to their specifications. A narrow, self-fabric, bound neck edge gives a fine finish to a shirt of this quality.
![]()
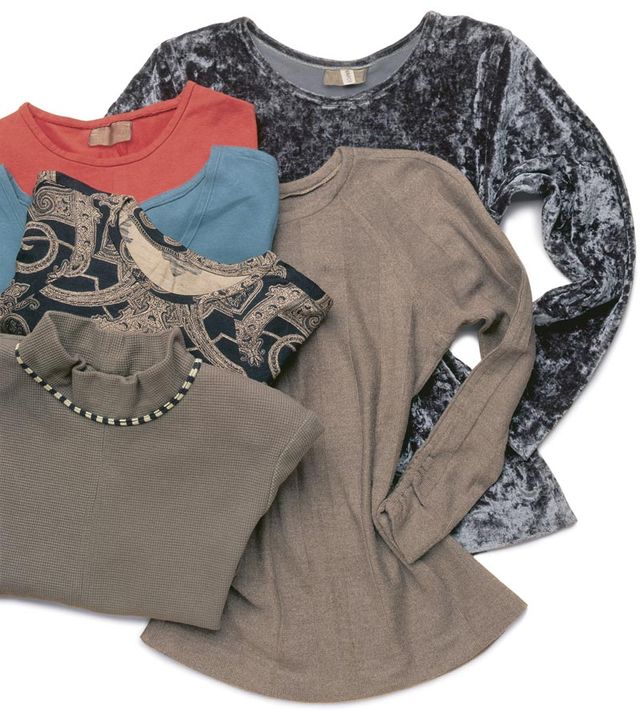
 For fall T-shirts, shift to slightly heftier knits, like those in this collection made from wool jerseys, velour, sweater knits, and thermal cotton.
![]()
I’ll discuss a few techniques I use to control stretch and get smooth hems and edges. Test each fabric you sew and keep a record of what worked for future reference. If you make a few T-shirts each season, you’ll have a collection of tops and a few refined patterns to use and wear again and again. And you can endlessly vary the style, sleeve length, and neckline.
Start with a good pattern
Begin with a pattern whose basic measurements and features are right for you. Measure a favorite T-shirt, or go shopping with a tape measure and try on garments, noting the key measurements, plus design and construction ideas, of items you like. Note especially the shape and length of the body; the amount of ease across the bust and hip; neck shape and width; shoulder width; and armhole depth. With this information, you can select and customize a pattern for the fit and details you want.
Some help with pattern sizing
When sewing with patterns from some American companies, like Vogue, McCall’s, Butterick, and Simplicity use your high bust measurement (above the bust at the underarm, straight around the back) when selecting pattern size. These companies tend to include extra ease across the upper body, and it’s harder to alter the neck, shoulders, and upper chest than to add ease at the side seams of a smaller pattern to fit the bust and hip. Use your full bust and hip measurements when adjusting the pattern.

When sewing Burda, Stretch & Sew, Kwik-Sew, and patterns from small companies, use your full bust measurement to determine your size.
First, adjust for fit
Fitting the pattern takes a little time and fussing, and you’ll continue to refine it as you sew. To adjust the fit, I combine flat pattern measuring with tissue- and pin-fitting and make a series of changes to improve the pattern, which I’ll discuss below.
Start with the flat pattern
You’ll use the pattern to determine the amount of ease it includes, whether you need to alter it to fit, and to compare one pattern to another. Most important at this stage is that the pattern is big enough to fit around you. (To be sure when cutting out the garment, allow 1-in. allowances at the side seams. Otherwise, use 5/8-in. seam allowances and 2-in. hems.)
![]()

If you want the pattern to fit the way the designer intended, you’ll need to include the same amount of ease. Calculate the ease intended for the garment style by measuring the pattern from side seam to side seam across the front and back at the bust and hip, then compare the total measurement with that on the back of the pattern envelope for the size you’re using. For example, if your pattern measures 34-1/2 in. at the bust, and the measurement for that size is 32-1/2 in., the pattern includes 2 in. of ease. So you’ll add 2 in. of ease to your full bust measurement, then add to the side seams to produce that measurement. If you need to lengthen or shorten the body, sleeve, or armhole, make these changes now. To learn more about a new pattern, I find it helpful to compare it to a favorite one with a similar amount of ease.
Next, tissue-fit your pattern
Tissue-fitting the pattern pieces, like pin-fitting a garment during construction, is a try-on-again, take-off-again procedure that helps you visualize the finished garment on your body and further refine the shape before you begin to sew.
Refine a neckline you like
You can alter the neck of a T-shirt to flatter your face or figure, to update a look, or to fit under another garment. It’s fine to adjust the front, back, and shoulder areas independently, but the final front and back must meet at the shoulder. Once you have a neckline shape you like, it’s easy to superimpose it on other patterns.
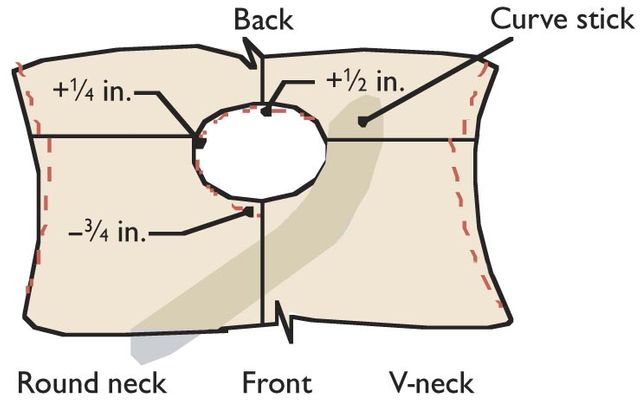
You have many options for neck shaping. If your face is very round, you may prefer the contrast of a V-neck; if you have an angular face, a round neck might be a good choice (many women can wear both). If you want a V-neck, mark the depth of the V while tissue-fitting, and convert to a V as shown in Drawing #1.
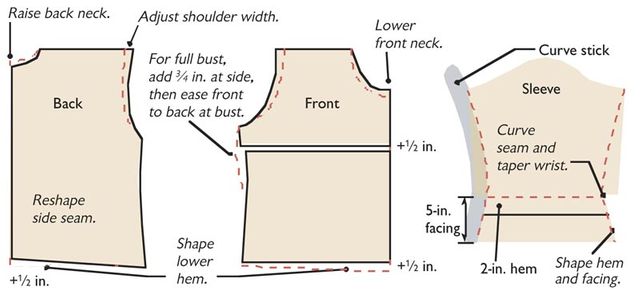
I’ve found that raising the back neck improves many patterns, and also helps camouflage a round back. I frequently raise the back neck and lower the front neck. Work in small increments to find the most flattering neck width for your face and body. If a neckline is a bit too wide after the garment is cut, you can draw it in when applying the neck binding.
For a smooth shoulder
Determine your best shoulder width by measuring favorite garments and adjusting during tissue- and pin-fitting (adjust the pattern as well). Multisized Burda patterns tend to have broad shoulders, so I use a size or two smaller for the armscye than for the body of the garment.
You’ll get a better fit across the shoulders if the back-shoulder seam is 1/4 in. longer than the front. Compare the two lengths, and add at the armhole seam.
A pleasing armhole depth
The depth of the armhole helps determine the proportion of a garment, as well as how it will fit beneath a jacket. In today’s clothes, armhole depth ranges from 8 to 11 in., from a high, set-in sleeve to a deeply dropped one. To determine a pattern’s armhole depth, measure in a straight line from the shoulder tip to the underarm. If you’re petite or small-boned, pare down the depth of the armhole, as shown in Drawing #2.

Drawing 1: Adjust neck and shoulder-width
Many patterns benefit from raising the back neck and lowering the front neck. Adjust the width of the neck and width of the shoulder as desired, but make the back shoulder 1/4 in. longer than the front, then ease during stitching.
Lengthen the front for tops and dresses women’s upper bodies are usually wider in front than in the back, so making a garment front 1/2 in. longer gives a smoother fit. Add the 1/2 in. at the bust, as shown in Drawing #4. For a full bust, also add width at the bust by curving the side seam out 3/4 in., tapering to zero above and below. When sewing, ease the front to the back in the bust area.
Tricks to refine shaping
Once the pattern fits and you’ve determined the best length, neckline, and armhole depth, the next step is to refine the pattern’s shape. These changes may seem subtle, but they make a big difference in the look of the finished garment.

Drawing 2: Balance front- and back-armhole depth
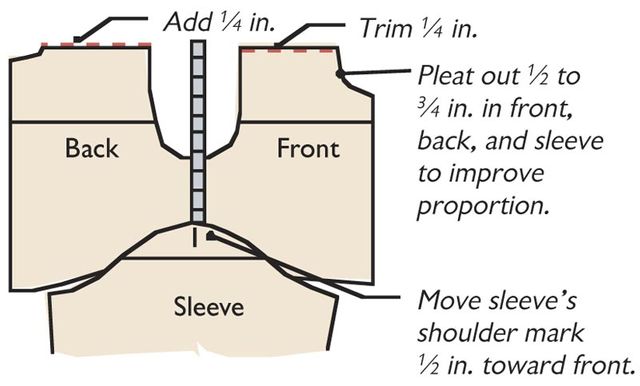
Check pattern. If front- and back-armhole depth are the same, balance armhole by adding to back, trimming from the front, and moving shoulder mark as shown. If the entire armhole is too deep for a petite or small-boned figure, pleat out excess on the back, front, and sleeve as shown.
Balance the armhole-To balance the armhole means to adjust the pattern so the back armhole is 1/2 in. deeper than the front, solving the problem of garments that ride toward the back. Though Burda and some small companies add this refinement to their patterns, many others don’t.
It’s easy to check a pattern for balance and correct an unbalanced armhole. Place the front and back armhole side by side, as shown in Drawing #2. If they’re the same, add 1/4 in. to the back-shoulder seam, and trim 1/4 in. from the front. Make the same change to the facings or sleeve, adjusting the latter by folding it in half lengthwise. If the shoulder dot is dead center, move it 1/2 in. toward the front to position more ease at the back where it’s needed.
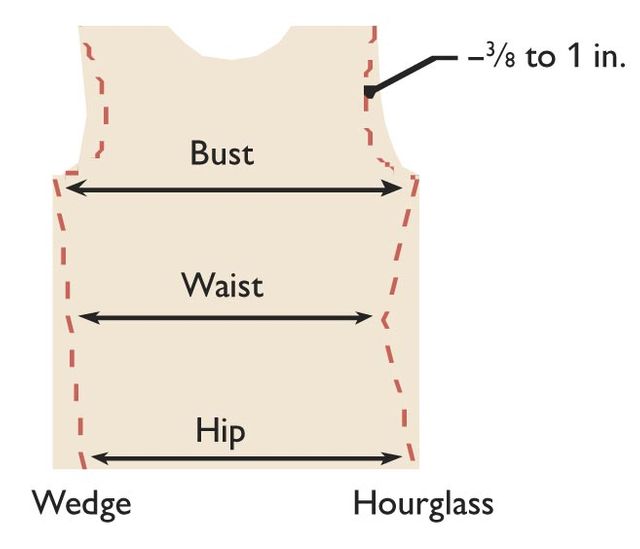
Refine the body shape-I find that a subtle hourglass shape or a tapered wedge that narrows at the hip is more flattering to the body than the straight boxy cut found in most ready-made T-shirts and patterns. Experiment to see which shapes you like best. I prefer to adjust the body shape during construction when I can see how the fabric drapes on the body, and then transfer changes to the pattern for future reference, as shown in Drawing #3.
The hourglass shape, curved to echo the shape of the bust, waist, and hip, is flattering for hourglass, pear-shaped, and rectangular figures. I like this curvy shape on short tops that end at the high hip. But it’s not so becoming to a figure that’s wedge-shaped or very straight and angular.
A tapered-wedge T-shirt shape is narrower at the hip or hem than at the bust and works well over leggings and slim-line pants and skirts. In an oversized shirt with adequate ease at the hip (at least 2 in.), this shape flatters most figures, especially wedge-shaped and straight, angular figures. Shoulder pads make the shape more flattering for hourglass and pear shapes.
The standard T-shirt’s straight, boxy cut adds bulk and works best for fluid fabrics or cropped looks. I frequently adapt purchased boxy T-shirts for a more pleasing shape.
Regardless of body shape, I suggest creating a slight curve at the lower hem by adding 1/2 in. at the center front and back, tapering to zero at the side seams. This makes a softer, more flattering line that follows body contours.

Drawing 3: Reshape side seams and remove excess fullness
Reshape front and back side seams for a more flattering fit. For wedge shape (left side), taper from underarm to hip measurement, plus 2 in. ease. For hourglass shape (right side), taper in at the waist and out at the hip.
To reduce extra fullness across the front on dropped-shoulder styles, redraw armhole on pattern front only and scoop out excess
No more boxier sleeves-Eliminate some of the fullness across the chest on dropped-shoulder styles by reshaping the pattern where the arm joins the body, on the pattern front only. During tissue-fitting, make a mark 3/8 to 1 in. from the cutting line (see Drawing #3), and redraw the line.

Drawing 4: Refine body and sleeve shape
Subtle refinements in shape give T-shirts a better ready-to-wear style. After lengthening the front body and center front and back, adjusting the neck shape, and balancing the armhole, curve and reshape the sleeve closer to the arm for a flattering silhouette.
Drawing 4: Refine body and sleeve shape
I find that the wrist on patterns is often too wide, especially in larger sizes. I prefer a close-fitting wrist, since knits stretch. Measure the width of your wrist and upper forearm; my ideal amount of ease is about 1 in. at the wrist and practically zero at the upper forearm.
If the sleeve seam is a boxy straight line, use a curved ruler to add a subtle shape, as shown in Drawing #4, when you adjust the sleeve width. (I use a Fairgate Vary Form Curve Rule, available online from www.artstuff.net. And, for easier hemming, taper the sleeve hem to mirror the garment shape. If you’d like a clean-finished, roll-up sleeve, add a 5-in. hem facing, as shown.
T-shirt construction tips
Preshrink and press fabrics before cutting, using the method you’ll use for the finished garment. Garments are usually cut on the lengthwise grain (follow a rib of the knit as a grainline), but you may occasionally prefer a fabric’s design or stripe on the cross-grain, which is fine if the fabric has enough stretch going around the body. Since many knits have a subtle directional shading (they’re knitted from one end to the other), use a “with-nap” layout whenever possible.
No fancy seams needed-You don’t need a serger to make beautifully constructed knits; since knit fabrics don’t ravel, a plain raw or pinked edge works fine. I prefer a straight stitch and a standard 2.5-mm stitch length; for very stretchy knits, use the smallest baby zigzag stitch, which will “read” as a straight stitch.
To control stretching, use a simple technique called staystitch plus. Apply pressure on the back of the presser foot or push down on the fabric behind the foot, stitch 1 to 2 in., then release; repeat along the length of the seam. With a bit of practice, you’ll maintain an even tension throughout.
A mock flat-felled seam is perfect for holding seams flat, like at the shoulder and for dropped or raglan sleeve seams. Stitch a standard seam, press it open, then press it to one side. Trim the underlayer, if bulk is a problem, and topstitch from the right side.
A size 12/80 universal needle (tapered, with a rounded point) and good-quality, all-polyester thread work well for most light- to medium-weight knits. If you get skipped stitches on synthetics, “power” knits with Lycra, or very fine knits, try using a ballpoint needle (with a more rounded point), apply needle lubricant (like Sewer’s Aid, available from Nancy’s Notions (www.nancysnotions.com) along with the spool of thread, then try a smaller needle. I often use double needles for topstitching hems; my favorite is a 4-mm-wide 12/80 universal.
For smooth hems and stable seams-Before assembling your T-shirt, prepare the hems by pressing them into place; I use an oaktag template as a guide. Next, apply a narrow cross grain strip of soft, all-bias knit fusible interfacing (like SofKnit from HTC) in hems to reduce rippling (it’s easier to add now while the garment is flat).
To sew and stabilize the shoulder at the same time, stitch the shoulder seam with the backside up, adding a strip of clear, unstretched elastic on top. Press the seam without touching the elastic, which will melt.
![]()

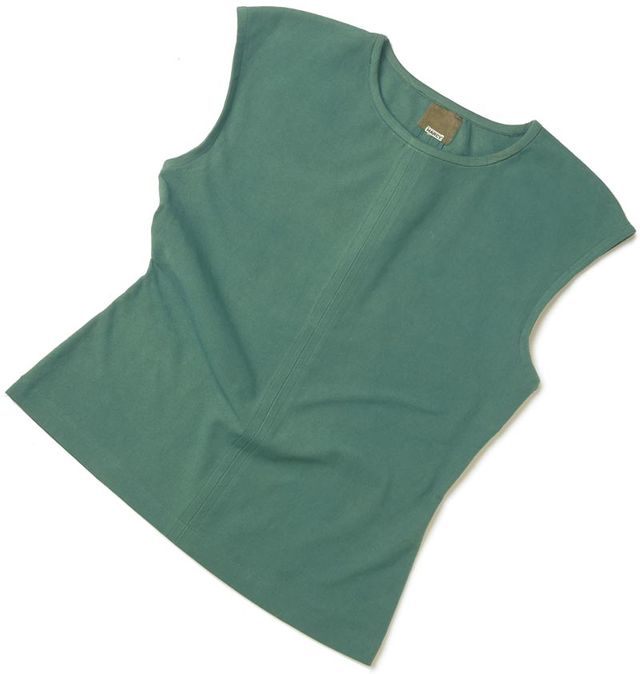
Tips for a neat, round neck-I prefer a self-fabric, bound neck edge 1/2 to 1 in. wide, as shown on the shirts on this page. A cross-grain strip of fabric works well for a single-layer, wrap-around binding on medium-weight to thick fabrics, and for a double-layer French binding on lightweight knits. Since each fabric handles differently, tinker with the binding’s length to get a smooth finish. It should pull the neck edge in and lie flat against the body without puckering. Before cutting the band, try on the shirt. Nothing more will be done to the cut edge of the fabric on the neck before it’s bound, so you can see whether the neckline needs to be drawn in, which is simple to do with the binding.
To calculate the width of the band, add three seam-allowance widths plus 1/2 in. (for the turn of the cloth and extra to catch in the final stitching). I find a 3:4 to 7:8 ratio between the length of the binding and neckline generally works well. For example, on a 20-in.-long neckline, I might start with binding of 15 to 17 in., depending on the stretchiness of the fabric. Adding 1/4-in. seam allowances, cut the neckband ends on a 45-degree angle to reduce bulk, and stitch the ends to form a circle.
To clean-finish the inside of a single-layer neckband, it’s handy to have a serger. But you can also pink the band’s remaining raw edge or turn it under before stitching in the ditch to secure. Positioning the band’s seam off-center at the back, divide the neckline and band in quarters, and mark with pins, snips, or chalk. With right sides together, position the band on top of the neckline so the feed dog can help ease in the longer layer and, stretching slightly, stitch the seamlines together, then press. Wrap the binding to the wrong side, press again, and try on the garment to check the neck fit and bandwidth.

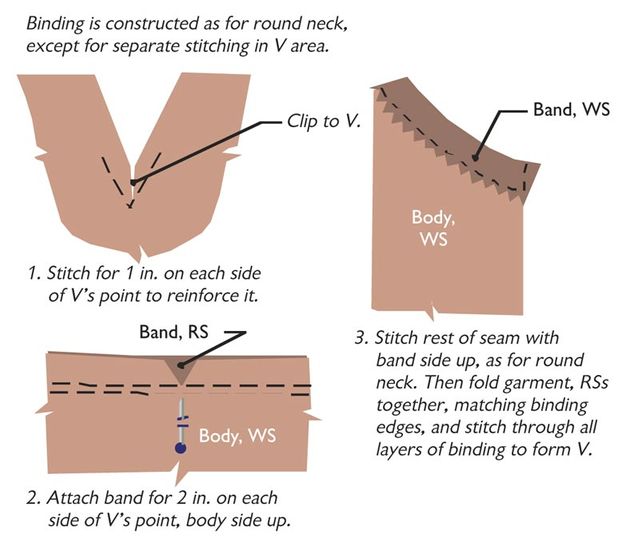
Drawing 5: Abound V-neckline convert a round neckline to a flattering V, mark the desired depth of the V during tissue-fitting, then redraw the neckline as shown in Drawing 1.
To prepare the V area, measure the neck, including the V, along the seamline, and calculate the length and width of the band as for the round neckline. Mark the seamline on the band, then divide both band and neckline into quarters and mark.
Pin the center-front mark on the band to the V’s point. With the reinforcing stitching (body side) up, sew for 2 in. on either side of the V’s point. As you pass the V’s point, shift the bulk around the needle to continue stitching.
Sew the rest of the neckband for a round neck, with the band side up. When the band is complete, shape the V by sewing a tiny dart on the inside of the band, as shown.
Binding is constructed as for round neck, except for separate stitching in the V area.
At this point, you can even out the seam-allowance width, but never grade or clip the seam allowance, which will weaken the seam and cause distortion. To create a similar binding on a V-neckline, follow the steps in A bound V-neckline.
On a double-layer binding, cut the binding wider than necessary, since folding and pressing will make it uneven. Then fold the binding in half, wrong sides together, press, and trim it to the length and width needed. After joining the ends at a 45-degree angle, stitch the raw edges to the neckline, as above. The folded edge will wrap to the wrong side and be caught in the ditch-stitching for a clean finish.
For T-shirts, I prefer a small, smooth shoulder pad covered with fusible tricot, as explained in More Power Sewing by Sandra Betzina, pp. 30-31. You can either sew the pads in place by hand or attach them with strips of soft hook-and-loop tape.
Finally, I urge you not to think of a T-shirt as a throwaway garment. Fitted and constructed carefully of beautiful fabric, it can be a valued piece in your wardrobe.
Marcy Tilton of Cave Junction, Oregon, is the author of Easy Guide to Sewing Tops & T-Shirts.
from Threads #65, pp. 62-67
Photos by Scott Phillips; drawings: Carla Ruzicka


Thank you for this very informative article.
Excellent article! Thank you...
I have found this article so brilliant! The single T-shirt I made from a pattern, was the most disappointing thing I have ever made,it was badly fitting in everyone of the ways you describe and I thought what a waste of time and money.
You should sell Tee shirt patterns on line! But this article is better still really, because you get to understand the ways to fix all the other patterns which are disappointing. Having made notes I am off to have another go.
A suggestion, I had to look up tissue fitting to see what you meant, I missed the fact that it was really pinning the pattern to up onto yourself.
Anthea
I'll have to go find an inch measure, because we are metric here.
Anthea
Hi,I have to go find an imperial tape measure, because we use metric here, also, I can only guess what an oak tag is.
Anthea
I am trying to make 'eco' items that use organic cotton etc, then at the end of their lives, can actually be composted and therefore be useful in the natural cycle of things. But that means I can not use nylon/synthetic interfacing. I would appreciate so much advice for inter-facing products that use sustainable materials. Does anyone manufacture a iron-on interfacing made from natural materials?
Anthea
I read your article and found it helpful. I made a great shirt for my 27 year old daughter. I tried to replicate a $98 Marc Jacob neckband that was constructed with two layers of knit jersey fabric with the raw edges showing. The raw edges rolled beautifully. I cannot figure out how to make the edges roll. Any help would be appreciated.
I'm sure that I read this article in Threads when it came out, but enjoyed reading it again after viewing Sarah Veblen's videos.
You could do all that sewing. But we discovered a better, faster way that doesn't require any sewing. Plus, it doesn't damage your shirt or dress!
Why did it take so long to think of this?
CleoClip.com
What is the CleoClip?
It is discrete functional jewelry that will add value to your wardrobe and makes you look fantastic!