

Use a dedicated machine-embroidery hoop or a third-party hoop that will fit easily under your presser foot.
From improved appliqué to the creation of entirely new fabrics and embellishments, there’s hardly a decorative sewing process that hasn’t benefited from the explosion of new stabilizers recently ignited by the popularity of machine embroidery. Designed to support, or even replace, fabric under the stress of dense and multi-directional machine stitching, stabilizers can be applied in many ways, but are usually used in conjunction with an embroidery hoop to hold fabric as flat and inflexibly as possible. But while the number and variety of new or improved stabilizers continues to grow, there are still only four basic types of stabilizers to choose from. I’ll describe each type and its basic uses, provide brand names and sources for current examples, and offer tips on getting the best results with each type.
Four basic types of stabilizers
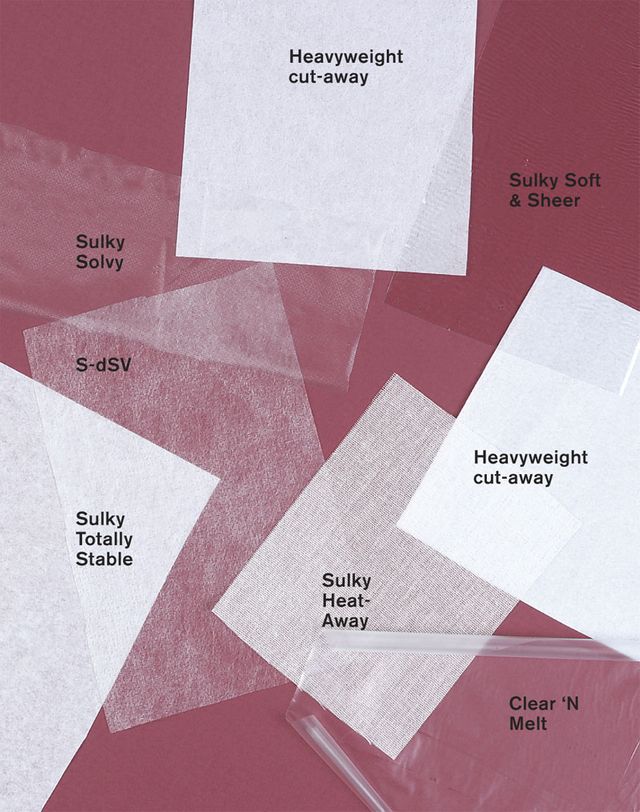
The four basic types of stabilizers- cut-away, tear-away, heat-away, and wash-away- are defined by the method used to remove them from the fabric once the embroidery is complete. Some stabilizers remain permanently affixed to the fabric, for example, cut-aways and some toppings (stabilizers used on top of the fabric rather than beneath it), while most are temporary and are removed once the embroidery is finished. Stabilizers in various weights, as well as forms-fusible, nonfusible, and adhesive-backed- are available in most categories. There are many Stabilizers available from mail-order sources, and you can also purchase stabilizers at fabric stores, notions departments, and most sewing-machine dealers.

Stabilizers make smooth machine-embroidery possible, but matching stabilizer to fabric is key. Keep several types and products on hand, and make test samples before permanently stitching out a design.
The stabilizer you choose will depend on your fabric, the nature of the embroidery design, and the end use. For example, natural fibers and thicker, softer fabrics are more likely to relax around the stitching and lie flatter after embroidery, so a tear-away stabilizer would be a good choice. And thin fabrics, knits, or synthetics would do better with a cut-away stabilizer. You also need to consider the stitch density of the design when choosing a weight of stabilizer, regardless of the type of stabilizer you select. The denser the stitch count, the sturdier the stabilizer needs to be. See the Stabilizers at a glance for a capsule comparison chart.
Because there are so many stabilizer options, experiment with various products to find the best results for a particular project. Also make test samples with your fabric before the final stitching; if you do a lot of embroidery, label and keep these samples for future reference. In some cases, you’ll get the best results by using several layers of the same stabilizer or more than one type of stabilizer in the same project. And, finally, bear in mind that some fabrics and embroidery designs are simply not meant to go together, and no stabilizer will change that fact.

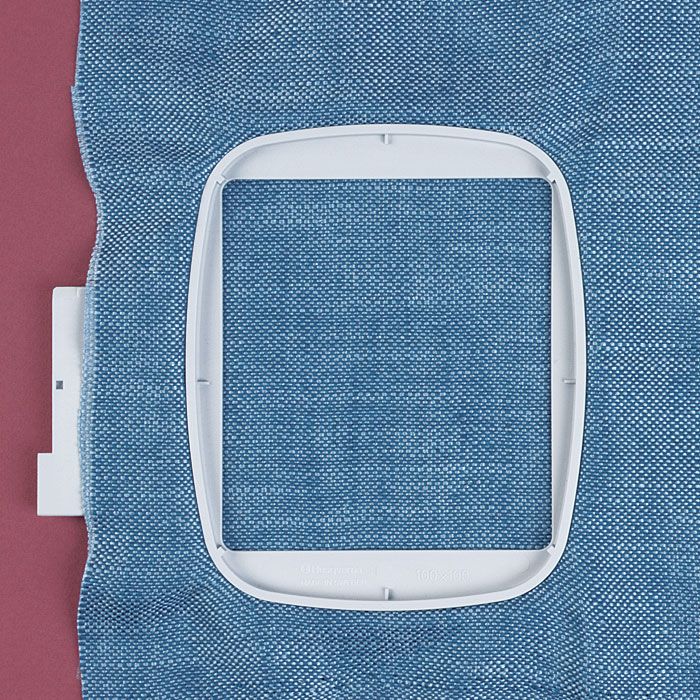
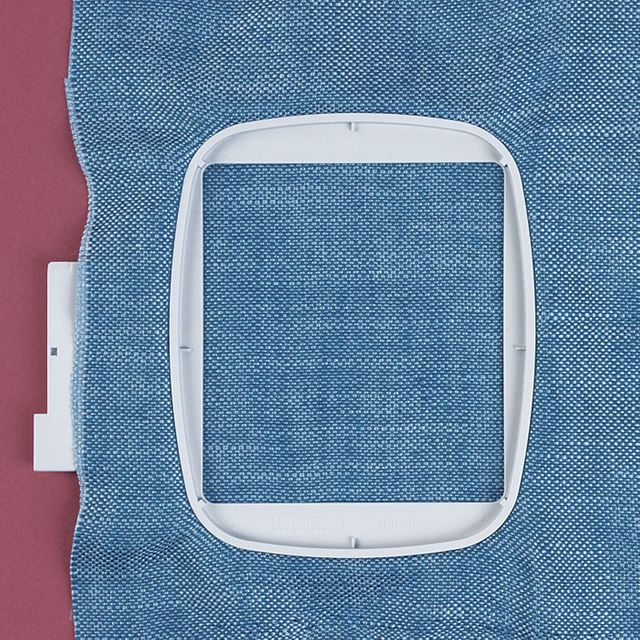
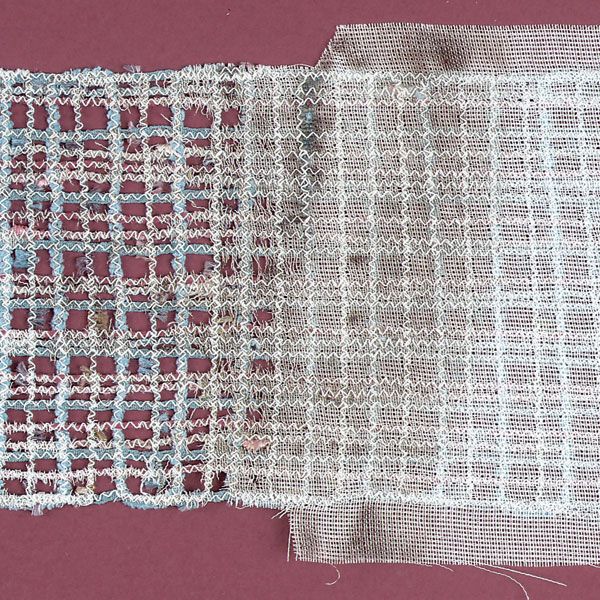
When embroidering on knits, use a permanent cut-away stabilizer (at top left) to keep the fabric smooth during stitching and prevent stretching during wear. Tear-away stabilizers (at top right) may not offer as much support.![]()

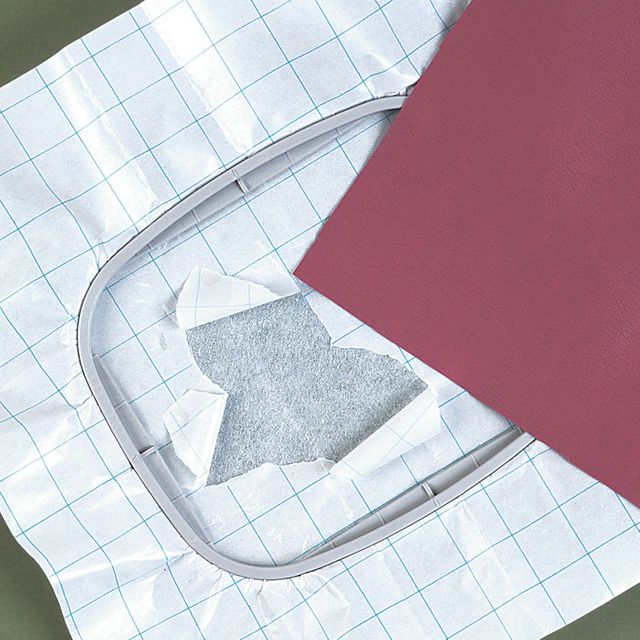
For fabrics like leather or velvet that could be permanently marked by hooping, use an adhesive-backed cut- or tear-away stabilizer, like Sulky’s Sticky tear-away. Hoop the stabilizer, remove the paper, stick the fabric to the stabilizer, and stitch.
Cut-away stabilizers– Cut-aways are permanent stabilizers that remain on the fabric and keep it stable during and after embroidery. They’re a good choice for knit fabrics, because they prevent the designs from stretching out with frequent wearing and washing. I also recommend using a cut-away stabilizer on loosely woven fabrics and on projects to be framed, where visibility of the stabilizer is not an issue.
Cut-aways are available in heavy to light weights, and in black as well as white. Choose a lightweight cut-away (like Sulky’s Soft & Sheer or OESD’s Poly-Mesh) for designs with light stitch density and a heavier stabilizer (like Sulky Cut-Away Plus) for dense embroidery designs, or use more than one layer of a light- to medium-weight product with the latter. If you’re stitching on a fabric that will easily crush or otherwise be marked by the embroidery hoop, like velvet or leather (see the photo at right), hoop the stabilizer only, then spray it lightly with a temporary fabric adhesive, and position the fabric on the hooped stabilizer. For fabrics that won’t be marred by needles or pins, whether hooped conventionally or as just described above, baste or pin the fabric securely in place so it won’t shift while stitching, keeping the pins out of the design area. (You may also find basting or pinning helpful when working with tear-away stabilizers.)
To remove a cut-away stabilizer, first rough-cut the excess stabilizer from the fabric. Then, using sharp embroidery scissors, trim close to the stitching.

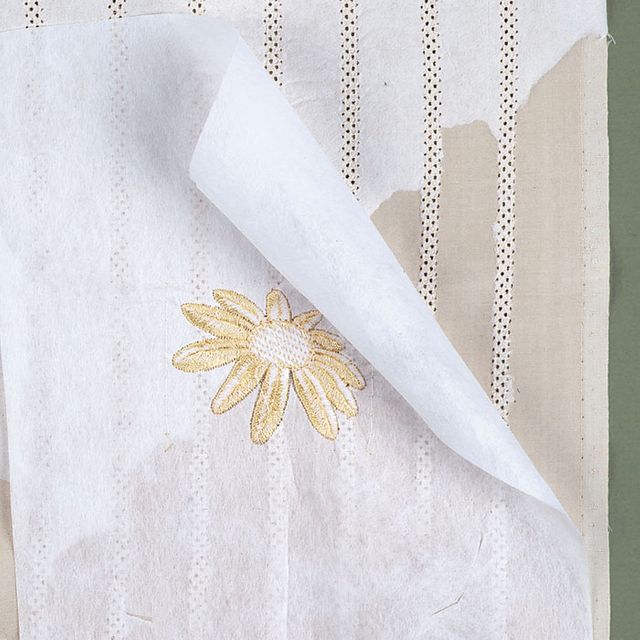
Multiple stabilizers can simplify complex projects. An iron-on tear-away (top) stabilizes a soft rayon for wing-needle stitching, but is removed it before hooping the fabric with a sewn-in tear-away (bottom) to stitch a digitized design.
Tear-away stabilizers– Tear-aways are temporary stabilizers that are generally easy to remove, but be careful to do so without pulling or stretching the fabric. Some of these products tear more easily than others, so check this when testing a stabilizer. Also keep in mind that some may tear more readily in one direction than another, so check “tearability” in all directions, as well. A product like Pellon’s Stitch ‘N Tear, a medium-weight tear-away that I especially like for linear wing-needle embroidery, pulls cleanly away from the stitching in all directions. When a fabric or project requires strong support and you want to use a tear-away, use several layers of a light- to mid-weight stabilizer, rather than one heavy product, then gently remove the layers individually. And when using a nonfusible stabilizer, I suggest spraying one side with a temporary fabric adhesive, then positioning it and basting, if needed, to hold the fabric securely in place.
Some tear-aways, called toppings, are intended for use on top of, rather than beneath, the fabric in order to prevent stitches from getting lost in a dense nap or pile. Permanent, plastic-like film tear-aways that come in colors (like Dry Cover-Up from Hoop-It-All) keep the fabric from showing through the embroidery.
Iron-on, fusible tear-aways make it easier to keep the fabric and stabilizer on-grain during hooping without stretching or distorting the fabric. And they prevent any grain shifting that may occur during stitching, especially when stitching a large area. But avoid using an iron-on for tightly packed rows of stitches, because it will be difficult to remove.
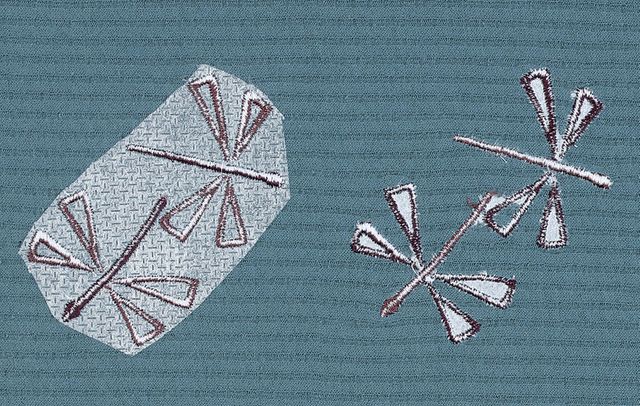
Make your own fabric with decorative threads and yarns, by sewing them randomly or in a pattern onto a heat-away stabilizer.

Heat-away stabilizers– Choose a heat-away stabilizer when the fabric is too delicate for a tear-away, too sheer for a cut-away, or isn’t washable, or when you’re working with a special technique like making lace at an edge. There are two types of heat-away stabilizers: woven (for example, Sulky’s Heat-Away) and plastic-like film (for instance, America Sews Clear ‘N Melt). The woven stabilizer turns brown and flakes when heated with an iron, and the flakes can be gently brushed away. Be cautious when using woven heat-aways because the chemical that causes the stabilizer to crumble when heated is water-soluble, so if you use a steam iron to remove the stabilizer, the steam will dissolve the chemical and allow it to transfer to the fabric and even the ironing surface, which may, in turn, crumble when heated. So here’s how to thoroughly remove this type of heat-away from a project and keep the ironing surface clean: Split a sheet of two-ply paper towel and lay the fabric between the plies. Press with a dry iron until the stabilizer is a light toast color. Then place all three layers in a plastic bag and roll the bag rapidly between your hands to crumble the stabilizer. Shake the project in the bag to remove the flakes, use a toothbrush to get rid of any stubborn pieces left on the fabric, and throw the bag away.
The second type of heat-away stabilizer, plastic-like film, which I refer to as a heat-and-melt, is used mainly as a topping to prevent stitches from getting lost in a dense nap or pile. It remains under the stitching, continuing to support it during washings. The excess stabilizer around the stitches disappears when heat is applied. To do so, use a hot dry iron to remove it, just touching the surface, trying not to slide across the film. Wipe away any beads of stabilizer from the iron’s soleplate with a paper towel or scrap of fabric.
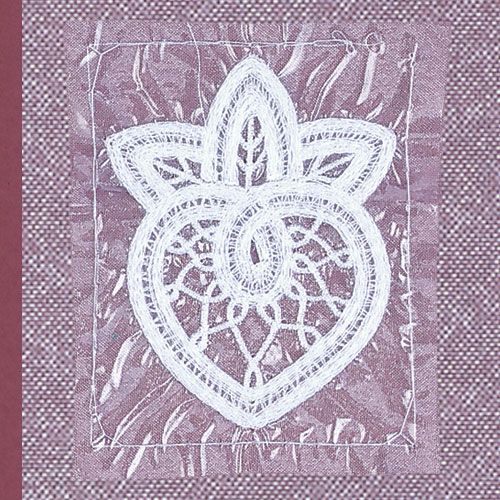
Use a film-like, water-soluble stabilizer when embroidering lace designs. Hoop the stabilizer with the fabric and baste around the design area for extra support.

Wash-away stabilizers– Wash-away stabilizers are designed to dissolve when wet and come in several forms: plastic-like film and soluble paper, both of which can be hooped with the fabric, and liquids that stiffen when brushed or sprayed on the fabric and allowed to dry.
In addition to their regular use, providing support beneath the fabric, some of the film wash-aways, like similar heat-and-melt-aways, can be used on top of the fabric to keep the embroidery stitches from sinking into a nap or pile. Because a wash-away will dissolve under the stitches when washed, heat-and-melt-aways or colored tear-aways, like Dry Cover-Up, are better choices if you need continued support during washing and wearing.
There are also adhesive-backed film wash-aways (see the left photo on the facing page) and heavier film wash-aways (like Pfaff-distributed Romeo and Sulky’s Ultra Solvy), which are great for embroidering lace and Richelieu, or cutwork, designs.
Use wash-away stabilizers for free-motion and programmed-stitch embroidery, especially with fabrics that are difficult to mark, because you can draw your design on the stabilizer with a fine-point marking pen to use as a stitching guide. Not all wash-aways require the same water temperature for removal, so be sure to check the instructions, and rinse the fabric thoroughly (this may mean several rinsings) so there’s no residue left to make your fabric stiff. Many of the film-like stabilizers get crisp when exposed to the air (I’ll talk about storage in a moment), so I like to let them “dry” a bit so I can then easily tear away any large amounts of excess stabilizer before washing the fabric.
Water-soluble paper stabilizers– (like LJ Designs Design Plus) that dissolve in water are great for creating mesh-like fabric and embellishing soft, delicate fabrics, because the paper doesn’t permeate and stiffen the fabric if not thoroughly rinsed out. Brush-on liquid wash-aways (like Palmer/Pletsch-distributed Perfect Sew) also work well on delicate fabrics, and sometimes I use a combination of a brush-on stabilizer to stiffen the fabric first, and a hoopable water-soluble stabilizer. But be careful not to make your fabric too stiff, because it can become brittle and crack when stitched.
A spray-on stabilizer, like Sullivan’s Fabric Stabilizer, makes the fabric firmer than if starched, but doesn’t seem to scorch or build up on the iron as starch tends to do. Heirloom-sewing expert Mimi Turner, of South Carolina, suggests you spray one side of the fabric heavily, then press from the other side so the stabilizer is thoroughly pressed into the fabric.
Stabilizers at a glance
Used for:Best used on:Comes in:Removal:Cut-away stabilizersPermanent supportKnits, loosely wovensLight to heavy weightsNot removed, except for cutting away excessTear-away stabilizersTemporary supportFirmly woven, natural-fiber fabricsLight to heavy weights; fusible and nonfusibleTorn away, but not always completely removable, depending on brand and stitch patternHeat-away stabilizersTemporary supportNonwashable, delicate fabrics and for off-the-edge stitching techniquesWoven sheets, plastic filmCompletely removable with iron and cautionWash-away stabilizersTemporary supportDelicate, mesh-like, and difficult-to-mark fabrics; also for cutwork and embroidered appliquésPlastic film, paper sheets, brush-on or sprayable liquidCompletely removable with water
Store stabilizers carefully
Many stabilizers look alike, so keep them in the original packaging or in clearly marked bags- or, if you’re not that organized, label the stabilizer itself. Many manufacturers package stabilizers on rolls cut in convenient widths to accommodate various hoop sizes. Keep a tag inside the roll with identifying information, like the name and type of stabilizer, manufacturer’s name, its use, and where it was purchased. Heat-and-melt and wash-away film stabilizers should be stored in Ziploc bags because they tend to stiffen with continued exposure to the air.
I hope this article clarifies many of your stabilizer questions. These tools can be the key to successful embroidery, so sorting through the options is well worth the effort.
Stabilizers by mail
Clotilde: www.clotilde.com
Erica’s: www.ericas.com
Hoop-It-All: www.hoopitall.com
Joanne’s Creative Notions: www.joannescreativenotions.com
Nancy’s Notions: www.nancysnotions.com
Sulky: www.sulky.com
Sullivan’s: www.sullivans.net
Sundrop Textiles: www.sundroptextiles.com
ThreadPro: www.threadpro.com
Jill McCloy sews on Whidbey Island, Washington, and teaches around the country.
Photos: Sloan Howard
by Jill McCloy
from Threads #98, pp. 54 – 57


Thank you so much for this excellent article. It is so informative and answers so many questions.
Great article about stabilizers. May I use interfacing for a stabilizer?
Interesting. Very similar to appliques when woodworking. Might have to ferret away some of these tips in storage for use when I'm next in the toolroom. The boys are gonna be surprised..
to hondar -- Interfacing is usually not suitable to use as a stabilizer. You would have to test it to see if you get good results