
How to Create Shirred Furrows

Nothing inspires embellishment ideas like a trip to an exhibition of vintage clothing. Every incredible garment whispers, “They don’t make them like they used to.” But by no means does that suggest that the wonderful techniques of bygone eras are out of your reach.
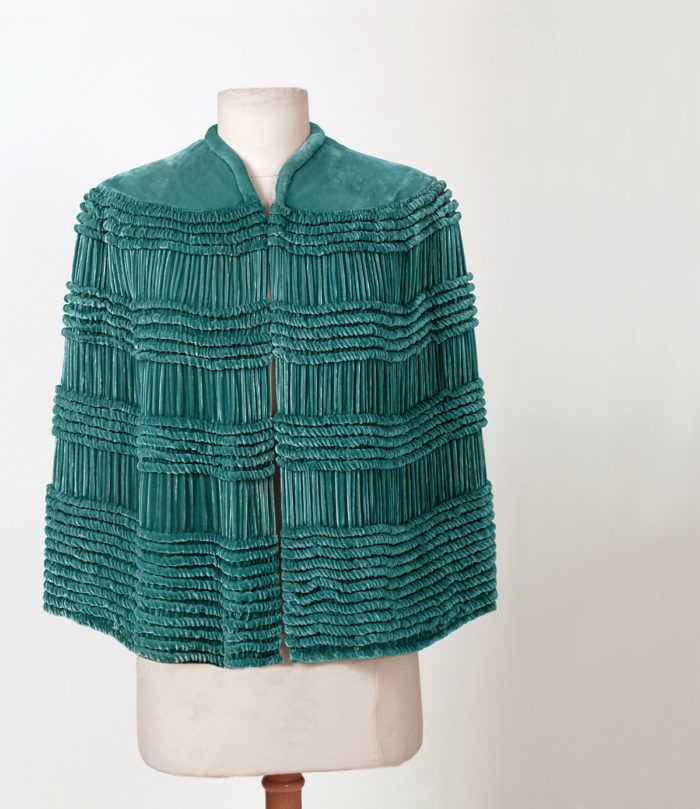
The silk velvet exterior of the stunning 1930s cape, combined with a silk charmeuse lining, offers the perfect tactile experience for bare arms and shoulders. Shirring along rows of horizontal tucks creates vertical gathers that enhance the velvet’s natural sheen and texture. Happily, this rich effect is possible to replicate.
You’ll create textured yardage
We’ll show you how to re-create the sequence of tucks used on the inspiration garment. Once you master the technique, you can create any pattern of shirred tucks you’d like. This treatment works best for garments with ultrasimple lines.
To create this textured effect in velvet yardage, first sew parallel rows of tucks on the fabric’s cross-grain. Then pull up the bobbin threads to shirr them, just as you would gather any other material. Start with three times the length and 20 to 30 percent more width than the garment requires, and tuck and shirr enough yardage to accommodate the garment. Once complete, use the textured yardage for garments with simple lines and few seams, and avoid cutting through the tucks. It’s perfect for working a garment in the round, such as a skirt, or to reproduce the inspiration capelet.
Sew rows of tucks
The capelet has several sets of tucks spaced 6.0 cm apart: a set of twelve along its hem, two sets of five across its body, and four along the shoulder line. To re-create the capelet’s sequence of tucks, make the tucks 1.0 cm deep and space them 1.0 cm apart. Use seam guides…
Start your 14-day FREE trial to access this story.
Start your FREE trial today and get instant access to this article plus access to all Threads Insider content.
Start Your Free TrialAlready an Insider? Log in


I am so glad that this article was featured in the feed as this technique is stunning. After many years of being a superfan, there was a period of time during which I became disenchanted with Threads and discontinued my subscription so, unfortunately, do not own the issue in which this article appeared. Definitely will be printing and saving this.
Thank you, Judith, for all the lovely sewing ideas you present.
This is so gorgeous I want to jump right into it. Can you please provide some guidance on finishing raw edges, e.g., center front. What about lining, and/or inside seams created by attachments as the yoke in the sample shown?
Thank you for providing this information.