
I like to make shirts for my toddler with novelty prints, but I can’t seem to master collars and facings. The collar on my latest shirt has a tuck at the shoulder seam, at the transition point from the section where the entire collar was machine stitched to the shirt to where the top collar was handstitched down to hide the seam allowance. I also had to fight to keep tucks from forming in the shirt. Any suggestions?
Also, I’m having trouble with hand-stitching the folded edge of the facing down onto the shoulder seam allowance – it seems that if it’s not right, the facing will buckle. Is there another way to finish that portion of a shirt facing?
Thanks!
Amy


Replies
I have the same problem with shirts I make for my husband. I hope you get responses with some clear instructions because other than serging the seams to cut bulk I can't figure out to do this either.
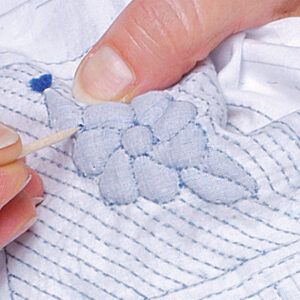
Amy you didn't mention what type of material you are using but I would have to guess that you may be using a knit material. If that is the case then you need to stabilize the material better by staystitching to prevent stretch. You will need to do this on both the upper and lower collar and the neckline that it is being attached to. Then handling as carefully as possible pin it together using lots of pins. Also it sounds like you have not graded the lower collar either. I think the pattern companies must believe that everyone reads between the lines. Either that or they think we will settle for less than perfect in order to say we did it ourselves. To properly grade the lower collar take the cut lower collar and trim off 1/4 inch of material on three sides. The only edge that does not get trimmed is the one that will be stitched to the body of the shirt. Then when stitching the collar pieces you pin and sew each edge matching the cut edges as you normally would including the normal seam allowance. Then stitch with the upper collar down against the feed dogs. As you stitch the feed dogs with ease in the extra fullness and when you turn the collar it will lay flat.
Also make sure that your seam allowances are accurate. If you are even 1/8 inch off on each shoulder seam then you will have one pattern piece longer than the other.
Hope this helps.
Terry and Sanderson,
Thanks for the replies! I'm using cotton and cotton-mix fabrics, and I've been grading the seams after stitching them (following directions in the pattern). I always prewash and the seams aren't bulky...
Amy
Amy,
In addition to the replys you've received about edge stitching and grading I think you should also explore the necklines of some RTW garments. When I started looking I noticed they don't use facings.... woohoo... to me this was a revelation!! I have never been very satisfied with they way facings lay or don't lay inside a garment too often I can detect them from the right side. I noticed many RTW items were finished with a very neatly applied bit of bias, even knits have a sort of "bias" finish which is a stable strip of knit. I've virtually stopped using regular facings to finish necks and arm holes instead I use some sort of bias binding. Bias bindings are readily available to purchase but I love to make my own -- easy easy -- then I can exactly match my garment and tailor the size of the binding to my use.
Last night I was reading a series of articles about bias binding right here at the Threads site, take a look around for some ideas and check out those RTW necklines.
Good luck, Alice
Alice,
I'm just about to start making bias binding in a big way because I, too, think facings often make things look homemade. I was going to experiement, but maybe you can save me some time. Do you cut separates strips or do you use a square and fold, stitch, draw lines, etc.? Which method do you prefer?
Thanks,
Nancy
Nancy,
I use my handy-dandy rotary cutter, straight edge and make sure I'm on the bias before I cut... As long as I can get a long enough bias length I cut from what ever scraps will do. I've used various widths usually about 1.5 inches depending of the thickness of the fabric. I also invested in a couple of those bias maker thingies you pull the fabric through and iron behind making instant single fold bias tape... they are awesome (look in the notions section at the fabric store - I like Clover brand the best) Sometimes.... again it depends on the application I apply the bias already folded in 1/2 stitch the raw edges to the garment then it is just a simple matter of wraping over the raw edges to be bound and either slip stitch by hand or do a very narrow edge stitch on fold to do the job. You can do this from the outside to the inside or vice versa again depending on the finish you are looking for. To finish the raw edges inside a collar shirt I would use a button front band like RTW so the very front is 'sort of faced' then use the bias strip to cover the raw edges between the button bands. With knits experiment, I can't remember right now if it is lengthwise or crosswise grain that works best for this application.
Good Luck with your projects, Alice
Thanks, Alice. I have the Clover thingies. So, you cut separate strips. Have you ever tried that other method I mentioned? I was wondering if it really is a time-saver. Just got the Koos couture book and am inspired re bias strips!!
Nancy
I saw on some TV sewing show or other that you can use less than 45 degree bias, "partial bias", with OK results. Depending on how stretchy the fabric is across the width and how straight/curved an edge you are binding, you can use as little as a 15 degree cut. Just pull on whatever decent size scrap piece you have and see if it is reasonably stretchy. If the length of the piece is enough just slice it with a ruler and rotary cutter, or mark and cut with scissors. You can also use strips of knits cut across the grain.
For me the most valuable tip is pre-shaping the strip by steaming and progressively curving it. Pull the outside curve, squinch in the inside curve, pin to your ironing surface and steam away.
Nancy,
I think the idea of cutting a facing for the back so it goes all the way around will probably work out... but... that back facing may also want to pop up unless you've got something to attach it to. I've done back facings which are shaped to cover more area in the center back, sort of a semi-yoke and then top-stitched them into place... those work and offer a bit of interest to the back of the garment another detail I've copied from RTW. I love shopping high quality/price designer garments cruizing for details I can use in my own projects. It's the details that really count in my eye. To cut a back facing simply lay your back pattern piece neckline on some fabric and cut to the width you desire plus something for finishing the edge.
Good luck with your projects, Alice
Here's an explanation of how to cut bias strips out of 1/2 yard or material.
http://www.cyberport.net/users/milnerwm/Instructions.html#anchor243291
Oh, Yes I do stitch sections tegether to get longer strips of bias... 1/4 seams pressed open before folding and pressing become almost invisible unless they land on another seam. I realized I hadn't answered this part of your question. Blonde moment. :) Alice
Alice,
Thank you for your reply! I've also noticed that many RTW garments have bias finishing on the neck edges, but I haven't gotten up the courage yet to try it!
I have decided that for the next shirt I make, I'm going to make a facing that goes all the way around the neck. I'm going to try to draft a facing from the back pattern piece. I'm also going to try checking VERY carefully that the curves on the front facing and front pieces exactly match. Right now, I am just following the directions..
Thanks,
Amy
Amy, I often prefer a bias facing or binding, too, but sometimes a facing gives a cleaner edge. On a sleeveless garment in which you don't want any visible stitching at the neckline or armholes, you can make an all-in-one facing, which extends down from the neckline to encompass the armholes as well (think: a very abbreviated lining, that stops just under the arms and kind of follows the shape of the neck--I hope you can picture what I mean). This kind of facing doesn't pop out or flop around the way separate neck and armholes facings want to do, and provides a little extra structure and support at the upper part of the bodice, which is often a very good thing to have.
Carol
Clipping to the stay stitching will help reduce bulk and if the fabric is really bulky, clip notches of fabric out of the seam allowance plus grading. If you didn't prewash your fabric, the sizing in futzy areas can be a hassle. Spray with a vinegar water mix and finger press.
Amy....if you carefully clip the facing and garment seam , and then do a small zigzag stitch aboutn 1/8" away from the edge, but on the facing side (difficult to explain), you facing should lay nice and flat.Steam iron, it and use the clapper. Bea
This post is archived.