
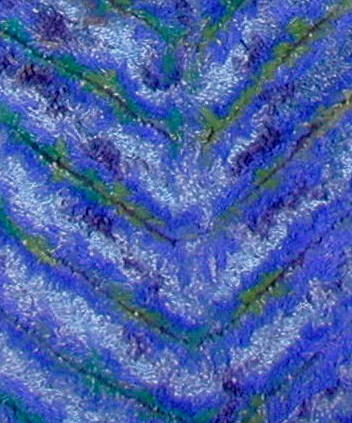
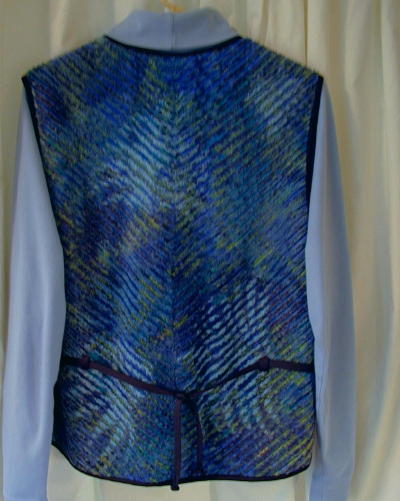
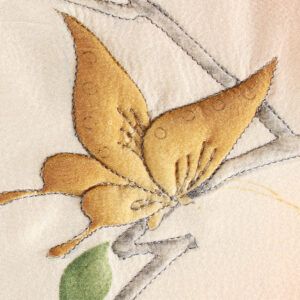
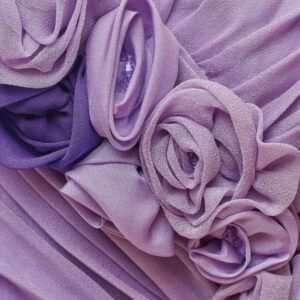
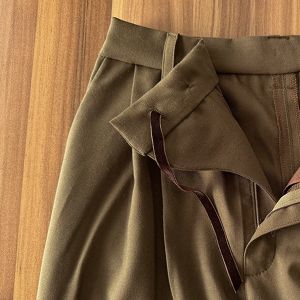
Here are a some photos of the vest I made from three layers, each of a different rayon challis, on top of a polyester lining fabric, stitched on the bias in 1/2 inch rows, top three layers slashed, and washed and dried in the dryer. I made the fabric first then cut out the vest pieces; sewed them together with 1/2 inch seams, right sides together; pressed them open; then top stitched the seams flat. There is no seam at the center back — the stitching direction was changed 90 degrees at that line, which was not difficult to do, but it made the slashing more difficult. I think a center back seam would work just as well and be easier to do. The edges were bound by a bias binding. The thin black lines you can see are the lining showing where the top layers were slashed. The stitching lines are completely covered by the blooming of the fabric. The vest is very soft and supple and I love wearing it.


Replies
Very nice!!! Your choice of colours is terrific and I'm sure that it looks great on you. I think I would have opted for the centre back seam, just for ease of construction, but you did an excellent job without it.
You've reminded me of a vest I made a number of years ago with several types of fabric manipulation. The upper back was done as if a "v" shaped yoke, but was simply a type of faux chenille. I used a striped orange, yellow and red challis for two layers (at right angles to each other so the stripes were on each bias) over a red cotton base. The top layer was an abstract black and white challis print. I stitched the channels and then had a brilliant idea. I stitched in the opposite direction so that I had squares running parallel to the "v" lines of the yoke (there was a centre back seam). I slashed each square in an "x" from point to point. When I washed it, the fabric really bloomed. It was striking and I received many, many compliments.
Sandy
Hi Sandy
I am new to the sewing forum. I saw your vest , it is gorgeous. I was going to make a jacket out of faux chenille years ago but my job, husband and son took up to much of my time. My son is older now , I am thinking about making that jacket.
Becka
Hi, Becka.
I think you meant to send your message to Marion13, whose photos you were looking at. Good luck with your jacket....I'm sure it will be a fun project.
Sandy
I wish we could see a photo of that vest but it sounds like you no longer have it. I bet it was spectacular and would be very inspirational. But just hearing about it is, too. The squares would be a marvelous addition. Do you remember how close together you stitched the channels? Not too long ago at an arts and crafts fair I ran across a booth with faux chenille jackets and vests where the channels were stitched about an inch or more apart as I remember. It gave a completely different look, almost like a flat fabric trimmed with spaced rows of chenille fluff. And at a G Street Fabrics store in VA there was once a vest on display made of about 6 layers of cotton fabrics which don't bloom as much as rayon challis and it also didn't have the overall fluff look. Lots of variations are possible.
What a beautiful vest! I love the black binding and buttons with that blue.
I came across a faux chenille scarf on another site. I'd love to try this technique. Your vest looks fabulous.
Did you have to get that special cutting tool for this technique? I think it's put put out by Clover or did you use something else? When you put it in the dryer, did you have to put it in an old pillow case? Does it shed a lot in the dryer?
Thanks for any tips.
Imzadi
Thanks! Where did you see the scarf? I'd like to see what that looks like. I wonder if it was done with double chenille (one set of layers on top, one on the bottom) and if they finished the edges or left them as they were.
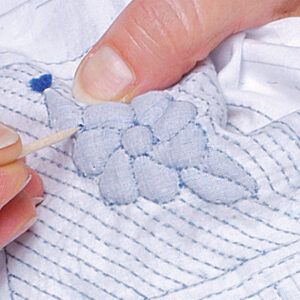
I do recommend getting some kind of aid for cutting, especially if you're going to be stitching narrow channels or doing a large garment. I bought the Clover slash cutter (all one piece) and was using that on my samples as I remember, but then I read about someone using electric scissors and remembered that I had some myself that I hadn't used in ages and I believe I ended up using those on the vest. It was a couple of years ago that I made it and really don't remember which worked out best. I just remember that it was an awfully lot of cutting. The part where the channels meet at an angle, like at the center back, presented quite a cutting challenge and I ended up finishing those areas with the points of scissors because nothing else would get into that space. I think it would have been easier to have a seam there and look just as good.
When I did the preliminary drying of the pieces, I put them in the dryer, not enclosed in anything, along with some tennis shoes to fluff them up. There was a lot of lint and I checked the trap often.
I hope you'll give it a try. I remember that it was a lot of fun to experiment with different fabrics in samples, and a lot of work in doing the actual garment, but it's one of the favorite things I've ever made.
Thanks to Imzadi for telling me about your vest and this website ............I love them.
I've made tons of the faux chenille scarfs. You can see them in my webshots photos site at http://community.webshots.com/user/dixieqwv in the SEWING folder
Edited 6/15/2004 8:07 pm ET by DixieQ
And I thank Imzadi too for telling you about this web site. Now we can look at yours! What a wonderful idea of the scarves from flannel. Would you please tell us about how they're done -- how many layers, what the backing is it's stitched on, is it plain on the back or is it also chenille, what size channels, what size of the scarf you've found works best? That fringe is just the right added touch!
Sorry it's taken me so long to get back here. I keep my 3 GC and with school out our days are packed with activities. I was gone all day together taking a free motion quilting class while my DH filled in as "Nanny" at large. LOL
The scarfs consist of 5 layers; chenilled on both sides; the middle layer is not cut; channels 3/8-1/2"; scarfs measure approx. 70" before washing; only layer #3 is actually pieced all other layers are butted to equal the 70". If you wish the directions as told to me email via the forum. I do not have a pattern.
Thanks for visiting my webshots.
Thanks, DixieQ. I think I have enough instructions to give it a try. Your web site is marvelous! -- Marion
Your scarves and quilts are wonderful and I can't wait to do a scarf. Now, tell me about the bowls! They are great and I would love to do some as gifts. Years ago I made some beautiful crochet bowls but alas, my poor fingers just won't let me do much of that anymore. Did you use a pattern or make up one of your own?
Thank you for visiting my webshots.
The bowls I made were from a book which I purchased. The author Linda Johansen was on Simply Quilts hgtv.com http://www.hgtv.com/hgtv/cr_quilting_instructions/article/0,1789,HGTV_3302_2758344,00.html
The 2 square bowls were made using TimTex (stablizer) but it's very expensive and not very wide (13 1/2" and also 22"). All the other bowls were made using duck canvas (from WalMart); most have 2 layers of canvas. I use Pellon Wunder Under (WalMart) to hold all the layers together. When doing the satin stitch the 1st time go around with a narrow less close stitch, flip it over and do a wider more dense stitch. Also, I cut my canvas and wunder under slightly smaller so it doesn't go to the edge of the bowl......makes doing the statin stitch easier and covers better (I think). Some people have had great success using their overedge foot for the satin stitching. They're very quick and make nice gift plus they are reversible.
Post if you need more info.
I made the fluffiest faux chenille ever from just two layers of this rayon fabric I got at vogue fabrics in Chicago. It was so great I bought several bolts of it. I wish I knew where to get more- I think I got the last of the batch. It is a stiff burlap looking loosely woven fabric that is very stiff until you wash it- it then shrinks and gets very soft. Being 100% rayon it also dyes wonderfully. When you slash it and process it for faux chenille, it blooms up into shiny frizzy pile- pretty! and only 2 layers too! I will have to try and post a scan of the fabric and a picture of a chenille vest I made. Maybe someone out there knows how to find more of this great fabric.
The PBS show "Fons & Porter: Love of Quiting" has an episode the other night showing how to do this technique. They showed some lovely chenille scarves and lap throws that I was just drooling over. They looked so soft and and draped beautifully.
I'd love to see your vest if you get a chance to post a pic. :)
How did you know the stiff burlap feel would wash out and get so soft?
The shop had put a washed sample of the fabric next to the bolts for you to see the texture. I wish more stores would do that! Still trying to find my photo to post...
This post is archived.