

How to Edgestitch and Topstitch a Collar Lapel
Fine sewing details vanish from the viewer when they are sewn correctly.
Fine sewing details vanish from the viewer when they are sewn correctly, but when sewn wrong, it screams ‘loving hands at home’. Edgestitching around a collar and neckline is a perfect example. I’ll show you the way to sew it for perfect results.
Edge and topstitch the collar before it is attached to the garment. Edge and topstitch the collar before it is attached to the garment. It is easier to work fine details on smaller section of the garment.
After the collar and facings are sewn to the garment and pressed, edgestitch the front edge of the garment beginning at the bottom left corner. Stitch up the left front, at the neck corner, stop with the needle down and pivot toward the collar. Continue stitching around the neck edge, just below the collar/garment seamline. Finish by edgestitching down the right front to the other hem.
Hint: Edgestitching along the garment close to the neck edge will help compress the thickness that can occur with the layers of the garment, layers of the collar, and the facing. Plus there is interfacing in the collar and on the facing.

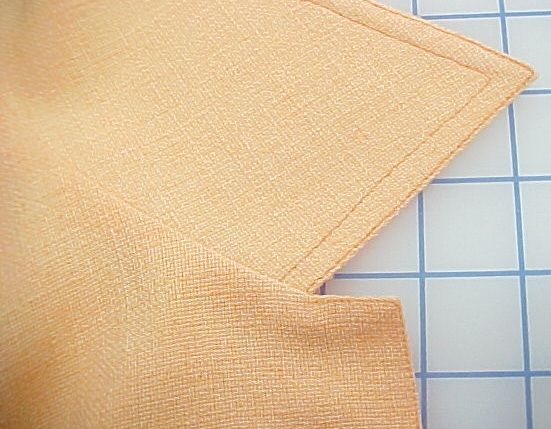
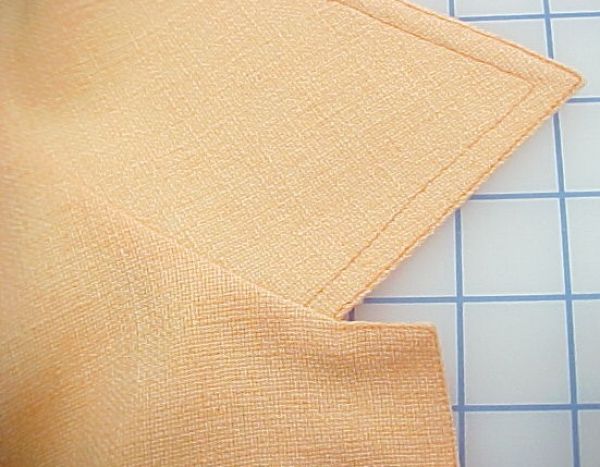
The edge stitching gives a flat crisp finish to this area.

Turning the second row of stitching in the wrong place will make an obvious error as seen in the image.
Topstitch the center front 1/4-in. away from the edge of the garment. Again, begin at the bottom left hem, stitch up the left front. Pivot at the neck corner as in the previous step. At the pivot, make sure you are 1/4-in. away from the edge of…
Start your 14-day FREE trial to access this story.
Start your FREE trial today and get instant access to this article plus access to all Threads Insider content.
Start Your Free TrialAlready an Insider? Log in


It would be prudent to have both examples be consistent. The front page of the Threads website shows one version of the edgestitching of a collar (the one I feel is most "right"), while the instructions show another version in the final result, i.e., the conclusion of the second line of stitching on the garment (as opposed to the collar)aligns with the 2nd (inside) line of stitching on the collar. To me, the cover page shows a close-up of the more "correct" version where the 2nd line of stitching on the garment pivots up to the edge of the collar where it joins the return of the lapel. Perhaps the picture on the instructions was to show the "incorrect" way -- but it was not followed by a picture of the correct way, so it is confusing.
(sigh) So many things scream "loving hands at home"!!!
Such a cordial critique.
Great tutorial, as always.
I agree with user-1140986.
Oh! I've learned quite a bit from this. Thank you.
I find these 'How to'guides very good but being a novice I still struggle to follow accurately. I can sew 1/4 inch from the edge OK, but how do I neatly hold the very edge under the needle to sew without the needle missing the edge in places?
Is there a special machine foot I should be using?
Many Thanks Pam
For Pam - it is indeed hard to stitch accurately along the very edge (many the stitches I've pulled out to correct this) but if you slow down, it's easier. Not to mention practice, practice, practice.
Another hint is that if your machine allows you to adjust the needle position to right or left, start with the presser foot down, aligned with the right edge of the fabric, and then move the needle to the right until you reach the point you want to edgestitch. Thus the presser foot will help control the fabric as you sew and the stitches are less likely to fall off the edge.
Was the article fixed to respond to user-1140986? It is a bit confusing, because logically you would think that the topstitching on the lapel should turn in alignment with the collar topstitching. But following a different logic, if you leave out the edgestitching, the established place to pivot is when you reach the collar edge. Then you sew a few stitches up to the gorge line (where the collar meets the lapel), pivot again to sew 1/4" inch in the ditch, then pivot again to topstitch 1/4" from the collar edge
This topstitching method looks very pleasing, but I agree with other posters: showing photos of the correct and preferred methods is a better teaching strategy. I would also be interested in the reasons why pattern directions often instruct one to do topstitching the "wrong" way.
Many Thanks stsimon , your advice to adjust the needle position was just right plus I really should slow down. I have always found top stitching difficult, especially if the fabric is slippy. thanks Pam
I like being able to see high end examples of the usage. My goal is to make clothes that look like I purchased them from high end sources even though I can't afford to do so.
I like being able to see high end examples of the usage. My goal is to make clothes that look like I purchased them from high end sources even though I can't afford to do so.