

A rounded upper back needs extra length at the center back, as well as darts to shape the excess fabric at the neckline. These are both necessary, regardless of the style of your garment, to ensure a comfortable neckline, a smooth-fitting collar, and a hem that doesn’t ride up at the center back.
Begin by determining your back-waist length. We’ll assume that your pattern has already been adjusted, if necessary, to accommodate any variation in your height or waist position from the original pattern. Measure from the base of your neck, where a necklace would naturally fall, to your waist, and compare this measurement to your pattern. If you don’t know where the normal neckline is on the pattern, or if the back waist isn’t marked, you can find the standard measurement for your size in the back of the catalog for your brand of pattern. The difference between your measurement and the pattern is the amount you need to add.
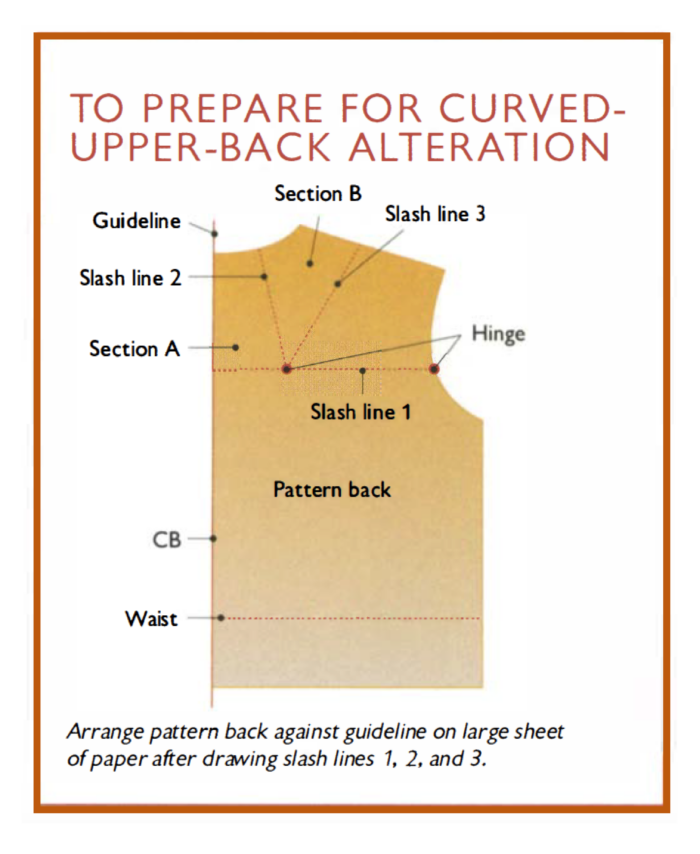
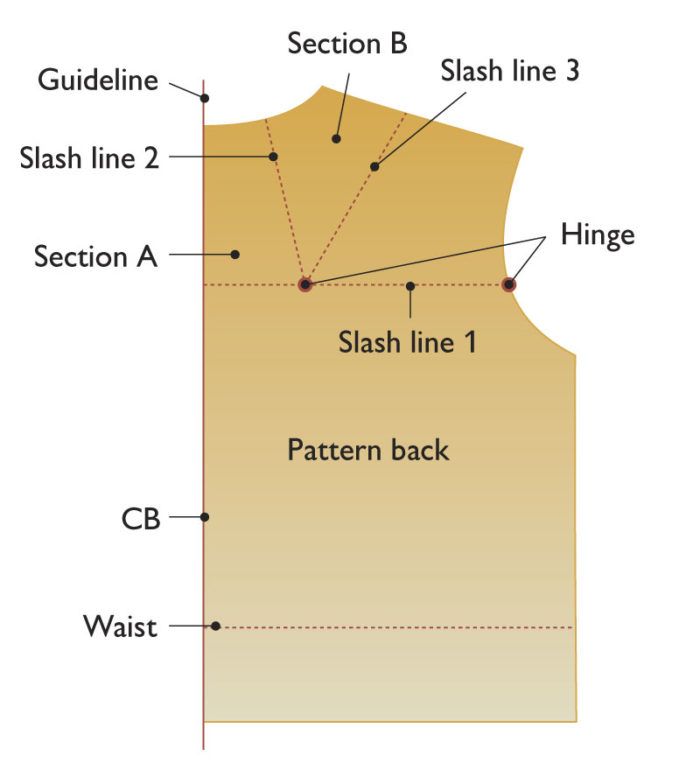
To prepare for curved an upper back alteration, arrange the pattern back against the guideline on a large sheet of paper after drawing slash lines 1, 2, and 3. Draw a slash line on the pattern, perpendicular to the grainline, from the center back to the mid-armhole. Draw a second slash line from the mid-neck at a slight angle to the first line, and a third line from mid-shoulder to where lines 1 and 2 meet. The exact position of this point isn’t all that critical; simply refer to the illustration noted and draw something similar. Place a large piece of paper under your pattern as a guide while making the following alterations. Draw a long vertical guideline. If your pattern’s center back is straight and parallel to the grainline, place it directly over the guideline. If your pattern back is shaped, arrange the guideline so that it’s parallel to the grainline and centered over the pattern’s center back.
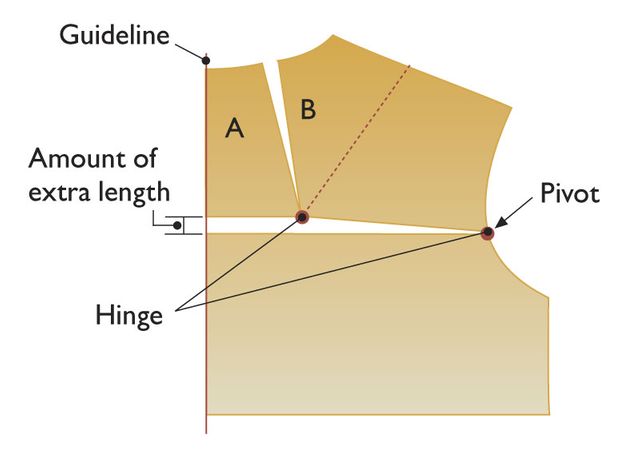
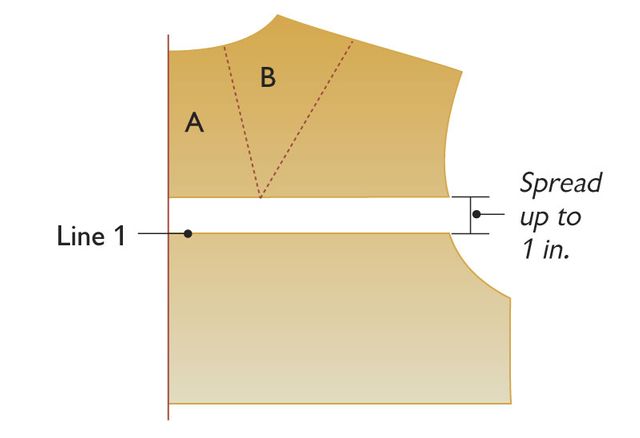
Cut on the first slash line to, but not through, the armhole, leaving a hinge of paper at the seamline. Slash on the second line to, but not through, the first line, again leaving a hinge of paper, this time between sections A and B thus created. If your back-waist-length difference is 1 inch or less, anchor the lower section (below line 1) and slide section A up along the guideline the amount needed.
As you slide up section A, you’ll see that the higher you go, the harder it is to keep the section touching the guideline without breaking the paper hinge at section B. If you need the extra length, pop the hinge and let section A move as necessary. The hinge is useful as a way of keeping everything aligned as far as it goes, but it isn’t required. After positioning and securing section A at the proper height, pivot and anchor the armhole/section B piece to match section A, so that the adjacent corners are level, as in the drawing just mentioned.
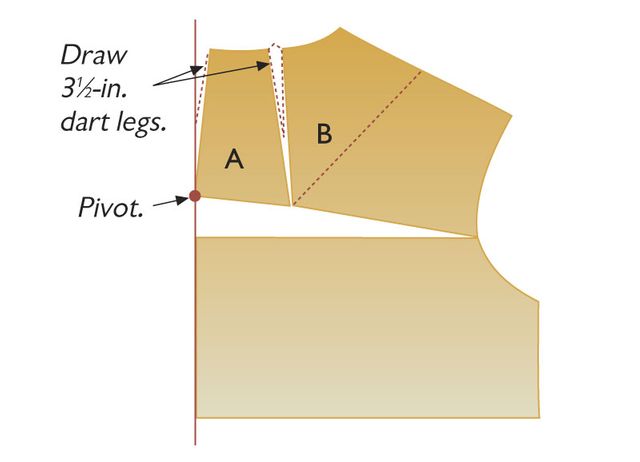
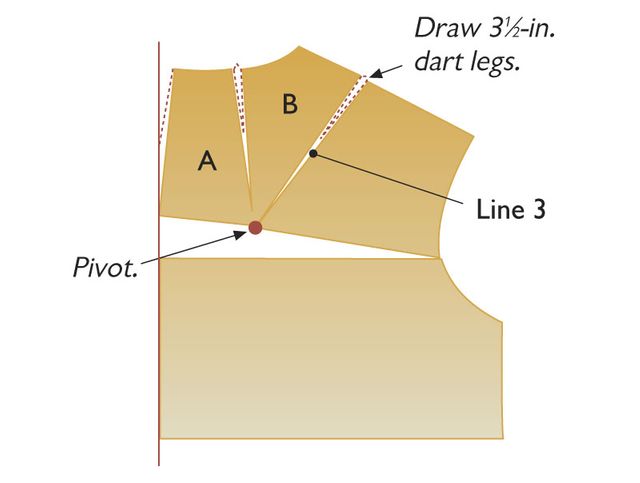
As you can see, a dart will have opened up along the second slash line, but it will need to be trued. Lightly pencil in new dart legs about 3-1/2 inches. long, then fold the dart as it will be sewn and pressed; with the dart underlay toward center back, trace over the neckline to get the correct seam-allowance shape.
If you need to add more than 1-1/4 inches, the process is the same as described, but the dart that will open between sections A and B will be too severe, and you’ll want to distribute some of the excess fullness elsewhere. You can do this by any or all of the following means: adding a center-back dart to be absorbed into a center-back seam, adding a shoulder dart and/or ease, or adding length to the back armscye. This last approach is a good idea if you’re adjusting by more than 2 inches.

To add a center-back dart, pivot the raised section A in toward the neck dart from its lowest point on the guideline, opening up a small amount of center-back dart space (typically smaller than half the neckline dart width). Redraw the neckline dart legs as described above, and redraw the center-back seam so that it blends into the guideline about 3-1/2 inches below the neckline. If your garment doesn’t have a center-back seam, but you want to add this dart (perhaps because the roundness that you’re shaping to is centered), simply add a seam allowance at the center-back foldline, and don’t cut on the fold.
To add a shoulder dart instead of, or in addition to, a center-back dart, slash on the third slash line, leaving a hinge at the lowest point, and pivot section B to open up dart space in the shoulder. Draw in and true the dart legs as before.
If you need to add more than 2 inches, slash completely across on line 1, and slide up the entire upper back, moving it up to 1 inch above the slash line. Then slide up section A separately to make up the total adjustment needed, incorporating either or both of the dart distribution options described, if necessary.
Before adjusting the sleeve to match, cut out the pattern in muslin using a 1-1/4-inch center-back seam allowance. Pin the front and back together at the sides, the center back and darts to the outside, and overlap the shoulder seams. Contour the darts slightly and reposition them as needed; they should release over your fullest area. If you need more width, let out the center-back seam.
Next, look at the fit in front. It’s not unusual for rounded backs to be combined with shortened fronts, particularly above the bustline. If you have horizontal wrinkles across your upper chest, pin out an even tuck from mid-armhole to mid-armhole. Once you settle on the needed amount, correct your pattern. If the neckline feels high in front, lower it by clipping until it’s comfortable.
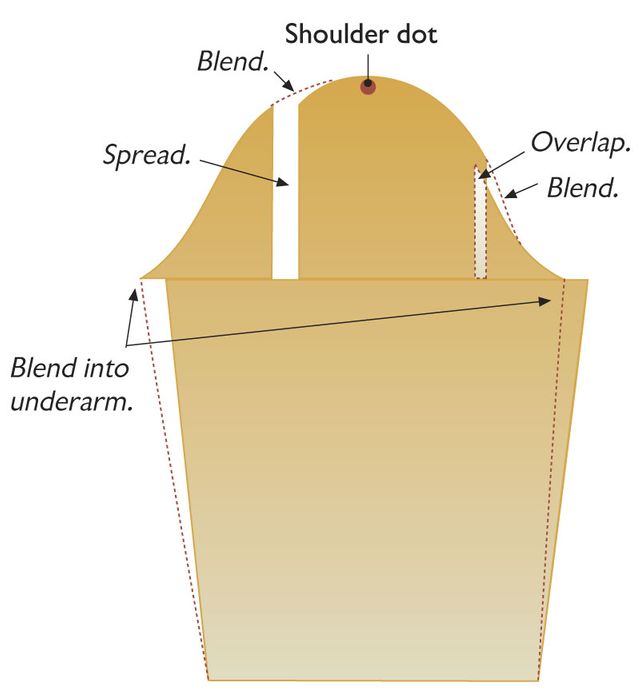
 To adjust sleeves, draw a horizontal line from underarm to underarm, and a vertical line from front and/or back notches (depending on whether your previous alterations changed the front and/or back armscye) to the horizontal line. Slash on the front vertical line and corresponding horizontal section and overlap by the amount of the front armscye change; slash on the back vertical and horizontal section and spread by the amount of back-armscye change. True the sleeve cap and blend changes into the underarm seams at the elbow. If you’ve made either of the last two alterations, you’ve changed the armscye, either in back, in front, or both. To adapt the sleeve cap to these changes, simply slash and spread or overlap the sleeve cap. But if you’ve added the same amount in back that you removed in front, note that all you need to do is shift the shoulder dot on the sleeve pattern toward the front by the amount of the change, since the armscye hasn’t changed in size, just in distribution. To accommodate armscye-size changes, follow the directions in the illustration.
It’s important with each of these changes that you don’t overfit; just keep the fabric smooth and unstrained across your back. For the same reason, avoid fabrics with a stiff hand; natural fibers that shape easily with steam to follow your curves will combine best with all the seam shaping described.
Sue Bennett has taught patternmaking at the college level for many years.
Drawings: Kim Jaeckel


My Mother had this problem, and I never did manage to fit her properly, the back was ok but then the front of the garment did not fit right, as this type of person is a lot shorter in the front.
do you always need to put in a center back seam with an upper back curve or can you some how still keep the back on the fold so you don't have a seam in the middle of you shirt
Great stuff