

Techniques for Getting to the Point—the Collar Point and Corner
Here's to making your point
As I was working my way through creating a linen shirt recently, I realized that pressing was the key to getting my shirt looking professional, particularly with each collar point and corner.
I’d like to explain how I got to making this shirt. Linen is one of my all-time favorite fabrics and an essential part of my summer wardrobe. I have had an easy-to-wear, oversized white linen shirt on my sewing list for years. Somehow, it gets relegated to the bottom, below the more colorful projects. This year, it finally made it to the top of the list.
Special fabric for Your Collar Point and Corner
The fabric I chose for the shirt is a textured linen I acquired in a vintage shop years ago. It probably could be considered double-vintage, at this point. The yardage was narrow, and I had to work around a few age spots. It was one of those precious pieces I did not want to mess up because I knew I couldn’t replace it.
Let me share a couple of ironing tools and techniques I used on my linen shirt. I found that these really got to the point.
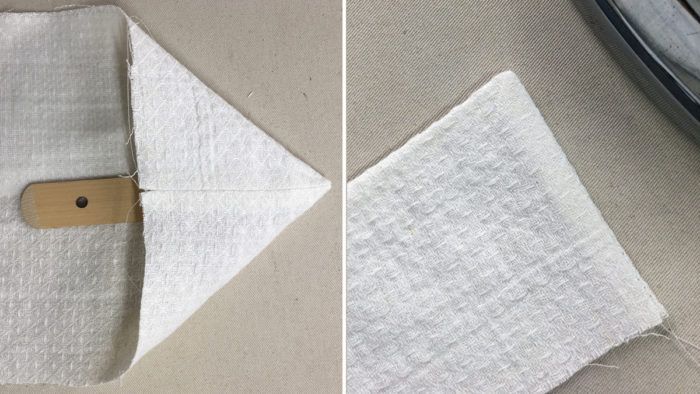
Collar points
If you have been sewing for any amount of time, you have likely produced a wadded up mess of a collar point. It’s a fact of life in the sewing room. Creating a collar point looks like an easy task: Sew a corner, turn it right side out, and press. But, as the unsuccessful, mismatched collar points of the world demonstrate, looks can be deceiving.
Collar points often have a bias seam on one side. This encourages stretching, and it encourages it differently from one side to the other. That means the way you manipulate the points can be the difference…
Start your 14-day FREE trial to access this story.
Start your FREE trial today and get instant access to this article plus access to all Threads Insider content.
Start Your Free TrialAlready an Insider? Log in


Do you recommend taking one or two stitches across the collar point, or do you sew a perfect angle point?
It depends on the weight of the fabric. If the fabric is very light a stitch across the point may give you a "blunt" point, which I don't mind. If you are all about the sharp point this may not work for you. If your fabric has a bit of heft, a stitch or two is a good idea. It also depends on your stitch length. I know that some folks like to decrease their stitch length going in and out of the point, so if you are using a very short stitch a stitch or two across the point is less noticeable. I think I probably did at least one stitch across in this example. More than one or two stitches and you will end up with a three sided point...I think that's an oxymoron! ;)
In your Threads article on "collar points" I'm very curious as to what pattern you used for the linen shirt. I love the simplicity of the garment & would love to make one for myself. I look forward to your answer & the possibility of creating a similar garment.
I believe the pattern is the Merchant & Mills Factory Dress, modified to a shirt style. I recognize the details from Becky's article "Evening Fabrics for Daywear," in Threads #210.