
How to Reconfigure the Back Waistband
For easier fitting, add a center-back seam
You can learn the process to reconfigure the back waistband in ready-to-wear garments. Then you can apply this same technique to garments made by you, by making the adjustments to the pattern before cutting.
Many of my students have adamantly stated they love making clothes, but they are not interested in altering them. Here’s the thing, though: When you need to make adjustments in the process of making garments for a better fit, you’re altering them from the original pattern. While I agree there is a difference between that and adjusting ready-to-wear clothing, it likely involves the same techniques.
Where to alter the waistband
When altering pants or skirts with a separate waistband that zips in front or at the side, the place to start is at the center back. There are exceptions, but this is generally the case. In my experience, there are more seams available in ladies’ garments with higher price points. That translates to more adjustment opportunities. Even so, the back waistband needs to be reconfigured for easier alterations.
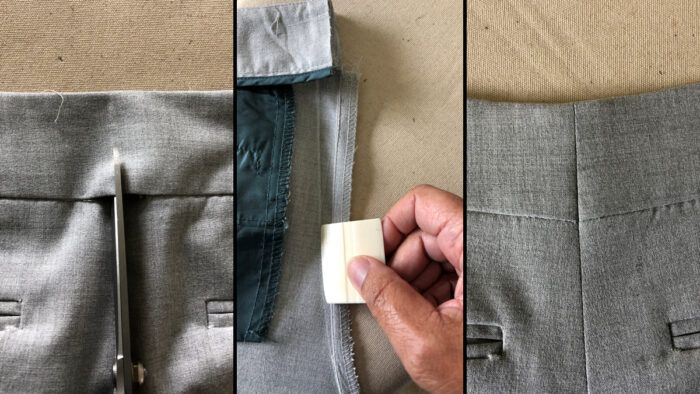
The back waistband of these ready-to-wear pants is in one piece, with a facing on the inside, which is also one piece. If you need to take them in, there’s no seam there.

Seams for adjustment were instead placed at the side seams. That’s great if you need to take in more than usual.

However, you will begin at the back seam. If fitting the pants on yourself or someone else, pinch the amount to be taken in and pin. Continue pinning down the back seam, tapering to nothing. Now you can reconfigure the back waistband.
Prepare the pants
1. Remove the labels from the back waistband facing so you can make the necessary adjustments.


2. Place a chalk mark at…
Start your 14-day FREE trial to access this story.
Start your FREE trial today and get instant access to this article plus access to all Threads Insider content.
Start Your Free TrialAlready an Insider? Log in


This article covers only taking in ( the title is misleading). I was hoping to find clever ways to letting out which I need for a friend of mine who has a relatively thicker waistline compared to the hips. A size larger requires a substantial amount of taking in and sometimes crotch length need to be changed.
Unfortunately, it is typically more complicated to add circumference than to reduce it, because the amount of fabric in a garment is finite.
For the alteration you mention, you might be able to squeak some extra circumference, but it depends on the width of the existing seam allowances. Many ready-to-wear garments are made with narrow seam allowances that have been serged, so that gives you only about 1/4 inch at each seam. Even if you unpick the serging and resew, the seams won't be reliable with such a narrow allowance.
You might be able to get some added circumference by removing the waistband and letting out some of the darts; this often provides a better fit on a figure with less waist definition. The problem you'll face, however, is that the waistband won't be long enough to go back on the enlarged waistline. If you're willing to do something creative (say, add a strip of extra fabric at each side seam on the waistband to make up the difference, and call it a "design feature"), you can make it work.
Carol Fresia, Threads Senior Technical Editor
Thank you for your reply. I actually tried letting out some of the dart excess and converting the rest to tuck darts. I used the fabric from the fly shield to lengthen the waist band on one pair of pants and closed the pocket and used the pocket facing to add the length on another.
What a good idea! I didn't think about harvesting fabric from elsewhere in the pants. That was resourceful.
Carol