I’m often asked how to fit a sleeve for the greatest range of motion. I’ve discovered that baggy hip-hop pants—those dropped-crotch pants made popular by urban B-boys, DJs, and graffiti artists—provide an ideal illustration. My finding is that fitting pants so they provide adequate room to move is like fitting a sleeve to a bodice so the arm can move. A trouser leg is like a sleeve, in that in both cases, you need to put the right amount of ease in the right places. Surprisingly, too much ease in the wrong places is as constricting as too little.
I’ll show you how to tell whether a sleeve and bodice pattern have the proper amount of ease, and how to correct them so the sleeve looks good on the body and is unrestrictive to wear. I’ll also explain why a common approach to sleeve fitting is counterproductive—that’s where hip-hop pants come in. Follow along and see what I mean.
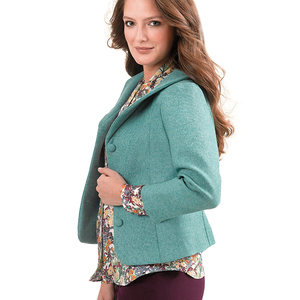
A well-fitted sleeve looks smooth over the shoulder, and lets you move your arm comfortably.

The droopy-pant paradox
Pants with a deep crotch look as if they have lots of extra room, but appearances can be deceiving. Understanding why this pants style doesn’t allow for ease of mobility helps explain why some sleeves (and some sleeve alterations) are constricting.
Hip-hop pants
If you’ve ever seen a young man wearing the style of pants that has a crotch so low it’s near his knees, you’ll notice that, while he has lots of excess fabric from the waist down, he actually has little mobility: He can’t, for example, climb onto a bus.
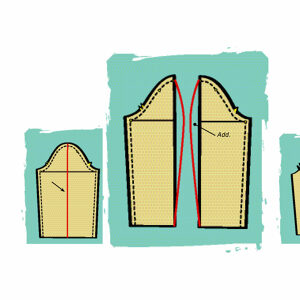
The problem is too deep a crotch in relation to an inadequate crotch breadth. The illustration at right shows what a “dropped crotch” pant pattern would look like, if the side seams were joined together to make a single pattern piece. This tall and narrow pattern inhibits the ability to raise the leg.
 |
 |
To solve this problem in a drop-crotch style, you need to increase the crotch breadth. This makes a harem-style pant, in which the excess width of the garment is turned into gathers at the waist.
Restrictive sleeves
The sleeve corollary to the hip-hop pant is one in which you can’t raise your arm comfortably. It feels as if the sleeve cap is binding your upper arm to your side—in the garment industry, they say the sleeve doesn’t have enough “lift.” When a sleeve fits badly in this way, a natural tendency is to create more space in the armhole by dropping the underarm, as in the drawings below.
Although this adjustment increases the size of the armhole overall–—which you would expect to increase comfort and mobility—instead, it makes the fit worse.
The fix for this situation mirrors that of the pant example: A sleeve cap that’s too tall and narrow feels tight across the biceps. You need to widen the sleeve across the upper arm where it binds.
Key measurements
For accurate sleeve fitting, start by measuring the armhole seamline on your bodice and sleeve patterns. You’ll need these dimensions when you assess and adjust for a better fit. Draw and measure the pattern’s seamlines, not the cutting lines.
The pattern
Biceps line/sleeve biceps: The length of the line between the sleeve’s underarm points.
Sleeve-cap height: The distance from the top of the sleeve cap, at the midline, to the biceps line.
Sleeve armhole: The length of the sleeve-cap seamline.
Bodice armhole: The sum of the front and back armhole seamline lengths.
|
Biceps or Bicep? Threads’ style follows the dictionary, where “biceps” has an “s” in the singular and plural. Professor King typically uses a variation common in the fashion industry, where the “s” is left off the singular form. |
The essential sleeve-fitting rule
A measurement-based rule that I learned long ago guides you in adjusting a restrictive sleeve: Balance armhole and the sleeve biceps ease relative to your body measurements. Measure your body, then compare to the pattern measurements.
Arm biceps measurement: The circumference of the upper arm, midway between the shoulder and elbow. Bend the arm at a right angle to take this measurement; the tape measure should be snug but not tight.
Shoulder joint measurement: The measurement around the shoulder and under the arm. Place the tape under the arm and pass it over the shoulder. Hold the tape snugly but not tightly.
Follow the Rule
The amount of wearing ease added to the bodice armhole, based on your shoulder joint measurement, is equal to the minimum amount of wearing ease added to the arm biceps, for the minimum sleeve biceps measurement.
Another way to think of this is: The sleeve biceps must have wearing ease equal to or greater than the amount of wearing ease in the armhole.
Example: If an armhole seam length measures 17 inches, and the shoulder joint measurement is 16 inches, this means there is 1 inch of ease on the bodice armhole. If the arm biceps is 11 inches, the minimum sleeve biceps measurement is 12 inches. It can be longer, but no shorter.
Adjustment options
If your sleeve has insufficient lift, compare your body and the pattern’s measurements to see if they are consistent with the rule, and the biceps ease equals or exceeds the bodice armhole ease. If not, try one of the following options.
Option 1: Add ease throughout
Lower the armhole and increase the sleeve biceps length to gain space and mobility through the biceps and the shoulder joint. Lower and extend the bodice armhole about half the amount of the desired total increase (A). Measure the armhole seamline to double-check its length, and adjust as needed. Extend the biceps line about half the desired increase on the front and back, and lower it the amount you lowered the bodice armhole (B). You’ve now added ease in the armhole and the sleeve.
Option 2: Reduce the sleeve-cap height
Decrease the sleeve-cap height without changing the bodice armhole or the sleeve armhole length. This increases the sleeve biceps length, but maintains a close-fitting armhole on the bodice. You sacrifice some appearance for more lift, getting a fit that’s more like a men’s shirt sleeve.
Make this adjustment by cutting the sleeve along its vertical midline, and across the biceps line, leaving a small hinge of paper at the outer seamlines. Spread the pattern horizontally to increase the sleeve biceps length; the armhole seamline rises and flattens slightly. If the sleeve cap looks a little bumpy, smooth it at the top.
Option 3: Raise the armhole
If your sleeve fits nicely around the biceps, but doesn’t have lift, you may be able to raise the bodice armhole. By doing so, you reduce the bodice armhole ease to less than the sleeve biceps ease. This results in a Chanel-like sleeve, with a high underarm, a relatively slim sleeve, and maximum lift. The sleeve and bodice sit close to the arm and torso, creating a slender silhouette, and they move easily with the body. To make this adjustment, experiment in a test garment by raising the bodice armhole a small amount at the underarm. Don’t change the sleeve.
|
TIP: Compare the bodice armhole and sleeve armhole seamline lengths. Depending on the fit adjustment you make, you may need to fine-tune the amount of ease in the sleeve-cap seam. Measure the bodice and sleeve armhole seamlines to find the difference. Blouses typically need 1⁄2 inch of ease; tailored garments are better with 1 inch to 1-1⁄2 inches. |


Log in or create an account to post a comment.
Sign up Log in