
On the Rhodes Again with Gilbert Muniz
Zandra Rhodes designs inspire and challenge an embellishments artist

When I was approached to take on this ambassadorship, I wanted to challenge myself to work with designer details that might otherwise be overlooked. My personal work leans into the more impractical aspects of design. But this endeavor has afforded me an opportunity to dial back the drama and demonstrate how adding small touches to simple garments can give clothes a fun edge. For my inaugural post, I’m looking at the infectious elation of color and print that is Zandra Rhodes.
Well-thought-out details by Zandra Rhodes
As someone who has found my happy place in surface design, I constantly gravitate to Rhodes’ work. There is a playful, yet calculated, spirit that runs through her designs. Even in the simplest of dresses, you’ll find details that at first seem naïve and inconspicuous, but upon further inspection, demonstrate an adept understanding of how to inject life into someone’s ordinary wardrobe.
Rhodes began her career as an upholstery textile designer and had no plans to enter the world of fashion. It wasn’t until she realized that her upholstery designs weren’t being understood that she ventured into apparel. As a result of this crossover, she has produced clothes that not only appeal to royalty and rock stars, but to stylish fashionistas who are eager to unravel the spell she casts over her work from season to season.
A dress example
The college where I teach has a historical collection of garments ranging from the 1800s to modern times. One of the pieces that has always caught my eye is a screen-printed, lavender silk chiffon Zandra Rhodes evening dress from the 1970s.

Its delicate surface is decorated in a poetic dance of printed lines and sparkles. There are a few details on this gown that I find intriguing and slightly confusing, however.
To demonstrate the effectiveness of these details, I designed and constructed a dress in the image of a Rhodes piece.

I’m not kidding myself here. This dress is not deserving of a Zandra Rhodes label. But because the sartorial scientist in me cannot dissect the closures on the back of the real gown (A: I would never deface such a beautiful source of inspiration and B: I would probably get fired), I decided to mimic them as best I could and create my own piece that I could easily explore. The body of the dress is silk crepe de Chine, and the waistband is polyester satin.

A few caveats: All the edges on the Rhodes piece are hand-rolled. My version is machine-finished with narrow hems. This was done to save time. Despite my understanding of working with quilted elements on clothes (seriously, I’ve won awards for it), my quilting here isn’t great. My only excuse is that this satin was more slippery than I’ve ever experienced. Finally, Rhodes used ball-shaped buttons on her piece, which I did not have in my button collection, so I used regular fabric covered buttons.
Quilted waistband
The Rhodes piece features a technicolor, contrast-fabric, quilted satin waistband, created with belting to make it stiff. The main body of the dress, meanwhile, is made of an airy silk chiffon. Regardless of the hot pink waistband’s garish intensity, I can’t imagine the dress without it.

Though not the same shape, the added waistband on my version is quilted.
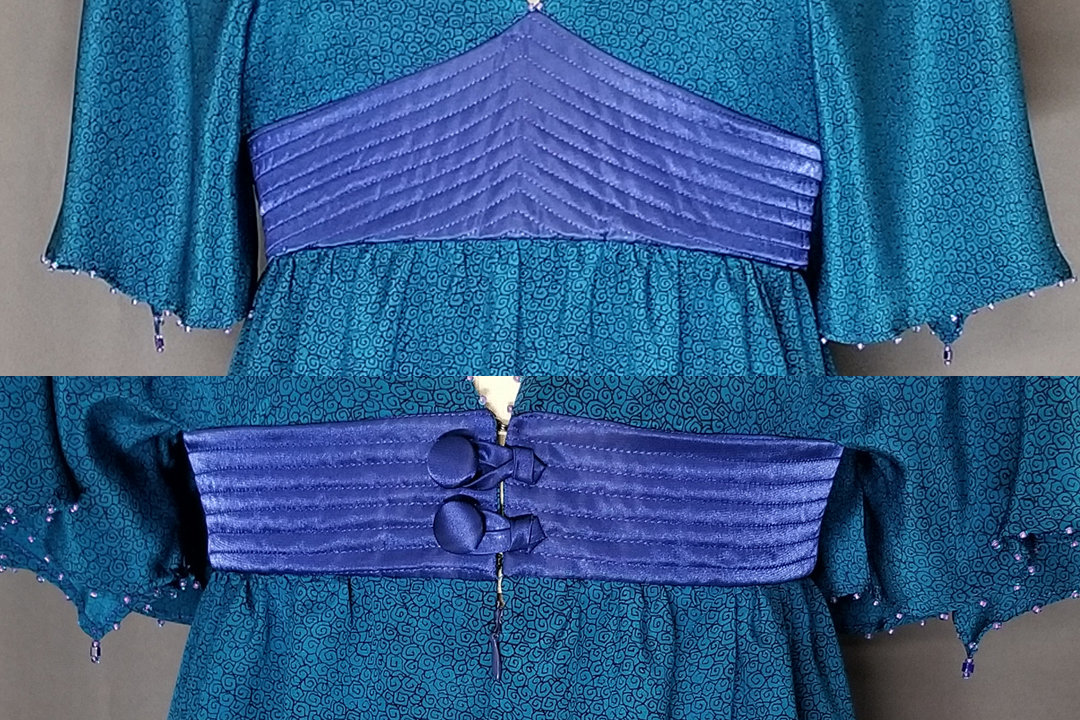
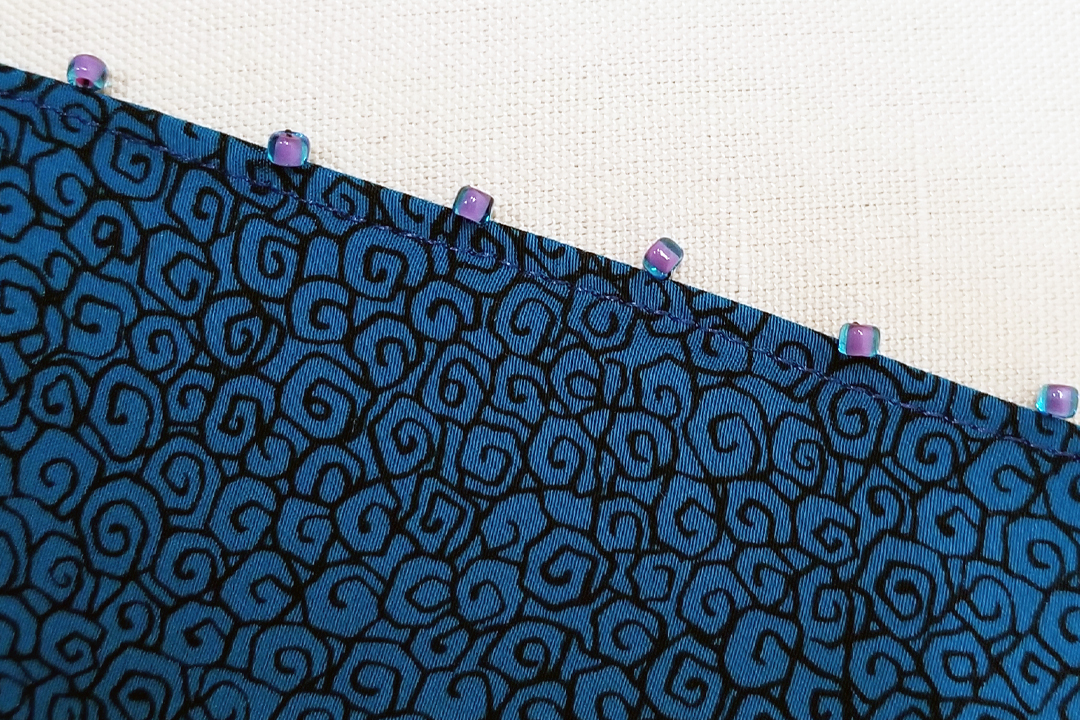
Beaded edges
Another feature on the Rhodes dress that amuses me is the outward facing seams outlined in small beads. It’s a delicate detail that elevates a simple edge to an elegant trim that is no more difficult than a basic stitch. Most designers would overlook this level of quiet opulence. Rhodes, however, insists that something as ordinary as a hand-rolled hem gets treated with as much colorful fun as any couture trim in Paris.

My sample received the same treatment, but I only used one bead shape and didn’t outline anything besides the neck and the sleeve hems.
Button-and-loop closure
The detail that I obsess over the most is that there is no zipper. The back opening closes by knotted loops and buttons that join at center back, while the rest of the waistband underlaps past center back. The skirt is lined in a stretch knit that covers the back opening below the waist, thus shielding the wearer from any peeping onlookers.


The backs of the real knots elude me, so I have come up with a passable compromise. It starts with a simple bias tube of fabric. The width is up to you, but my dress sample was made with 1/4-inch tubing. I tried working smaller, but the effect isn’t the same. Instead of attempting to resolve the Möbius strip effect of the original button loop, I have simply stitched the ends of the tube to the part that is sewn down to the garment. They will never be seen, so the stitches don’t have to be perfect.
Knotted loop how-to
The following is the order of operations to wrap and stitch the knotted loop. Once complete, simply stitch the knot to the garment in the desired location, leaving the loop free to encircle the button. As you fold the initial fold behind the loop (step 3), you can adjust the length of the loop to make sure it will go over your button. Then stitch the folded loop in place behind the fold (step 4). To start, sew a 1/4-inch-wide bias tube and press flat.

1. Cross one end of the tube over the rest of the tube.
2. Fold the short excess to the back of the tube.
3. Stitch down the raw end to the tube, being careful to not stitch through to the outside.
4. Fold the opposite end behind the knot.
5. Fold the end across the front.
6. Adjust the knot’s front to keep the tube straight and the knot tight.
7. Cut off the excess.
8. Be sure to leave enough of the edge to sew down.
9. Stitch down the raw edge to the back of the knot.
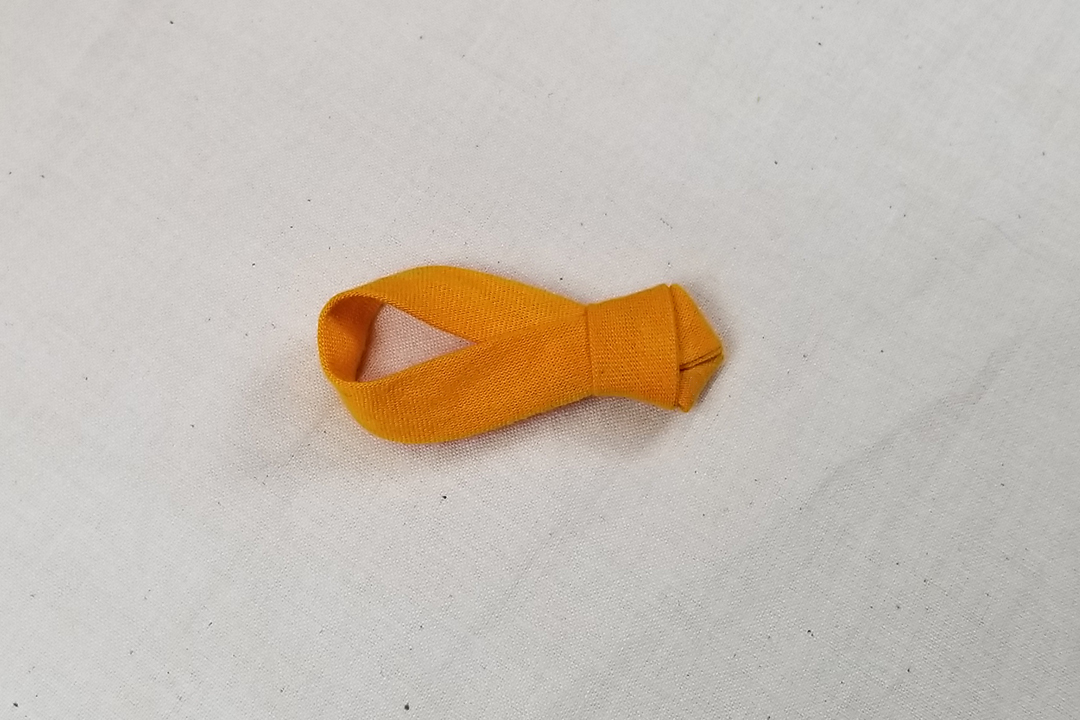
These knotted loops are simple to make and work on a multitude of designs. They can be used as cuff closures or even as lightweight, decorative “grommets” to lace ribbon through. You can make them in matching or contrast fabric. Have fun playing with button shapes, but make sure the loop will go over the bulk of the button’s mass.
Doodle magic from Zandra Rhodes
Zandra Rhodes’ work will always be an inspiration to me.
I have a few of her picture and archive books that I often reference for my own screen printing. There is a magic to the lines and squiggles she doodles on fabric. You get a sense of where she wants the wearer’s mind to travel when they put on one of her pieces. If you get a chance to explore her design details and make some knotted loops of your own, have fun adding a small touch of magic to your clothes.


Log in or create an account to post a comment.
Sign up Log in