
The following instructions present only one method for creating seven basic hand stitches. In other sewing references, you’ll find countless varied instructions for these stitches. Try them all to see what works best for you—the exact method is less important than feeling comfortable with the stitch. Be sure to choose the easiest, most invisible stitch for the task; I most often recommend the versatile slipstitch.
Note: All hand stitches are illustrated for right-handed sewers. If you’re left-handed, you may find it helpful to turn the illustration upside down. This may not represent every stitch pattern accurately; sometimes it also needs to be flip-flopped. But turning it will give you a better left-handed view.
A needle pick is the basis for all hand stitches
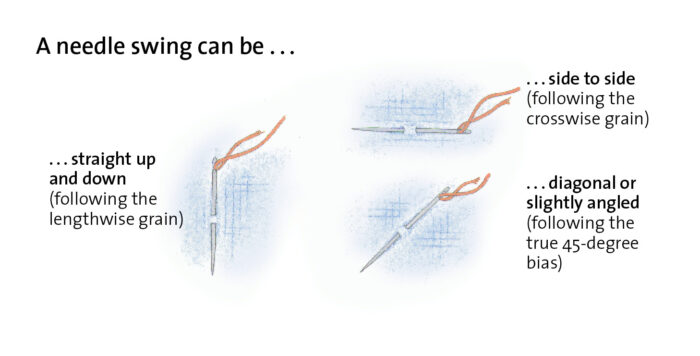
A needle pick is the action of inserting the needle and thread up through or down into the fabric. In a single pick, the needle and thread are inserted once. In a double pick, they’re inserted twice. The needle swing, or angle of the needle pick, determines the length of the stitch and how much thread will show. A needle pick can swing: straight up and down (following lengthwise grain); side to side (following crosswise grain); diagonally or slightly angled (following true 45-degree or ordinary bias).
Running stitch
Uses: Seaming, visible hemming, mending, and craft work. Although the stitch resembles quilting, this is technically not how the quilt stitch is formed.
How to sew: Sewing from right to left, come up through fabric and sew as many needle picks as you can in straight or curved line while maintaining the desired spacing and stitch length. Pull the thread to create even tension; repeat.
Comments: Stitch length and spacing depend on the project’s purpose and desired overall look: For general quilting or appliqué,…
Start your 14-day FREE trial to access this story.
Start your FREE trial today and get instant access to this article plus access to all Threads Insider content.
Start Your Free TrialAlready an Insider? Log in

















Log in or become a member to post a comment.
Sign up Log in